This is a new page I decided to create in order to
consolidate all the customizations and various tips of special importance
that I have come up with in the course of making this plane.
As I found out when I went to put
in my fuel lines, I found that it's a major hassle to get them in around the
gear weldments. Put your fuel lines in while the weldments are in place,
but not bolted. If they aren't bolted in, you can move them around a bit to
help get the fuel lines in. See my June 12, 2003 fuselage description for
details.
Make damn sure you
drill out your tri-gear main gear leg frame holes to clear the wing mount
bolt holes BEFORE you install the gear leg frames. Otherwise, you will be
VERY sorry when you go to mount the wings. See
HERE and
HERE for details.
The front wheel comes with the bearings taped to the outside
of the wheel. You should get the tape off ASAP, and be sure to clean off
the tape residue, You don't want the tube sticking or chafing on
anything. Also, you should oil (or grease) the front wheel bearings and races as soon
as you get your finish kit, to prevent rust from forming on them before you
assemble and mount the wheel. They come ungreased, and rust can form if
they sit awhile before they get greased and assembled.
3 TIPUP CANOPY TIPS:
1. Make sure you put in the 2 rivet holes that are NOT
pre-punched, at the aft end of each C702 skin aft tab, BEFORE riveting the
C702 skin.
2. Make sure you fabricate your C725 canopy strut mount
blocks and drill & countersink the mounting holes in the C702 skin and cabin
frame BEFORE you rivet the C702 canopy skin.
3. Don't let the plans fool you about what aluminum
block stock to use to fabricate the C725 blocks - the strut package contains
what you need to use, with a minimum of cutting; just cut to length and
you're done.
When back-riveting, it is very easy to get so wrapped
up in all the process of filling the holes with rivets, taping them down,
etc; that you can forget to add the piece you are back-riveting on.
I've done this a couple times. Remember to add the piece you are
back-riveting before you start setting those rivets.
Running the countersink at a slower speed seems to
result in less countersink pilot chatter and better holes than doing so at
high rotational speeds.
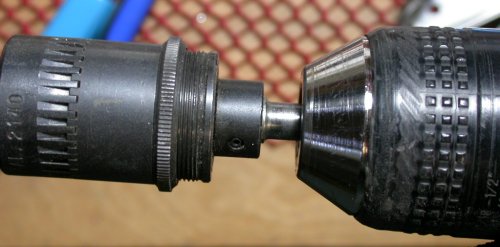
Here is a tip for when you use a microstop countersink cage, such as this
Magnavon unit. If you shove the drive shaft all the way into your
drill chuck, then the sliding housing will slide back until it hits the
chuck. This will throw off your cage adjustments. If you later
reinsert the cage differently into the chuck, it will now be cutting too
deep. LESSON: when you are adjusting your countersink
cage, make sure, when your sliding outer cage housing is all the way back,
that it clears your drill chuck. This has bitten me a couple times.
FIREWALL RECESS - For those with non-Lycoming
engines, it turned out that using the firewall recess
as advised was a HUGE mistake. It
caused plenty of problems, especially with the
heater, and
served no benefit. If you don't need the recess for something
specific,
put in the replacement FLAT PANEL.
T8 BULBS - At the suggestion of a friend, I replaced
some of the 4' florescent bulbs in my garage with T8 bulbs in daylight
color. What a huge difference! More and better light from
fewer bulbs, and each bulb takes less electricity. I HIGHLY recommend
T8 bulbs for your shop.
SWITCHES SUBPANEL - an easy
way to make a subpanel, below your main instrument panel, is to simply use
an old panel, cut off the bottom 2" or so, and flip it upside down. As I found out when I
decided to do this, there are plenty of them around that the owner doesn't
need. Either they may have messed one up or they decided to go with
some aftermarket panel. SteinAir often has them available. You
may well be able to get one for no more than the cost of shipping it to you.
See my May, 2007 avionics page for
pics and details of it. May 20
has a pic of the old, hokey, piecemeal method I had used. To make your
own full length subpanel, you'd have to buy at least a 2' x 3' piece of
0.063" aluminum from ACS, then cut and bend it. An old panel comes
already bent, with minimum waste. Even a messed up one is OK, as long
as the bottom 2" doesn't have any cuts in it.
INLINE CONNECTORS - My
June 7, 2007 avionics page shows a
clever way I came up with to make small, secure inline removable connectors
that take up almost no space. Especially great for when you just
have a wire or 2 to disconnect. Use this idea for small wires
only. If you're using larger wires than 22ga, use a Molex connector.
RUST REMOVAL - see these
links for great information on how to easily and completely remove rust, and
only the rust, from anything rusted, using electrolysis:
JACKING THE PLANE - When I was building, I
bought a transmission jack so I could install the wings by myself.
First, a transmission jack has a much larger top plate/contact point than
most jacks. It also has adjustment screws so you can tilt the
top plate
left-right and fore-aft to get the perfect angle. A transmission
jack is also wide and stable, so no worries about it tipping over.
The transmission jack also turned out to be a great way to safely jack the
plane for wheel/tire maintenance.
I used
a piece of 3/4" plywood on the plate, then a milk crate, then another piece
of 3/4" plywood, then a piece of 2" styrofoam insulation to protect the
wing. The red knobs are for tilting the plate. Tilt it left-right so the angle of the styrofoam matches the
wing. Tilt it fore-aft so the center of the styrofoam is
contacting directly under the wing spar. Then jack it up. Works
great
Jacking the nose for maintenance is very simple. All you need is
a couple 2x4s and maybe a 1" board (here I'm using the 3/4" plywood piece
from the wing jack described above) stacked in front of the nose gear shaft and
a 3 foot long 2x4. Slip one end of the long 2x4 under the nose gear
leg, then push down on the other end of it. Then hold it down with
your foot while you pull your rollaway tool chest over the end of the 2x4.
Very quick, easy, and effective.
 Here is a tip for when you use a microstop countersink cage, such as this
Magnavon unit. If you shove the drive shaft all the way into your
drill chuck, then the sliding housing will slide back until it hits the
chuck. This will throw off your cage adjustments. If you later
reinsert the cage differently into the chuck, it will now be cutting too
deep. LESSON: when you are adjusting your countersink
cage, make sure, when your sliding outer cage housing is all the way back,
that it clears your drill chuck. This has bitten me a couple times.
Here is a tip for when you use a microstop countersink cage, such as this
Magnavon unit. If you shove the drive shaft all the way into your
drill chuck, then the sliding housing will slide back until it hits the
chuck. This will throw off your cage adjustments. If you later
reinsert the cage differently into the chuck, it will now be cutting too
deep. LESSON: when you are adjusting your countersink
cage, make sure, when your sliding outer cage housing is all the way back,
that it clears your drill chuck. This has bitten me a couple times.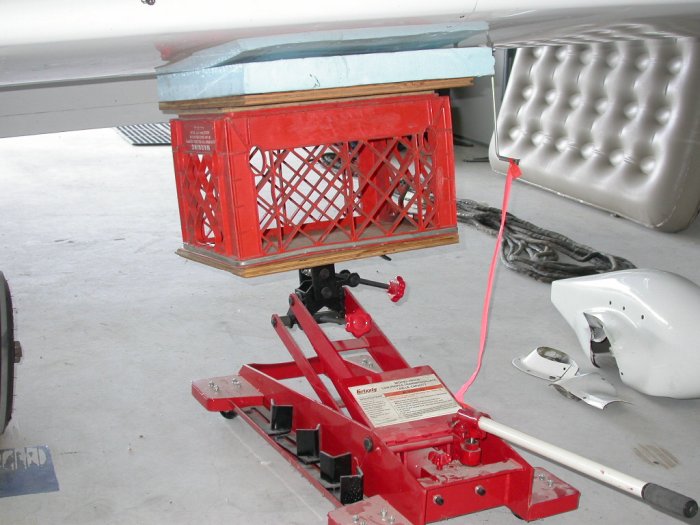 I used
a piece of 3/4" plywood on the plate, then a milk crate, then another piece
of 3/4" plywood, then a piece of 2" styrofoam insulation to protect the
wing. The red knobs are for tilting the plate. Tilt it left-right so the angle of the styrofoam matches the
wing. Tilt it fore-aft so the center of the styrofoam is
contacting directly under the wing spar. Then jack it up. Works
great
I used
a piece of 3/4" plywood on the plate, then a milk crate, then another piece
of 3/4" plywood, then a piece of 2" styrofoam insulation to protect the
wing. The red knobs are for tilting the plate. Tilt it left-right so the angle of the styrofoam matches the
wing. Tilt it fore-aft so the center of the styrofoam is
contacting directly under the wing spar. Then jack it up. Works
great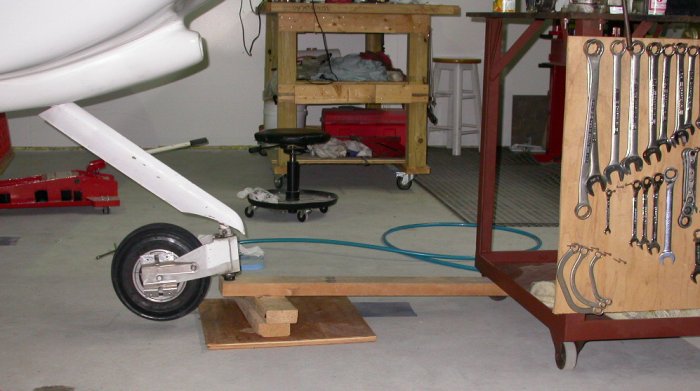 Jacking the nose for maintenance is very simple. All you need is
a couple 2x4s and maybe a 1" board (here I'm using the 3/4" plywood piece
from the wing jack described above) stacked in front of the nose gear shaft and
a 3 foot long 2x4. Slip one end of the long 2x4 under the nose gear
leg, then push down on the other end of it. Then hold it down with
your foot while you pull your rollaway tool chest over the end of the 2x4.
Very quick, easy, and effective.
Jacking the nose for maintenance is very simple. All you need is
a couple 2x4s and maybe a 1" board (here I'm using the 3/4" plywood piece
from the wing jack described above) stacked in front of the nose gear shaft and
a 3 foot long 2x4. Slip one end of the long 2x4 under the nose gear
leg, then push down on the other end of it. Then hold it down with
your foot while you pull your rollaway tool chest over the end of the 2x4.
Very quick, easy, and effective.