 Here is
the LT brake line, completely redone.
Here is
the LT brake line, completely redone.December, 2003 fuselage work
Dec 1 - resume work on LT brake line. Got that in, and installed RT brake line. Both Van's and several people on the Eggenfellner list said I should not replace the F-601K-1 firewall with a flat panel, so I fixed the fuel return line at the firewall so the firewall recess panel clears it. It wasn't as bad as I'd dreaded. Then I moved one Adel clamp that I could see will interfere with the instrument sub-panel. Fixed rudder pedal bracket so the F-601K-1 clears it. It needed about 1/2" more cut away from the horizontal leg than the plans had showed. Cleaned up the workbench some. It was VERY cluttered from all the plumbing work I've been doing. 2006 update - it turned out that using the firewall recess as advised was a HUGE mistake. It caused plenty of problems, especially with the heater, and served no benefit. If you don't need the recess for something, put in the replacement FLAT PANEL. 4.5 hr + 3.0 doc
Here is
the LT brake line, completely redone.
 This picture shows how the longeron trimmed edge and the aft fuselage deck
skin hang over the aft bulkhead by 1/16" or so. Another builder
on the RV list pointed this out. He was concerned about it on his
QB. In hindsight, I probably should have trimmed it back some, but I
am not going to redo all my empennage alignment work, and I don't think it
really needs to touch the bulkhead, as it is not bolted to it on top; it's
bolted to the elevator stop.
This picture shows how the longeron trimmed edge and the aft fuselage deck
skin hang over the aft bulkhead by 1/16" or so. Another builder
on the RV list pointed this out. He was concerned about it on his
QB. In hindsight, I probably should have trimmed it back some, but I
am not going to redo all my empennage alignment work, and I don't think it
really needs to touch the bulkhead, as it is not bolted to it on top; it's
bolted to the elevator stop.
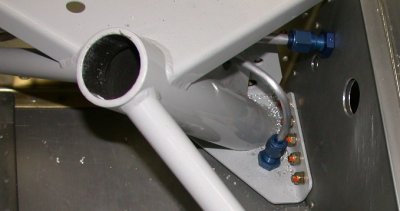
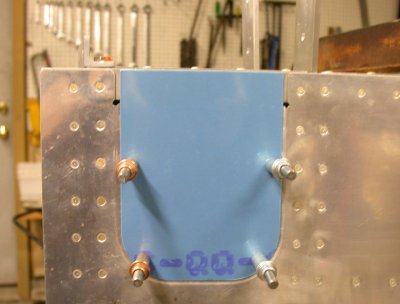
 I moved
the fuel return line so it does not interfere with the F-601K-1 firewall
recess panel. The consensus on the 'net was that I should use the
recess, instead of a flat panel, even if I am not using a Lycoming engine.
I moved
the fuel return line so it does not interfere with the F-601K-1 firewall
recess panel. The consensus on the 'net was that I should use the
recess, instead of a flat panel, even if I am not using a Lycoming engine.
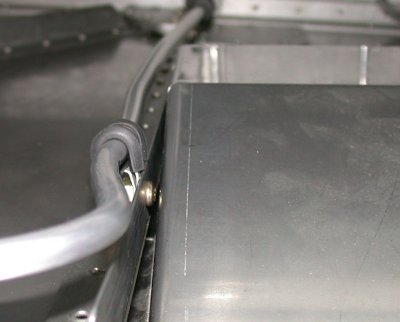
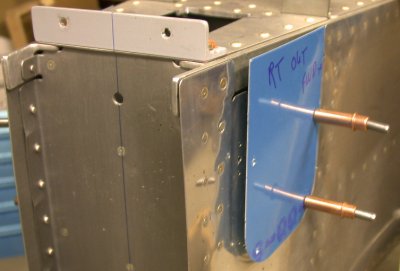
 Here are
both brake lines redone (and the fuel supply and return lines to the
firewall). I need to come with a good way to clamp the 2 brake lines
and the fuel supply line together where they go up over that triangular
brace.
Here are
both brake lines redone (and the fuel supply and return lines to the
firewall). I need to come with a good way to clamp the 2 brake lines
and the fuel supply line together where they go up over that triangular
brace.
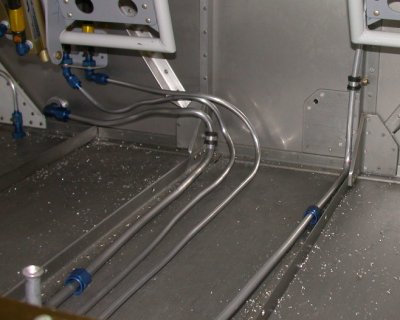
 Here
are the plumbing lines, 3/4 done. The fuel supply lines to the shutoff
valve will be done after I mount the wing, so I can see just how the
wing/fuselage junction fits, and just how long I need the fuel supply line
to be.
Here
are the plumbing lines, 3/4 done. The fuel supply lines to the shutoff
valve will be done after I mount the wing, so I can see just how the
wing/fuselage junction fits, and just how long I need the fuel supply line
to be.
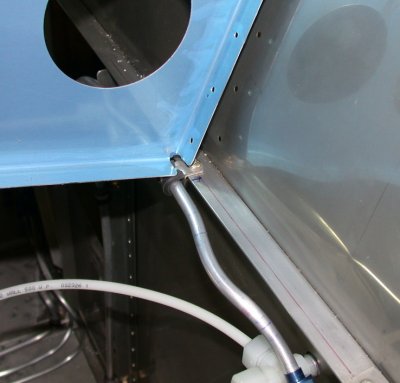
 The RT side
of the F-601K-1 and the fuel return line now fit nicely together.
The RT side
of the F-601K-1 and the fuel return line now fit nicely together.
 Then I
had to trim the rudder pedal weldment brace 1/2" more than the plans
specified, so the F-601K-1 would fit OK on the LT side.
Then I
had to trim the rudder pedal weldment brace 1/2" more than the plans
specified, so the F-601K-1 would fit OK on the LT side.
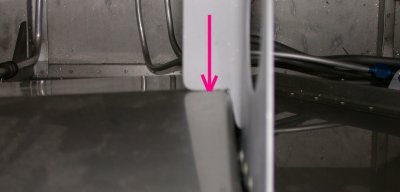
 This shows where the sub-panel rib was going to hit the spot I used for the
Adel clamp, so I had to move that over an inch.
This shows where the sub-panel rib was going to hit the spot I used for the
Adel clamp, so I had to move that over an inch.
Dec 2 - Answered a bunch of questions for people on the 'net. I seem to spend more & more time doing that lately. Then worked on adjusting the fit on the LT fuel return line, at the valve, for a better, more relaxed fit. Cleaned up the bench some more, as it was just buried in parts and tools from the big plumbing push lately. I plan to move the fuselage to the bench soon, so I can do the initial wing mounting inside the garage. Started doing fabrication for F-796B, C, D; LT and RT tank attach bracket hardware. Even after previously drilling out 4 rivets that should have been left out of the QB, but were not, I seem to have 1 more rivet where I need to put a screw. Wrote to Van's about it. 4.5 hr + 1.0 doc
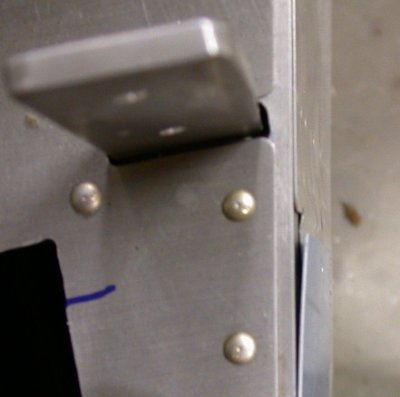
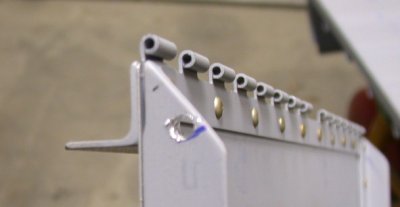
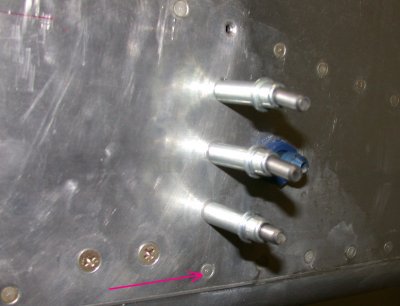 The arrow shows
a rivet in place where I need to put a AN509-10R12 screw through this
point, the lower longeron, and the bottom of the F-796B on the other side of
the skin. Above it are the 4 rivets that some QBs came with mistakenly
installed, which I already drilled out.
The arrow shows
a rivet in place where I need to put a AN509-10R12 screw through this
point, the lower longeron, and the bottom of the F-796B on the other side of
the skin. Above it are the 4 rivets that some QBs came with mistakenly
installed, which I already drilled out.
Dec 3 - Finish fabricating F-796B-L. After I was done with it, was not satisfied with it, so I remade it, using up the other half of my 3/4" x 3/4" x 1/8" aluminum angle stock. So, now I'll have to order more of that to do the RT side. Install F-796B, C, D on LT side. It wasn't mentioned on the plans, but I had to countersink the F-796C so it goes over the dimpled skin holes OK. Primed LT side tank attach bracket parts. Will rivet them in tomorrow. Will have to wait to next week to do the RT side. Countersunk the lower skin and longeron for the AN509-10R12 (which I do not have in my kit, so I will have to order them from ACS, too). 4.0 hr + 1.0 doc
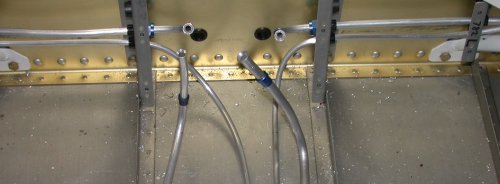
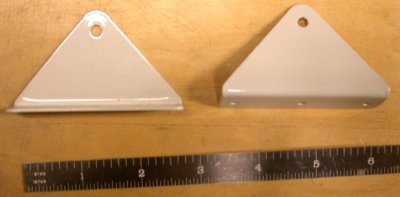
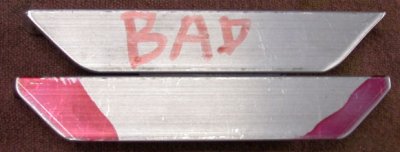 The upper one was
my first attempt. For one thing, it came out a bit too short. I
marked it with a pen instead of the more accurate dye & scribe method,
and I cut too close to the lines. You can also see here that I made
the 45 degree cuts to the OUTER portion of the leg. The lower one is a
much better bit. It is the proper length, and I cut the 45 to the
INSIDE of the angle. The holes in the side you can't see are not as
close to the edge of the metal in the bottom one as in the top one. Be
sure you cut the 45 to the INSIDE of the angle, or you'll end up with the
metal cut too close to the 3/16"hole. The actual angle and where
the lower end of the cut ends up are not at all critical.
The upper one was
my first attempt. For one thing, it came out a bit too short. I
marked it with a pen instead of the more accurate dye & scribe method,
and I cut too close to the lines. You can also see here that I made
the 45 degree cuts to the OUTER portion of the leg. The lower one is a
much better bit. It is the proper length, and I cut the 45 to the
INSIDE of the angle. The holes in the side you can't see are not as
close to the edge of the metal in the bottom one as in the top one. Be
sure you cut the 45 to the INSIDE of the angle, or you'll end up with the
metal cut too close to the 3/16"hole. The actual angle and where
the lower end of the cut ends up are not at all critical.
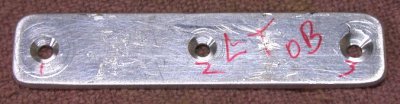 The F-796C
must be countersunk to fit nice and tight over the skin hole dimples.
I had to cut the bottom hole a bit deeper, as the dimple stuck out a bit
further than the others.
The F-796C
must be countersunk to fit nice and tight over the skin hole dimples.
I had to cut the bottom hole a bit deeper, as the dimple stuck out a bit
further than the others.
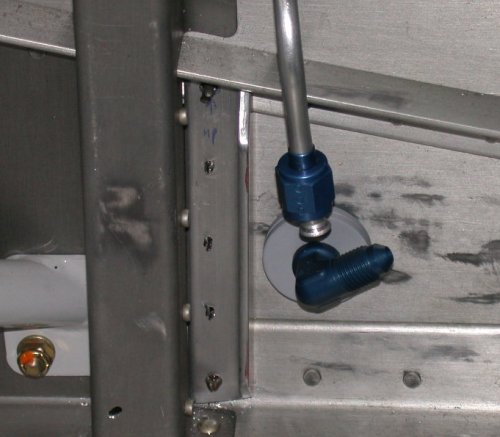 This is the
F796 assembly clecoed into place. The little C and D pieces are under
the B angle you see here. All the C and D do is fill in under the B,
between the B and the skin, where the B runs vertically between the middle
longeron and the lower longeron. I had to disconnect the vent line and
loosen the bulkhead fitting, because they were interfering with the F-796B,
because the angle bulkhead fitting was leaning toward where the F-796B had
to go. I'll reconnect it in a more vertical alignment.
This is the
F796 assembly clecoed into place. The little C and D pieces are under
the B angle you see here. All the C and D do is fill in under the B,
between the B and the skin, where the B runs vertically between the middle
longeron and the lower longeron. I had to disconnect the vent line and
loosen the bulkhead fitting, because they were interfering with the F-796B,
because the angle bulkhead fitting was leaning toward where the F-796B had
to go. I'll reconnect it in a more vertical alignment.
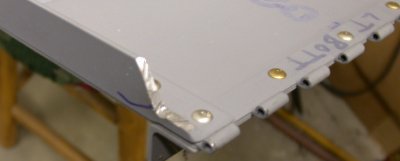
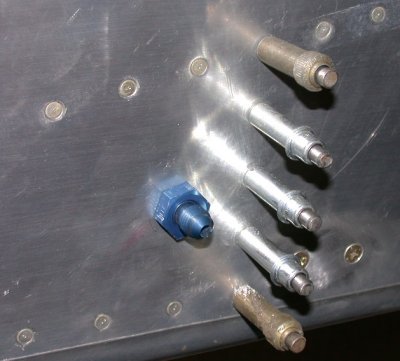 Here is
a pic of the LT F-796 pieces clecoed from the outside. Next, I will
put in the 3 #40 rivets, then attach the actual tank attach bracket over
these rivets. The 3/16" hole at the top gets an AN3 bolt, and
there is one more #12 hole to drill for the lower bolt hole on the bracket
for a second AN3 bolt. The lower 3/16" hole gets an AN509-10R12
screw, but I didn't seem to have any in my kit, so those were added to
tonight's ACS order.
Here is
a pic of the LT F-796 pieces clecoed from the outside. Next, I will
put in the 3 #40 rivets, then attach the actual tank attach bracket over
these rivets. The 3/16" hole at the top gets an AN3 bolt, and
there is one more #12 hole to drill for the lower bolt hole on the bracket
for a second AN3 bolt. The lower 3/16" hole gets an AN509-10R12
screw, but I didn't seem to have any in my kit, so those were added to
tonight's ACS order.
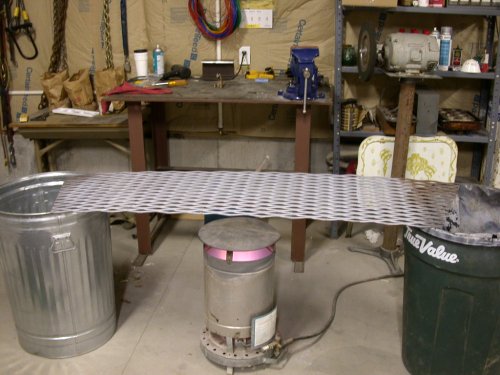 It's back to
below zero temps here in northern NH. This is my setup that heats the
garage and warms parts before priming. I turn the heat down low, put
the parts on the rack to warm up, then shut off the burner, spray from a
rattle can, open the doors awhile, turn the heat back on, and close the
doors. It works pretty well.
It's back to
below zero temps here in northern NH. This is my setup that heats the
garage and warms parts before priming. I turn the heat down low, put
the parts on the rack to warm up, then shut off the burner, spray from a
rattle can, open the doors awhile, turn the heat back on, and close the
doors. It works pretty well.
Dec 4 - Prep and rivet LT F-796B, C, D. Drill, bolt, & torque LT F-796A. I'll have to wait for ACS order to finish the RT side. Hook LT fuel vent line back up. Then I had to look around some to figure out what to work on next. The box of parts that came with the QB fuselage is nearly empty now. I found a couple parts I couldn't identify, so I wrote to Van's about them. My F-688 is listed as a "plate". But what plate, where? I also have 3 little triangular powder-coated steel brackets, but I have no idea what their part number is or where they might go. I decided to work on 4 remaining simple covers; the F-824B aft fuselage cover plates and the F-982A brake and fuel line covers. I put the 8 nutplates into the fuselage for the aft fuselage covers. Then I realized I'd used flat K1000 nutplates instead of the proper dimpled K1100 nutplates. Grrr! I drilled out all 16 rivets, dimpled the screw holes, and re-riveted the nutplates in. Started prepping the F-982A brake/fuel line covers. 6.75 hr + 2.0 doc
 This shows the LT F-796 parts riveted and bolted together. The bottom
hole is empty, waiting for my latest ACS order to come next week. I
also reconnected the fuel vent line here.
This shows the LT F-796 parts riveted and bolted together. The bottom
hole is empty, waiting for my latest ACS order to come next week. I
also reconnected the fuel vent line here.
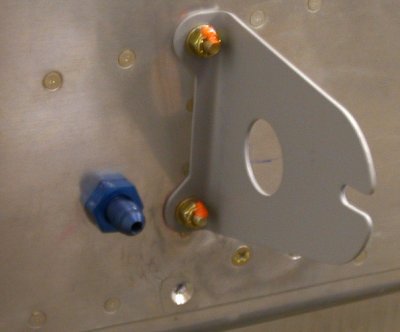 Here's the F-796A fuel tank attach bracket bolted in place, torqued, and
painted.
Here's the F-796A fuel tank attach bracket bolted in place, torqued, and
painted.
 The pile of
remaining fuselage parts is getting pretty small. I couldn't identify
these 2 brackets, though, so I emailed Van's with a request for assistance
identifying them. Van's initially replied that they were V-stab hinge
brackets, but when I said the tail had been done for a year, they said the
brackets are part of the tip-up latch mechanism, found on DWG 49.
The pile of
remaining fuselage parts is getting pretty small. I couldn't identify
these 2 brackets, though, so I emailed Van's with a request for assistance
identifying them. Van's initially replied that they were V-stab hinge
brackets, but when I said the tail had been done for a year, they said the
brackets are part of the tip-up latch mechanism, found on DWG 49.
 Here's the RT F-824B plate clecoed on and partially drilled to #28 for the
#6 screws.
Here's the RT F-824B plate clecoed on and partially drilled to #28 for the
#6 screws.
 The whole rear fuselage on this plane is imperfect. If you read my
empennage mounting write-up, you'll remember all the fit problems I had
between the skin and the aft bulkhead with the rearmost 2 rows of rivets I
had to put in. Just fwd of this panel is the next double vertical row
of rivets. It was very hard to photograph, but the skin bows in a bit
where they riveted the skin to the next-to-aft bulkheads, then it bows back
out on its way to the aft-most double vertical row of rivets. This
causes the joggled panel opening to bow out, as you can see here. You
can also barely see how the skin is bowed in a bit by the rivets just fwd
(up in this pic) of the panel. It's as though the bulkhead was a tad
too small, so when they riveted the skin in tight to it, it pulled the skin
inward.
The whole rear fuselage on this plane is imperfect. If you read my
empennage mounting write-up, you'll remember all the fit problems I had
between the skin and the aft bulkhead with the rearmost 2 rows of rivets I
had to put in. Just fwd of this panel is the next double vertical row
of rivets. It was very hard to photograph, but the skin bows in a bit
where they riveted the skin to the next-to-aft bulkheads, then it bows back
out on its way to the aft-most double vertical row of rivets. This
causes the joggled panel opening to bow out, as you can see here. You
can also barely see how the skin is bowed in a bit by the rivets just fwd
(up in this pic) of the panel. It's as though the bulkhead was a tad
too small, so when they riveted the skin in tight to it, it pulled the skin
inward.
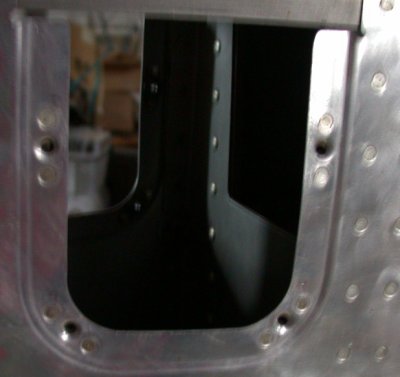
 Here's another picture showing the bowing effect. The bowing out of
the skin at the fwd part of this access panel joggle causes the panel to
want to go way out. As I finalize the work on this part of the plane,
I'll do my best to minimize the fit and appearance problems caused by this
QB fault. I don't think it will affect flying, but getting a good fit
around the panel will be more of a challenge.
Here's another picture showing the bowing effect. The bowing out of
the skin at the fwd part of this access panel joggle causes the panel to
want to go way out. As I finalize the work on this part of the plane,
I'll do my best to minimize the fit and appearance problems caused by this
QB fault. I don't think it will affect flying, but getting a good fit
around the panel will be more of a challenge.
 Here's the aft fuselage access, with proper K1100 dimpled nutplates riveted
into place.
Here's the aft fuselage access, with proper K1100 dimpled nutplates riveted
into place.
Dec 7 - Fit & primer prep F-982A - L&R fuel/brake line covers. Trim, bevel edge & primer prep F-688 gusset plate. Primer prep F-796A-R tank attach bracket and F-824B aft fuselage covers. Fabricate bracket for custom baggage rudder cable cover. 2.0 + 2.0 doc
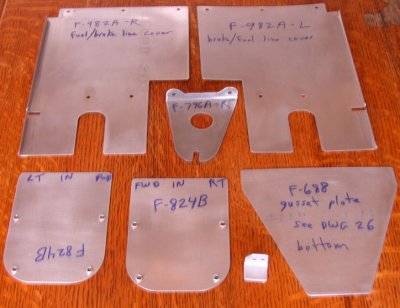 Here are all the covers I was working on. The F-688 gusset plate will
get its rivet holes later, after I match-drill them to the fuse top skin.
Here are all the covers I was working on. The F-688 gusset plate will
get its rivet holes later, after I match-drill them to the fuse top skin.
Dec 8 - got about 3 feet of snow over the weekend, so spent all day plowing & shoveling
Dec 13 - Laid out F-688 gusset plate and match-drilled it to the F-774 skin. Fit rudder cable tubing clamp bracket. Primed all the parts I had ready. Riveted the rudder cable clamp bracket into place. Reinstalled rudder cable yet again. 2.5 hr
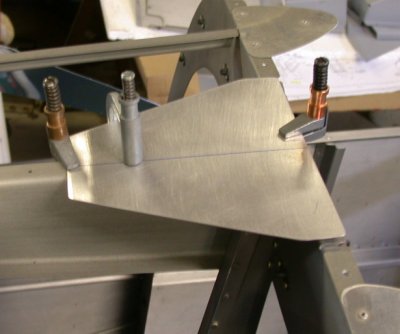 I finally got a
chance to use one of those C-clamp clecoes. It was helpful
here. This is the F-688 gusset plate, clamped into place, so I
can figure where it goes fore/aft, so I can start match-drilling it to the
skin, so I can primer the durn thing with some other parts I have to primer.
I finally got a
chance to use one of those C-clamp clecoes. It was helpful
here. This is the F-688 gusset plate, clamped into place, so I
can figure where it goes fore/aft, so I can start match-drilling it to the
skin, so I can primer the durn thing with some other parts I have to primer.
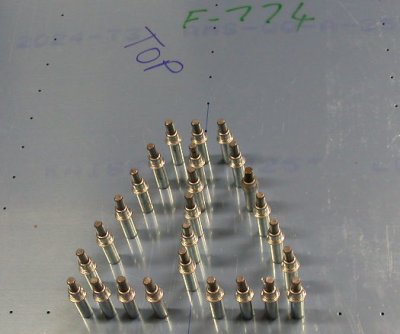 Once I got the
F-688 placed fore/aft, then I match-drilled it to the F-774 fuselage top
skin. I'm not ready for the skin yet, but I had the F-688 completed,
and I wanted to prime it.
Once I got the
F-688 placed fore/aft, then I match-drilled it to the F-774 fuselage top
skin. I'm not ready for the skin yet, but I had the F-688 completed,
and I wanted to prime it.
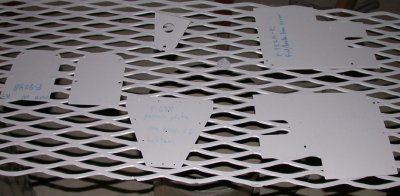 Here are the
parts I've been working on lately, primed. There are 2 aft fuselage
access covers, the F-688 gusset plate, the 2 fuel/brake line covers, the RT
tank attach bracket, and my little rudder cable clamp bracket.
Here are the
parts I've been working on lately, primed. There are 2 aft fuselage
access covers, the F-688 gusset plate, the 2 fuel/brake line covers, the RT
tank attach bracket, and my little rudder cable clamp bracket.
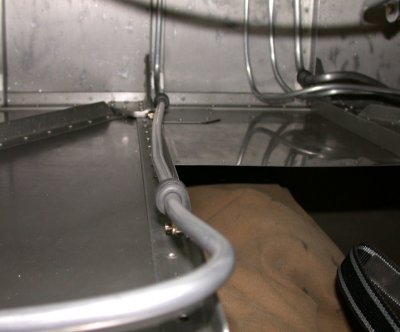
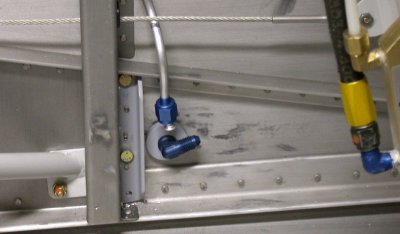
 Here
is the completed assembly to protect the rudder cable inside the custom
baggage compartment. The tubing goes from the normal baggage
compartment aft wall, back to the next rib aft. The rudder cable goes
through the tubing, thus protected from anything in the custom baggage
compartment touching it. The clamp holds the tubing in place, and the
bracket holds the clamp in place. Forward is to the left in this
picture.
Here
is the completed assembly to protect the rudder cable inside the custom
baggage compartment. The tubing goes from the normal baggage
compartment aft wall, back to the next rib aft. The rudder cable goes
through the tubing, thus protected from anything in the custom baggage
compartment touching it. The clamp holds the tubing in place, and the
bracket holds the clamp in place. Forward is to the left in this
picture.
Dec 14 - After trying the seat cushions, I decided to modify the seat back angles , so they don't interfere with the F-758 electric flap brackets when you tip the seat forward. Primed all the covers and parts I've been working on lately. Installed the RT F-796B, C, D tank bracket parts, except for the 3 rivets through the skin. 5.5 hr + 3.0 doc
 I needed
to trim these angles, because they hit on the F-758 brackets when you tip
the seat back forward. The hole is for the cut radius.
I needed
to trim these angles, because they hit on the F-758 brackets when you tip
the seat back forward. The hole is for the cut radius.
 Then I
used the cutoff wheel to cut back to the hole. Then all this was
smoothed and polished.
Then I
used the cutoff wheel to cut back to the hole. Then all this was
smoothed and polished.
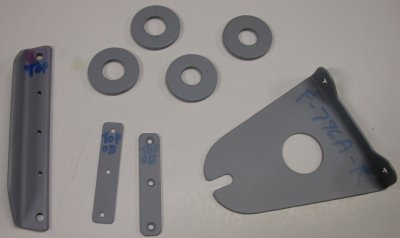 Here are all the
primed pieces for the RT side F-796 fuel tank attach bracket. The 4
thick aluminum washers are for the fuel line feed and return firewall
bulkhead fittings.
Here are all the
primed pieces for the RT side F-796 fuel tank attach bracket. The 4
thick aluminum washers are for the fuel line feed and return firewall
bulkhead fittings.
Dec 17 - I am off to Jamaica until the middle of March, then going to Las Vegas for a week to get married, then SoCal for a couple weeks honeymoon. By the time I get back from CA, it will be time to go to Sun N Fun. No work on the plane for awhile, but a gig's a gig & it takes money to support the plane. It's good to get out of the horrible winter, though. We've already had 2 major storms accumulating some 5 feet of snow.
GO TO APRIL, 2004
BACK TO MY RV BUILDER'S HOME
BACK TO BRIAN'S HOME