 Here are some of the MT prop bushings I got machined, after correcting the
INCORRECT drawing Eggenfellner sent me.
Here are some of the MT prop bushings I got machined, after correcting the
INCORRECT drawing Eggenfellner sent me.ENGINE WORK August, 2009
Aug 4 - unboxed the prop & started looking into mounting it. First, I need to determine what bolts and spacer bushings I need, as Eggenfellner not only did not supply them, he also gave me incorrect dimensions for making the bushings back in January, 2008. Emailed Subaru group to see if anyone has the bolt spec info. Also updated my ConnectorsPinouts file with all the SDS wiring changes, in preparation for getting back into doing the avionics wiring. 2.0 hr
Randy Crothers has had problems with his turbo installation, and hasn't flown for a couple months. He is now planning to keep the STi block and heads and build the engine up as a normally-aspirated 2.6L engine, with a 4mm stroked crank, custom 10.4:1 ceramic-topped pistons, and WRX cams & sprockets.
Aug 5- While I'm waiting on prop mount bolts and bushings, I need to do some other things in the meantime. I won't run the engine with a prop without working brakes, and to get the brakes working, I need to hook up the rudder pedals to the rudder so they're not flopping around when I need brakes. So, I need to get the tail installed first; I'm doing that now on my FINAL EMPENNAGE MOUNT page. See my August Interior page for details on installing the Infinity Aerospace grips. See my August Fuselage page for details on installing the brake lines and getting the brakes working. Found my box of "MT mount" parts, so now I see the special thick washers, the bushings for Gen 2 PSRU, and the bolts I need to use. Ordered 1/4" shorter Grade 8 bolts from Bolt Depot and a reamer for making the bushings from MSC. 1.0 hr
Aug 6 - spent a couple hours turning some stainless steel on my lathe, to make the prop bushings. I got a piece long enough to make 2 bushings turned down to the 1.100" for the major diameter. At this rate, this will take FOREVER. Even with turning them down so slowly and using a new carbide bit, the s/s was getting pretty hot by the time I finished that first step. Tomorrow, I'll see if I can find a local machine shop to do this for me. I also already received my prop bolts order from Bolt Depot; great quick service! 2.0 hr
Aug 10 - dropped off my prop bushings drawing and some s/s bar at a machine shop near the airport. They will do the bushings for me on a NC machine. Then I'll be assured all the bushings will be exactly the same. They said it'll take a couple days.
Aug 11 - picked up my prop flange bushings & installed them. I also had a set made for Carsten. The guy also said that, of the two pieces of s/s round bar I'd given him to make the bushings from, one of them - the one I'd tried machining myself, was definitely NOT 303 stainless. He said it was some super-tough material that he ruined a couple bits on and he couldn't work that stuff, either. So I don't feel so bad about my poor results in trying to machine it. The other piece I gave him was marked "303", and he said it cut just fine.
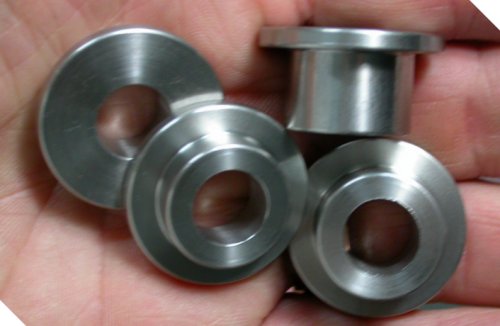
Here are some of the MT prop bushings I got machined, after correcting the
INCORRECT drawing Eggenfellner sent me.
It's also occurred to me lately that I never got the upgrade MT was supposed to do to the controller, so I contacted MT about it. Seems they'd somehow forgotten about me & Carsten on their upgrade list, so they're going to let me know tomorrow what they're going to do about it. I thought I was on their "list" for 2-3 years, but I've been so busy with the Eggenfellner problems, I hadn't thought about the controller in years.
Even though Eggenfellner, in all his infinite wisdom, said to get the prop bolts 1/4" shorter, I don't think it's such a great idea. I ordered them and just bolted up my prop. With 1 3/4" bolts, I am only going to have 1 thread showing. Good enough for Eggenfellner, but not good enough for me. There is just a hair under 1/4" gap now between the end of the bolts and the PSRU, so I'm going to take it all apart again and grind maybe 1/16" off the ends of the 2" bolts. These are heat-treated bolts, so if you do it, use water, don't take off too much at a time, and don't let them get too hot to touch when you grind off the tips. If you have a coarse wheel, it will heat up the metal less than a fine wheel as you grind. Have a nut (or die) already threaded onto the threads when you do this, then when you remove the nut or die, it'll clean up the threads. Then polish the end with a wire wheel.
 stainless steel prop bushings installed into the PRSU flange. They
push through from the back side. They were a perfect, snug,
"finger-press" fit. Note the shorter one that mates with the one
unique hole in the MT prop flange
stainless steel prop bushings installed into the PRSU flange. They
push through from the back side. They were a perfect, snug,
"finger-press" fit. Note the shorter one that mates with the one
unique hole in the MT prop flange
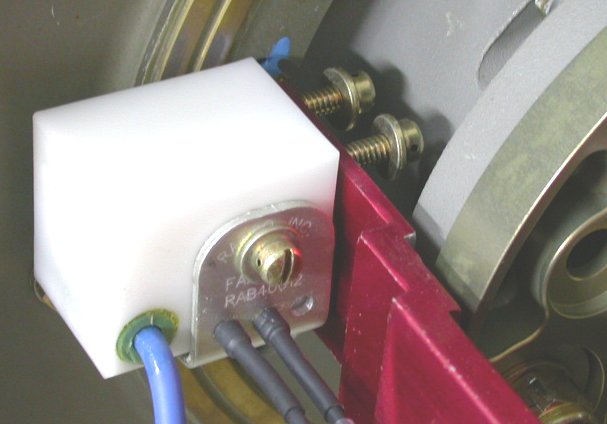
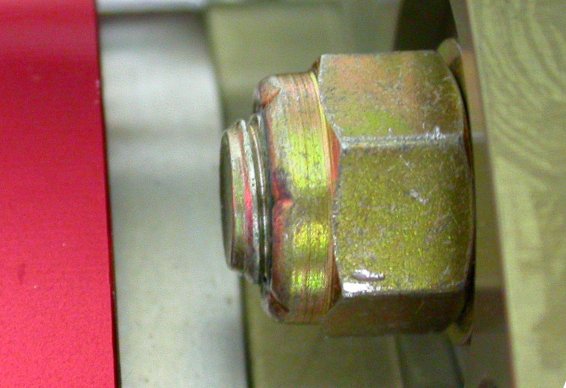 This is with the nut tightened down on the Eggenfellner-recommended (but not
supplied) 1 3/4" bolts. Not enough threads showing, especially for
something as critical as the prop mount. The red is the nose of the
Gen 3 PSRU.
This is with the nut tightened down on the Eggenfellner-recommended (but not
supplied) 1 3/4" bolts. Not enough threads showing, especially for
something as critical as the prop mount. The red is the nose of the
Gen 3 PSRU.
There's also a "procedure" for mounting the prop. I just did it alone, but if you can get a helper, much better. First, insert all the bushings into the PRSU flange. Because of the short cutouts in the prop flange for the bolts, you can't just "insert" the bolts into the prop flange. You have to put the big fat washer onto the bolt first, but keep it near the threaded end, then wiggle both the washer & bolt around until you get the bolt through the hole. You have to put ALL the bolts in first, because there isn't enough "wiggle room" in the bushings to allow the bolt head enough room to tip out so the bolt head can get through the prop flange holes. Then you line up the prop flange, with all the bolts sticking out of it, and the PSRU flange. The helper is very useful for keeping all 6 bolts aligned with the bolt holes in the PSRU flange bushings as you do this. You have to do it all at once with all 6 bolts. Once the prop flange is up against the PSRU flange, there is no way the bolts can go in or come out without removing the prop flange from the PSRU flange. In hindsight, perhaps if you put the bushings in LAST, instead of FIRST, you might be able to insert & remove bolts while the 2 flanges are together.
Removed prop, ground down 2" bolt tips about 1/16 - 3/32", reinstalled prop. Clearance is now about 3/32". It might have been OK with unground 2" bolts, but the clearance would have been paper-thin. All good now. Started torquing nuts incrementally to 41-44 ft lb (plus locknut drag), but as the torque went up, the crappy old 5/8" crowfoot wrench I have started slipping. Placed an order with MSC for some new crowfoot wrenches. Will finish the job next week, after I get the MSC order at home this weekend. I didn't think at the time (about 0100 last night) to have the order sent to me here at the hangar, where I'd have it tomorrow. 3.75hr
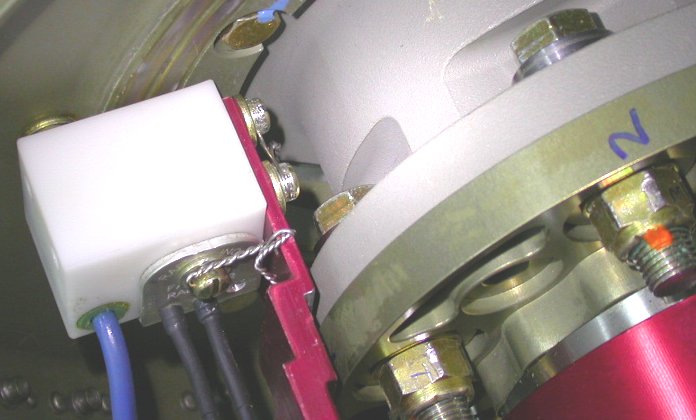
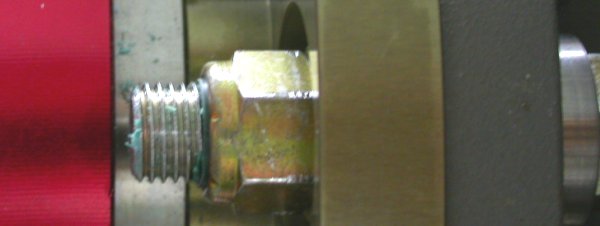 Here's the same picture as above, with 2" bolts and about 1/16"-3/32" ground
off the tips. Note the special thick MT-supplied stainless steel bolt
head washer on the RT edge of the pic.
Here's the same picture as above, with 2" bolts and about 1/16"-3/32" ground
off the tips. Note the special thick MT-supplied stainless steel bolt
head washer on the RT edge of the pic.
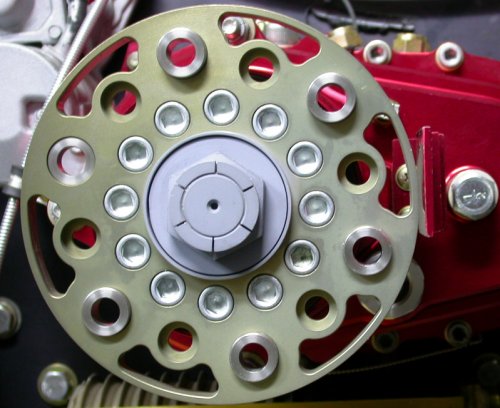
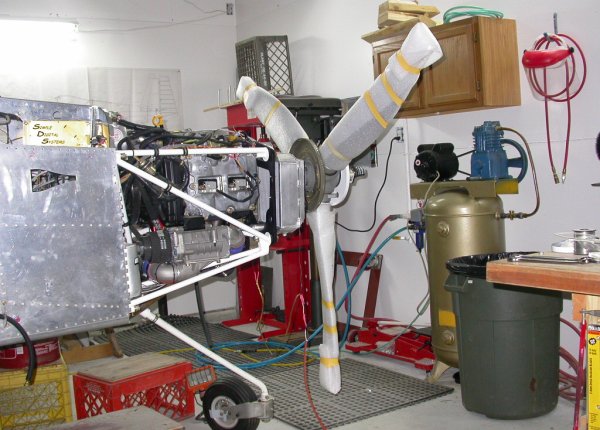 It's starting to look more like a real plane - here's the prop installed -
just need final torque on the bolts when I get the proper tools.
It's starting to look more like a real plane - here's the prop installed -
just need final torque on the bolts when I get the proper tools.
Aug 14 - as part of installing the tail, I needed to cut down the pilot's stick so it wasn't hitting the switches panel, so I'm also working on installing the Infinity Aerospace grips, with all the switches. Still no response from Sara at MT, regarding our conversation several days ago. Called Sara, and she said she got no response from Germany to her email. She will send again as high priority.
I also found out that Eggenfellner has screwed up yet another relationship with yet another supplier. Ross Farnham's SDS ECU, the best thing that ever happened to Eggenfellner's product line, is no longer being supplied on Eggenfellner products. Methinks Egg's demise is forthcoming. And I know there are many customers who've been waiting years for props they paid for a long time ago. Well, you can't say I haven't warned people - some have chosen to listen, some have chosen to ignore, a couple have chosen to attack the messenger.
Aug 17 - Over the weekend, I got my MSC order with new crowfoot wrenches. For the 5/8" I need for the prop nuts, I couldn't decide between 2 of the brands offered by MSC, so I got both. The Proto was more than double the price of the Armstrong and SK brands in crowfoot wrenches; about the same in other wrench types. I thought maybe there's something special about it, so I got that one and the Armstrong in 5/8". The Proto is quite a disappointment; not only did it cost more than double the others, it's nothing more than a simple flat piece of stamped steel. It also seems to have a sloppier fit on the nuts than the Armstrong. I measured the opening on the 2 wrenches, and the Proto opening is 0.005" more than the Armstrong. The Proto is a bit thinner and a bit larger circle diameter than the Armstrong. I may well send it back. I also picked up a special type of Craftsman open-end wrench I had at home that may grasp the nuts better; we'll see what works best.
Used the Armstrong crowfoot to torque the prop mount bolts to 45 ft lb (41-44 ft lb + locknut drag). Resumed work on tail. 0.5 hr
Aug 18 - decided to mount MT brush to brush mount bracket. While installing the brushes BEFORE installing the prop may have made installing the prop slightly more difficult, it was a real bear to install the brushes with the prop installed. I REALLY don't want to remove the prop now that it's installed and torqued. I eventually managed to get the brushes installed, however, using needlenose pliers to put the screws in and turn their heads a few degrees at a time. Safetied all screws on brushes. 1.5 hr
 It's quite a tight fit to get the brushes screws in with the prop hub in the
way.
It's quite a tight fit to get the brushes screws in with the prop hub in the
way.
 But I got it done, using needlenose pliers to turn the heads a few degrees
at a time. Because the screws are going into plastic and because
they're safetied, I didn't have to get them very tight; as tight as
needlenose pliers on the heads would allow was probably just right.
After more diddling, I got them safetied. The two screw heads are a
bit scraped, but perfectly serviceable. It really would be much better
to install this BEFORE installing the prop. Note the rub marks on the
prop mount bolt nuts from torquing them with the crowfoot. Strictly a
one-use item. Any time they get removed, they should be replaced with
new ones. The crowfoot didn't slip over the corners while torquing,
but it might round the flats if the nuts were reused. I numbered
the prop mount bolts to make sure they all got properly torqued, and none
got overlooked.
But I got it done, using needlenose pliers to turn the heads a few degrees
at a time. Because the screws are going into plastic and because
they're safetied, I didn't have to get them very tight; as tight as
needlenose pliers on the heads would allow was probably just right.
After more diddling, I got them safetied. The two screw heads are a
bit scraped, but perfectly serviceable. It really would be much better
to install this BEFORE installing the prop. Note the rub marks on the
prop mount bolt nuts from torquing them with the crowfoot. Strictly a
one-use item. Any time they get removed, they should be replaced with
new ones. The crowfoot didn't slip over the corners while torquing,
but it might round the flats if the nuts were reused. I numbered
the prop mount bolts to make sure they all got properly torqued, and none
got overlooked.
Aug 20 - Got a call from from Sara at MT regarding the controller upgrade. She said to send it in and they'd send it to Germany for the warranty upgrade. I passed the info on to Carsten. I removed the controller from the panel, and hope to get it out UPS sometime tomorrow. Tomorrow is the start of our little town's big event for the year; The Cornish Fair, so I'll be attending that Fri-Sun.
Aug 21 - shipped MT prop controller back to MT in Florida for warranty controller upgrade.
I started working on the brake lines. See the August Fuselage page for details on that.
Aug 26 - I realized after hooking up the MT brushes that I'd neglected to include the MT speed sensor wires on the brushes block (blue-cased wires in above pic) when I ran the wiring through the LT firewall. Now, I'll have to remove the increasingly-difficult-to-remove "removable" electrics tray and either add the prop speed sensor wires to that bundle in the existing pass-thru or create a new pass-thru. After a bunch of pondering and trial wire runs, it appears that the wires will be just barely long enough to go through the unfinished pass-thru on the RT firewall. 0.5 hr
Aug 28 - got a call from Sara at MT. Turns out, I already sent them the prop controller back in October, 2006, and they already did the upgrade. Duh! I guess I'd forgotten it had been already done, and when I called recently to check on the status of my name on the upgrade list, MT also didn't realize it had been done. Sara will send the controller back to me. Well, at least we got Carsten's controller all taken care of as a result of this.
go to Sept '09 engine
BACK TO MY RV BUILDER'S HOME
BACK TO BRIAN'S HOME