 Here is the drawing that Jan Eggenfellner sent me for the MT prop bushings with Gen 3 PSRU -
I later found
out from John Moody in Australia that this is not correct.
Thanks, Jan!! Typical Eggenfellner attention to detail!! John says this:
Here is the drawing that Jan Eggenfellner sent me for the MT prop bushings with Gen 3 PSRU -
I later found
out from John Moody in Australia that this is not correct.
Thanks, Jan!! Typical Eggenfellner attention to detail!! John says this:ENGINE WORK January, 2008
Jan 4 - I decided to get moving on the Van's SB, even though I hate to. I hate going backwards, and it's going to be difficult to do it with the Eggenfellner engine frame making it nearly impossible to remove the nose gear leg. But I figure it's especially essential with an Eggenfellner engine, as having an Eggenfellner engine increases the likelihood of an off-airport landing. Last week, I ordered a 1.25" x 16 tpi HS steel adjustable die and holder from MSC. The die is MSC p/n 03946506 and the die holder for that is MSC p/n 03344579.
Jan 11 - I began building a frame to support the engine while I am doing the gear leg work. I have an engine hoist I bought for installing the engine, but it tends to slowly leak down, and for this project, which will probably drag on quite a while, I need it to remain up and fixed in place, with no need for the movement that the engine hoist provides through the casters. So, I am building a big frame from 4x4s to support a chain hoist. 1.75 hr
Jan 13 - more work on hoist frame - mostly done 2.0 hr
Jan 15 - called Van's to order the new nose gear fork. They said it's a 4-6 week lead time! Yikes! I guess I should have ordered it some time ago, although I wasn't really sure until recently that I'd do it. On one of the Eggenfellner Subaru lists, one customer said he's sending his Gen 3 PSRU back to Eggenfellner for the SECOND time due to front seal leak. I also understand from others who have just gotten their new Gen 3 PSRUs that there are fit problems I will have to deal with, too. Eggenfellner is claiming that the new Gen 3 PSRUs have been sent out, but so far no sign of mine.
Jan 16 - Jan Eggenfellner was very rude to Chuck Chappell, another STi victim, on the Eggenfellner Subaru list. All Chuck did was ask very politely why the list of additional new parts, that we are just now finding out we're going to need with the new Gen 3 PSRU, wasn't sent out in advance. Jan's snotty reply included "If you are generally an unhappy person, we do not want to hear from you ". Jan's arrogance is more irritating with every interaction with him. Only happy Eggenfellner cheerleaders are welcome in Eggenfellner Country.
Jan 17 - requested from Eggenfellner the specs for the new prop bushings that will be required with the Gen 3 PSRU. Received it promptly. They are stainless steel, though, so I will probably just order them from Eggenfellner, rather than trying to machine the s/s myself. At the end of the day, an orange bucket appeared on my porch, so I spent the evening installing the Gen 3 PSRU. 4.0 hr
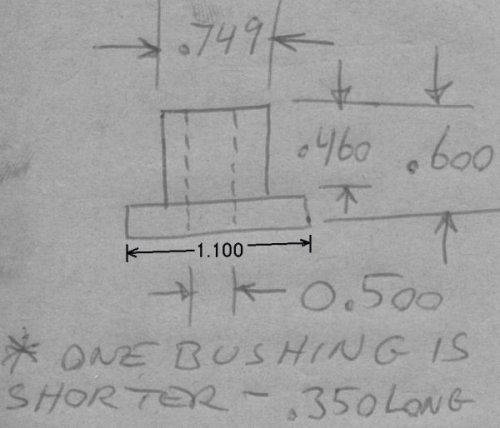
Here is the drawing that Jan Eggenfellner sent me for the MT prop bushings with Gen 3 PSRU -
I later found
out from John Moody in Australia that this is not correct.
Thanks, Jan!! Typical Eggenfellner attention to detail!! John says this:
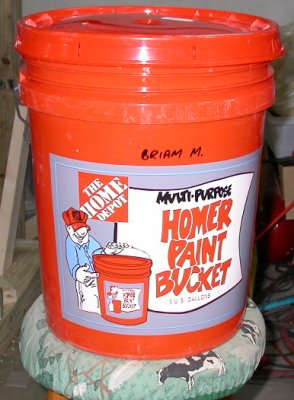 Clever way to ship the PSRUs around. I understand Jan got this idea
from the way someone returned their Gen 2 to him.
Clever way to ship the PSRUs around. I understand Jan got this idea
from the way someone returned their Gen 2 to him.
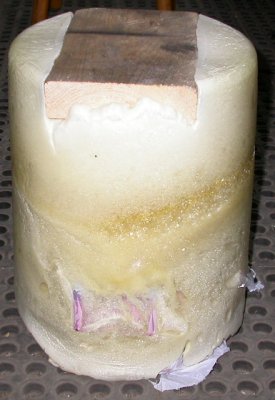 After opening the bucket and tipping the contents out, this is what you get.
Some people complained of uncured foam sticking to things, but most all this
foam was cured. Then I just used my fingers to pull the foam apart.
After opening the bucket and tipping the contents out, this is what you get.
Some people complained of uncured foam sticking to things, but most all this
foam was cured. Then I just used my fingers to pull the foam apart.
 In the top of the container were these additional parts. It would have
been real nice if he'd included all the other parts we're slowly finding out
we're going to need with this. Or if he'd even just let us know what
we'd be needing before the last minute & all buckets were shipped.
Now we have to pry the details out of him one piece at a time.
In the top of the container were these additional parts. It would have
been real nice if he'd included all the other parts we're slowly finding out
we're going to need with this. Or if he'd even just let us know what
we'd be needing before the last minute & all buckets were shipped.
Now we have to pry the details out of him one piece at a time.
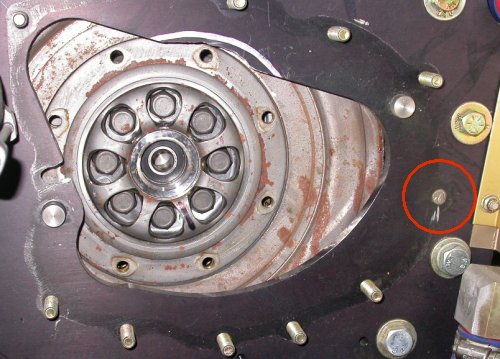 Before
I could install the new PSRU, there was one more step from "removing the Gen
2" that I'd missed; cutting off this no-longer-used stud. Believe me -
I double-checked, triple-checked and quadruple-checked this before making
the cut!
Before
I could install the new PSRU, there was one more step from "removing the Gen
2" that I'd missed; cutting off this no-longer-used stud. Believe me -
I double-checked, triple-checked and quadruple-checked this before making
the cut!
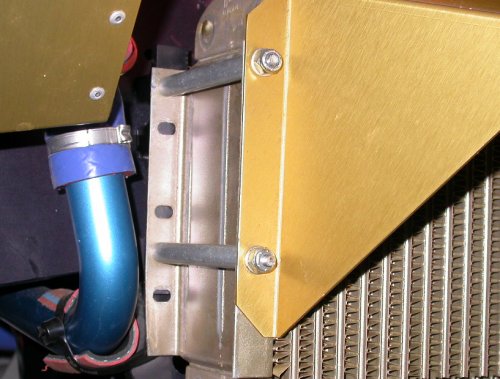 The bottom of the Gen 3 PSRU is lower than the Gen 2 was, so the oil cooler
won't fit in where it was installed. My easiest fix was to just drill
new holes in the oil cooler mount flange and remount it a bit lower. I
went 3/4" higher on the mount holes. Sure hope the lowered oil cooler
clears the cowl. I have a feeling it won't, as I believe some people
were complaining that it didn't clear the cowl even before it was lowered
another 3/4".
The bottom of the Gen 3 PSRU is lower than the Gen 2 was, so the oil cooler
won't fit in where it was installed. My easiest fix was to just drill
new holes in the oil cooler mount flange and remount it a bit lower. I
went 3/4" higher on the mount holes. Sure hope the lowered oil cooler
clears the cowl. I have a feeling it won't, as I believe some people
were complaining that it didn't clear the cowl even before it was lowered
another 3/4".
![]() I now have about 1/4" clearance between the PSRU and the oil cooler.
For a closer fit that will put the new mount holes further from the edge
than I used, and that won't lower the oil cooler any more than necessary,
move the holes up 1/2" or 9/16", instead of the 3/4" I used. It will
be impossible to drain the PSRU oil without removing the oil cooler
regardless of the gap here, but I suppose I'd be changing engine oil at the
same time and would need to disconnect the oil cooler lines to drain the oil
cooler, anyway.
I now have about 1/4" clearance between the PSRU and the oil cooler.
For a closer fit that will put the new mount holes further from the edge
than I used, and that won't lower the oil cooler any more than necessary,
move the holes up 1/2" or 9/16", instead of the 3/4" I used. It will
be impossible to drain the PSRU oil without removing the oil cooler
regardless of the gap here, but I suppose I'd be changing engine oil at the
same time and would need to disconnect the oil cooler lines to drain the oil
cooler, anyway.
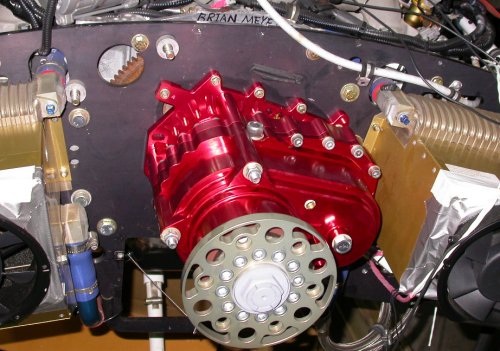 Here's the new Gen 3 PSRU installed. Everything slid in nice & smooth.
Sure is purdy! To get the Gen 2 out, I only had to slightly loosen the
starter, but to get the Gen 3 in, I had to completely remove the starter.
The starter went back in without a hitch, though. It's a close fit,
but good clearance between the PSRU and starter.
Here's the new Gen 3 PSRU installed. Everything slid in nice & smooth.
Sure is purdy! To get the Gen 2 out, I only had to slightly loosen the
starter, but to get the Gen 3 in, I had to completely remove the starter.
The starter went back in without a hitch, though. It's a close fit,
but good clearance between the PSRU and starter.
Jan 18 - found out I WILL need a new MT prop control brushes mount bracket with the new Gen 3. Randy Crothers mentioned it in an email, and I confirmed it by directly asking Eggenfellner again. Yet again, you NEVER assume anything with Eggenfellner and his cryptic half-answers and half-information. On the 16th, I had asked him:
I understand new shorter bolts are needed for Gen 2 to Gen 3 for MT. Are new prop bushings and/or brush mounting needed for MT if one already has those items (unused) for Gen 2?
He had replied:
<<I understand new shorter bolts are needed for Gen 2 to Gen 3 for MT
Yes, 1/4" shorter
>>Are new prop bushings and/or brush mounting also needed for MT if one
already has those items (unused) for Gen 2?
You need new bushings for the G3
Since he ignored the question about the bracket, I assumed it meant a new bracket was not necessary. Turns out it does need a new bracket. Grrrrr - so typical of Eggenfellner.
Jan 28 - Karla and I tried to erect the engine hoist frame I'd made, to get started on the Van's SB. Erecting the frame was a much easier task in my mind beforehand than reality turned out to be. The thing is MUCH heavier and more cumbersome than I'd imagined. Also realized that it'll be so tall (about 9 feet), I won't be able to open the garage door once it's erected. It'll need at least 3 people to erect it and to dismantle it later. Back to the drawing board. I may cut the legs down to make it shorter, and find some more help to erect it. Or I may just s-can it and use the hydraulic hoist. I've also been exchanging a lot of emails with the other STi owners regarding getting a new supercharger sprocket. 0.5 hr
Jan 30 - cut 8" off the end of each leg of the hoist frame, so the top of it will clear the garage door. Hope it's still tall enough to be useful. Removed oil cooler, safety-wired the PSRU drain plug, and reinstalled oil cooler. Put 16 oz of Mobil 1 75w90 synthetic gear oil into the PSRU and safety-wired the fill plug. Added a quart of oil to the engine to replace what was lost when I drained the oil cooler as part of removing the old PSRU. 1.5 hr
another month gone - go to Feb, 2008 ENGINE
BACK TO MY RV BUILDER'S HOME
BACK TO BRIAN'S HOME