Jan 15 - I am back to working on
my avionics, while finishing up on the engine
and doing more fuselage work. Doing
some preliminary EFIS/AHRS mount planning. It looks like they'll go in
OK fwd of the F768B sub panel and between the 2 F745 ribs. I
still need to first find out where the long avionics components will be
coming through the sub panel. 0.75 hr
This is from my August, 2004 page:
GNS530
11"
GTX330
11.25"
SL30
10.5"
Jan 16 - received and put away my
Waytek Wire order. 1.0 hr
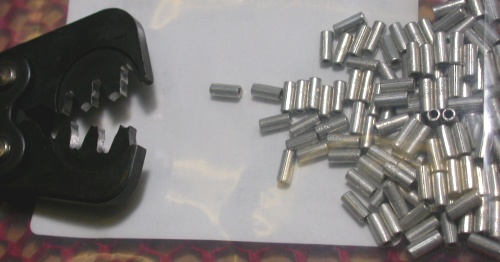
These are the kind of overlapping wire splices Jan recommends for engine
wiring harness work. Very small & secure. They get covered with
heat shrink tubing that has sealant inside. The crimper for them looks
like a slightly larger than normal Molex crimper. These came from
Waytek Wire.
This is the collection of dual wall heatshrink I got from Waytek Wire.
This is one of Waytek Wire's "metri-pack" connectors. Oddly enough,
they call this a "female" connector, even though it goes into another "male"
connector. Someone needs to explain the birds & the bees to them
;-) The connectors are completely sealed - the connectors are
sealed, and each wire has a little seal as it goes into the connector.
I thought Waytek's customer service sucks, though. My packing
list said they'd shipped everything, but one item was missing. I
called about it, and they said it had been backordered, but had just come
in. They shipped it to me, and charged me $9 to ship a $12 item that
couldn't have weighed more than an ounce or 2. I complained to their
sales manager, but he said "TSCB".
I won't be buying anything from them again, and I recommend you don’t buy
from them, either.
Jan 17 - check layout of Garmin
radio stack trays, and how they can fit onto panel, and where I can get the
long ones through the subpanel, and how I can mount he EFIS/AHRS boxes fwd
of the subpanel, so everything clears everything else. Cut brackets to
hold trays to panel. More panel and tray layout in the house, where
it's warmer. 3.5 hr
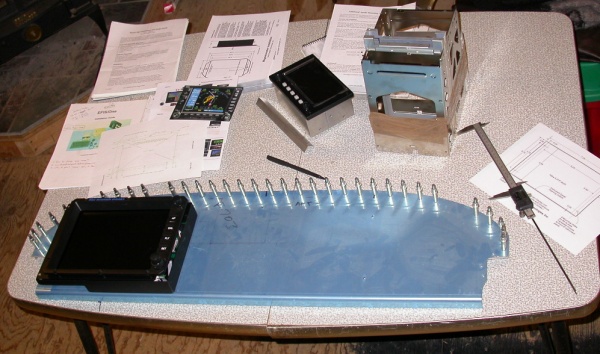
I've moved into the house, where it's warm, to resume working on my panel.
First priority is to get the Blue Mountain EFIS/One placed, as low and far
to the LT as I can get it. Then, I'll need to get those Garmin trays
put in about 2/3 of the way to the right, far enough to the LT so they will
clear the canopy hinge on the subpanel. Then, I'll fill in the rest of
it with the space remaining.
This
is a rough version of what I am shooting for. I am still undecided
whether to have the Garmin GNS530 in the second or third column. If I
can reach and see it easily, I will mount it in the stack, as shown here.
If I decide it's too far away there, I will have to put it in the second
column, above or below the GRT, as in my previous iteration here:
Jan 18 - Talked to Eckhard about a
couple details about the Garmin trays & mounting them. He will
drop off some mounting screws when he visits Claremont airport later today.
More planning panel layout and measuring for clearance between panel
components, subpanel and its parts, and BMA EFIS installation.
That BMA EFIS/AHRS/computer is HUGE, and takes up a lot of space.
I need to make sure everything will fit together OK. Took lots
of measurements and made lots of notes. Update web site
1.5 hr + 1.0 hr doc
Jan 19 - Decided to exchange my
BMA EFIS display (plus $1200) for one of their new "hi-bright" displays.
It's 1" thicker than the existing one, so I had to do a bunch of measuring
to be sure it would still clear behind the panel ok. Boxed up
display and shipped to Blue Mountain. Also spent some time hooking up
the fuel transfer tank filters and new pump hose & nozzle.
1.5 hr
Jan 22 - finally finished fuel
transfer tank. I spent the last few days working on that.
It will allow me to supply auto fuel to my plane at my airport which does
not have auto fuel available. It was a diesel tank I bought well used
at an auction, and fixed up for gasoline. Anyway, back to direct plane
work. My workbench is a horrible mess; several layers deep of tools
and parts. More fitting and measuring work on the panel.
The Garmin trays, in order to clear the RT canopy hinge, must be at least
1/2" to the LT of the original F745R. Holes in panel for F745R are
3/8" to the RT of the F745R, so the right-most the trays can be is 7/8" to
the left of the holes in the panel for the F745R.
1.0 hr
After working on the plane, and all the work on the fuel transfer tank, the
bench is now a complete mess, with no room to do or find anything.
I'll have to clean this up soon.
Measuring where the Garmin trays will come through the panel into the
subpanel. I have to make sure I am to the LT of the canopy hinge block
and slot, shown by the arrow here.
Jan 24 - I am reconsidering
putting the Garmin 530 in the radio stack. I think I will go back to
the previous configuration, with it under the GRT EFIS. Lots more
measuring and marking. 2.0 hr
Here is the final panel layout, with the Garmin 530 moved to the 2nd column
and the Dynon & GRT EIS moved more to the LT. The BMA display is out
being upgraded to an even brighter one.
Jan 25 - Talked to Eckhard about
more details of mounting the Garmin trays. The SL30 is about 0.070"
less wide than the other trays. Eckhard says I may need to bond or
rivet a shim (rather than using loose washers) to bridge the gap. I
asked him about a music radio with XM satellite reception capability.
I was considering a PS Engineering model. He recommended getting a
Garmin 396 to cover that, plus provide backup GPS capability.
Worked on finalizing panel layout and marking cut lines for all the major
components. 1.5 hr
The panel is all marked out and ready to start cutting. Blue lines
for cuts, red lines for bezel edges.
Jan 26 - Doing the web update &
seeing the pic of me holding the Garmin stack to the subpanel makes me
realize that, now that I've moved the 530 from the 3rd stack, my SL30 may be
going to hit the RT canopy hinge block. I guess there'll be more
measuring tonight, before any cutting. I can leave the audio panel up
high, as it's short, but I may need to move the rest of the Garmin stack
(just the SL30 and the GTX330 now) down to the top of the Dynon & leave an
expansion space between the SL30 and audio, rather than have the space
between the bottom of the 330 and the Dynon, as shown here. Update web
site 0.25 hr + 1.0 hr doc
Jan 27 - Last night, I measured
the distance between the top skin and the bottom of the RT canopy hinge
block. It was 2 1/16". With the tray for the (short) audio panel
tray just clearing the bottom of the reinforcing angle at the top of the
panel, the bottom of the tray is at exactly 2 1/16", so I am fine there
for clearance for the SL30 under the audio tray.
I guess I'll be ready for cutting the panel tonight & this weekend.
I talked to Eckhard, and the GNS530 also has a rather large plate on the
back, to hold the connectors, that will make the overall length longer and
may interfere with the BMA AHRS. He dropped a loaner back plate off at
the airport, and I went over and picked it up. It adds about 2"
overall length to the 530, but it's still about 1/2" less than the SL30, so
clearances should be fine. Worst case, if it just won't work, the BMA
AHRS box will have to be moved, not the radios.
0.5 hr doc
Even with the connector bracket on the back of the GNS530 tray (A), it's
still about half an inch shorter than the SL30 with its bracket (B).
I already checked the clearance for the SL30, so I should be fine for no
interference with that HUGE Blue Mountain Avionics EFIS ADHRS box.
Jan 29 - spent a couple hours
cleaning up some of the garage mess and about 1/2 hour cutting out the first
panel hole - for the Grand Rapids Engine Information System.
2.5 hr
Here's the first cut on the panel. The shotbag and the benchtop anvil
help make sure the panel doesn't slide around while I am cutting it. I
used a cutting disk in the cordless drill, and finished the corners with the
hacksaw blade laying on the anvil. I cut slow and careful, staying
inside the lines. By cutting to the inside edge of the lines, it'll
mean more final filing work, but less chance of cutting too much.
Jan 30 - I got an email back from
Van's, confirming that I can use the same "distance from center" or
"distance from top skin" measurements on the subpanel as on the panel, for
when I am ready to start making the cuts in the subpanel for the long
radios. Cut out more of the panel. Update web site
2.75 hr + 0.5 hr doc
Most
of the panel is cut out now. The BMA is 3/4 cut out, and I just have
to do the 3" round hole for the Dynon. I may adjust the Dynon hole
slightly to the left or right, after I get the EIS and 530 holes finalized,
to make sure it is centered between the two. All the white shiny stuff
is aluminum powder from all the cutting. The cutoff disk in the
cordless drill seems to be working quite well.
Jan 31 - Worked to wee hours
filing and fitting cut panel holes to each instrument. Finished holes
for EIS, GRT EFIS, and Garmin 530. After fitting the Garmin 530 hole,
I realized I probably should have cut the holes smaller. I had
asked Eckhard about the fit of the trays. The Garmin trays have
2 sides and the top at one length, and the bottom surface is about 1/8"
longer in front (aft end). Eckhard didn't sound that sure about it, but he said
to make the 3 sides flush with the outside surface of the panel. After
cutting & fitting, it appeared to me that the holes should have been
smaller, with those 3 sides butting up against the BACK of the panel,
instead of coming through the hole to be flush with the panel.
Also, it appears that the mount screw holes will be right in the mount angle
web if I was to make the 3 sides flush with the panel. Update web site
5.5 hr + 0.5 hr doc
 These are the kind of overlapping wire splices Jan recommends for engine
wiring harness work. Very small & secure. They get covered with
heat shrink tubing that has sealant inside. The crimper for them looks
like a slightly larger than normal Molex crimper. These came from
Waytek Wire.
These are the kind of overlapping wire splices Jan recommends for engine
wiring harness work. Very small & secure. They get covered with
heat shrink tubing that has sealant inside. The crimper for them looks
like a slightly larger than normal Molex crimper. These came from
Waytek Wire. This is the collection of dual wall heatshrink I got from Waytek Wire.
 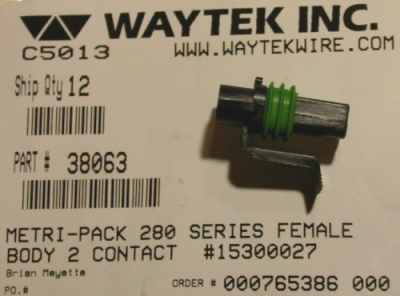 This is one of Waytek Wire's "metri-pack" connectors. Oddly enough,
they call this a "female" connector, even though it goes into another "male"
connector. Someone needs to explain the birds & the bees to them
;-) The connectors are completely sealed - the connectors are
sealed, and each wire has a little seal as it goes into the connector.
I thought Waytek's customer service sucks, though. My packing
list said they'd shipped everything, but one item was missing. I
called about it, and they said it had been backordered, but had just come
in. They shipped it to me, and charged me $9 to ship a $12 item that
couldn't have weighed more than an ounce or 2. I complained to their
sales manager, but he said "TSCB".
This is one of Waytek Wire's "metri-pack" connectors. Oddly enough,
they call this a "female" connector, even though it goes into another "male"
connector. Someone needs to explain the birds & the bees to them
;-) The connectors are completely sealed - the connectors are
sealed, and each wire has a little seal as it goes into the connector.
I thought Waytek's customer service sucks, though. My packing
list said they'd shipped everything, but one item was missing. I
called about it, and they said it had been backordered, but had just come
in. They shipped it to me, and charged me $9 to ship a $12 item that
couldn't have weighed more than an ounce or 2. I complained to their
sales manager, but he said "TSCB".
 I've moved into the house, where it's warm, to resume working on my panel.
First priority is to get the Blue Mountain EFIS/One placed, as low and far
to the LT as I can get it. Then, I'll need to get those Garmin trays
put in about 2/3 of the way to the right, far enough to the LT so they will
clear the canopy hinge on the subpanel. Then, I'll fill in the rest of
it with the space remaining.
I've moved into the house, where it's warm, to resume working on my panel.
First priority is to get the Blue Mountain EFIS/One placed, as low and far
to the LT as I can get it. Then, I'll need to get those Garmin trays
put in about 2/3 of the way to the right, far enough to the LT so they will
clear the canopy hinge on the subpanel. Then, I'll fill in the rest of
it with the space remaining.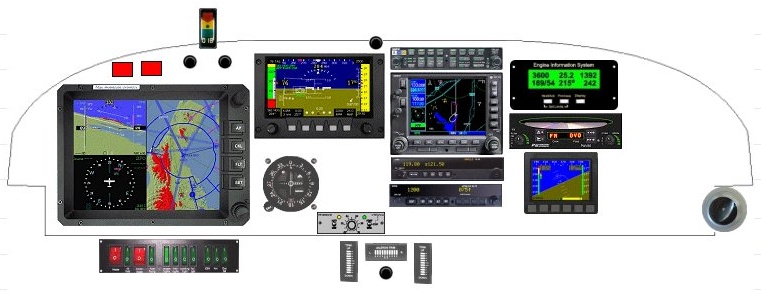 This
is a rough version of what I am shooting for. I am still undecided
whether to have the Garmin GNS530 in the second or third column. If I
can reach and see it easily, I will mount it in the stack, as shown here.
If I decide it's too far away there, I will have to put it in the second
column, above or below the GRT, as in my previous iteration here:
This
is a rough version of what I am shooting for. I am still undecided
whether to have the Garmin GNS530 in the second or third column. If I
can reach and see it easily, I will mount it in the stack, as shown here.
If I decide it's too far away there, I will have to put it in the second
column, above or below the GRT, as in my previous iteration here: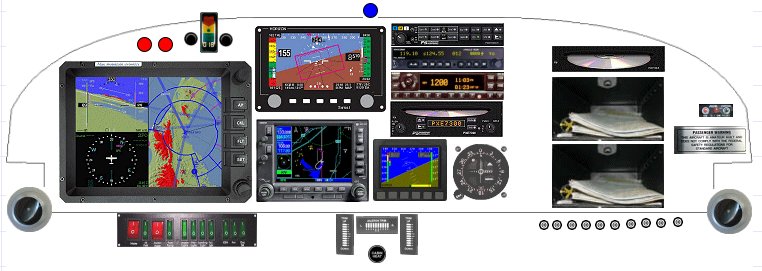
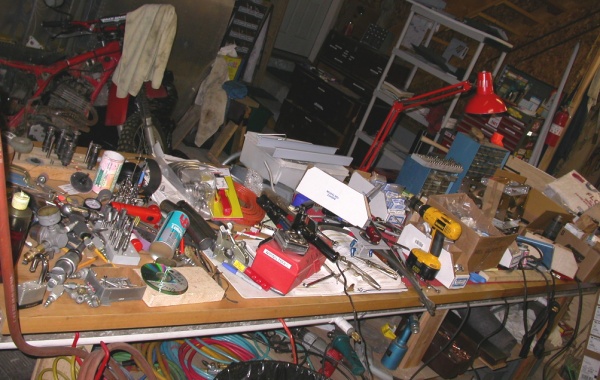 After working on the plane, and all the work on the fuel transfer tank, the
bench is now a complete mess, with no room to do or find anything.
I'll have to clean this up soon.
After working on the plane, and all the work on the fuel transfer tank, the
bench is now a complete mess, with no room to do or find anything.
I'll have to clean this up soon.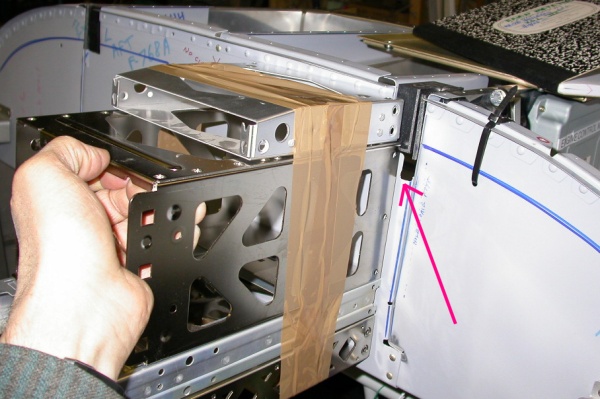 Measuring where the Garmin trays will come through the panel into the
subpanel. I have to make sure I am to the LT of the canopy hinge block
and slot, shown by the arrow here.
Measuring where the Garmin trays will come through the panel into the
subpanel. I have to make sure I am to the LT of the canopy hinge block
and slot, shown by the arrow here. Here is the final panel layout, with the Garmin 530 moved to the 2nd column
and the Dynon & GRT EIS moved more to the LT. The BMA display is out
being upgraded to an even brighter one.
Here is the final panel layout, with the Garmin 530 moved to the 2nd column
and the Dynon & GRT EIS moved more to the LT. The BMA display is out
being upgraded to an even brighter one.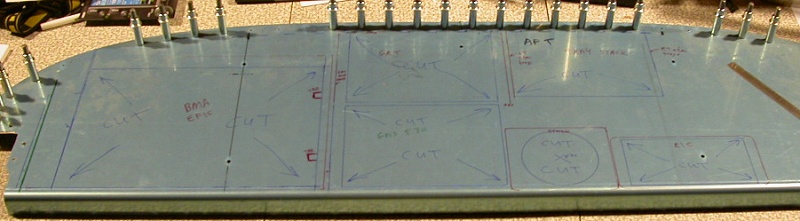 The panel is all marked out and ready to start cutting. Blue lines
for cuts, red lines for bezel edges.
The panel is all marked out and ready to start cutting. Blue lines
for cuts, red lines for bezel edges.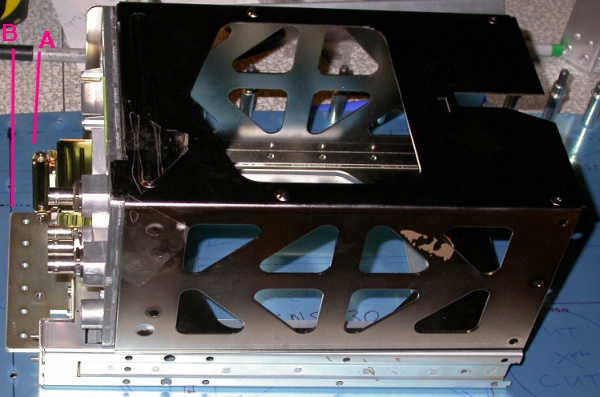 Even with the connector bracket on the back of the GNS530 tray (A), it's
still about half an inch shorter than the SL30 with its bracket (B).
I already checked the clearance for the SL30, so I should be fine for no
interference with that HUGE Blue Mountain Avionics EFIS ADHRS box.
Even with the connector bracket on the back of the GNS530 tray (A), it's
still about half an inch shorter than the SL30 with its bracket (B).
I already checked the clearance for the SL30, so I should be fine for no
interference with that HUGE Blue Mountain Avionics EFIS ADHRS box.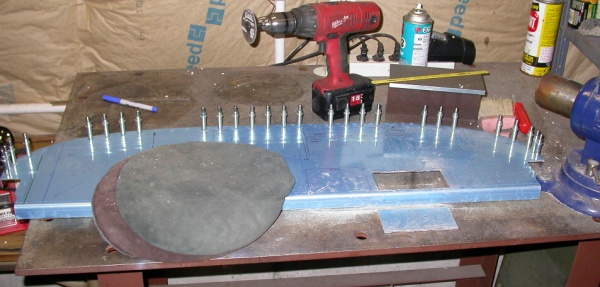 Here's the first cut on the panel. The shotbag and the benchtop anvil
help make sure the panel doesn't slide around while I am cutting it. I
used a cutting disk in the cordless drill, and finished the corners with the
hacksaw blade laying on the anvil. I cut slow and careful, staying
inside the lines. By cutting to the inside edge of the lines, it'll
mean more final filing work, but less chance of cutting too much.
Here's the first cut on the panel. The shotbag and the benchtop anvil
help make sure the panel doesn't slide around while I am cutting it. I
used a cutting disk in the cordless drill, and finished the corners with the
hacksaw blade laying on the anvil. I cut slow and careful, staying
inside the lines. By cutting to the inside edge of the lines, it'll
mean more final filing work, but less chance of cutting too much.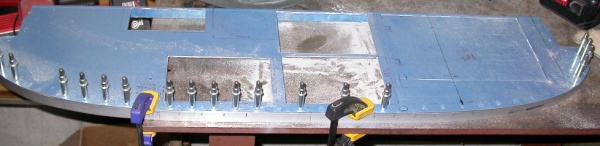 Most
of the panel is cut out now. The BMA is 3/4 cut out, and I just have
to do the 3" round hole for the Dynon. I may adjust the Dynon hole
slightly to the left or right, after I get the EIS and 530 holes finalized,
to make sure it is centered between the two. All the white shiny stuff
is aluminum powder from all the cutting. The cutoff disk in the
cordless drill seems to be working quite well.
Most
of the panel is cut out now. The BMA is 3/4 cut out, and I just have
to do the 3" round hole for the Dynon. I may adjust the Dynon hole
slightly to the left or right, after I get the EIS and 530 holes finalized,
to make sure it is centered between the two. All the white shiny stuff
is aluminum powder from all the cutting. The cutoff disk in the
cordless drill seems to be working quite well.