Feb 1 - Called Eckhard & left
message about the Garmin tray fit problem. Also called the local
maint shop, Ascutney Aviation, and asked them about it. Steve referred
me to Gene Agustonavitch, who said that the LONG BOTTOM SURFACE is the one
that's supposed to be flush with the panel. That will leave the other
3 sides not even quite touching the back of the panel. So, the holes I
made could definitely have been made smaller. I guess it will still
work OK. I was probably trying to get too perfect a fit, anyway.
I wish I could have gotten the correct info the first time, when I asked
Eckhard about it specifically. Worked to the wee hours again on the
GNS530 rack install. Made and fitted rack mount brackets & started
installing nutplates in them. 3.0 hr
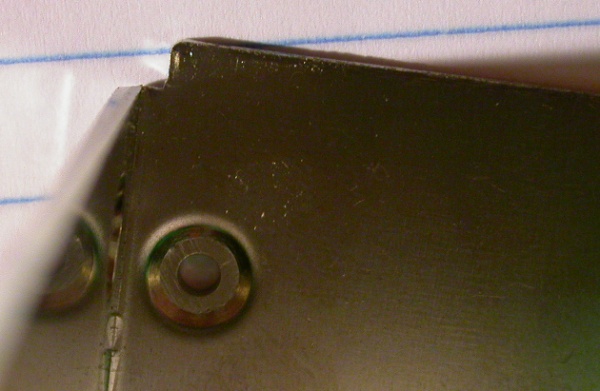
This pic is looking down from the front top (aft-most) of a Garmin tray.
The fuzzy line on the LT of the pic is the RT side of the tray.
You can see how the bottom piece is inset a bit on the side, and sticks out
further than the rest of the tray. The face of that longest edge is
what the radio butts up against, and it supposed to be mounted so it's flush
with the face of the panel. That also means that the side and top
pieces do not come through the panel, so the cutout hole does not have to be
the distance from outside edge to outside edge, as I did it.
The cutout width should be from inside edge to
inside edge on the sides, and the cutout height should be outside bottom
edge to inside top edge. It sucks finding this out after
the fact. Hopefully, I can use the angle mount brackets to make up the
1/8" to 3/16" or so of slop I am left with at this point. The rest of
the cutouts (GRT EFIS and EIS) came out perfectly. I am still waiting
for BMA to send me back my new display. Supposedly, I will get it
tomorrow. Ordered some 1/2" aluminum angle from Wicks for the
rack mounts. I am using 3/4" on the 530, but I think the others will
need the more narrow angle, so I can get the slip-on captive nuts onto them
and over the hole. There won't be room on those others to use
nutplates, even the miniature MK ones, as all the screw holes are too close
together.
I am using the Garmin 530 tray in its hole to help guide the tray mount
brackets to exactly where they need to be. Having the hole cut to the
outside edges of the tray (as opposed to the inside edges, which would be
the minimum necessary) made the mating of the brackets easier. The
tray was firmly in place on the inside of the cutout, and I just clamped the
brackets to that & match drilled the brackets to the panel.
Feb 2 - Ordered $150 worth of assorted
nutplates from Wicks. Received my Blue Mountain display back from
upgrade. Until I took the BMA display apart to install it, I didn't
realize how it mounts. There are 3 parts to it; the bezel, a
backing plate for the bezel, and the display itself with the electronics
inside. Trimmed 0.065" off the bottom of the backing plate, so it will
fit into the flange curve at the bottom of the panel. Update web site
1.0 hr + 0.5 hr doc
Feb 3 - Trimmed another 0.030" off the bottom
of the BMA backing plate. Fit BMA display to panel. Found
out 2 key things; first, the proper cutout line is to the inside
edge of the plate tabs on 3 sides, and follow the exact plate ID outline
on the RT side. Second, the proper assembly technique for the BMA
is to first fasten the bezel to the panel with the backing plate behind
the panel. Then attach the display box to that. Marked and
drilled GRT EFIS mount holes and plan nutplates. Mark & drill
Dynon cutout and screw holes. Received tools order from
The Yard. Their web site was
rather slow and cumbersome, so I'd given up on that and ordered
everything by phone. Set up Garmin 340/330/SL30 stack and finished
filing the hole for that. Spend a couple hours working on planning
the F745L extension layout and placement. Best place for the F745L
extension is right on the Garmin 530 LT bracket rivet line and tie that
in with the LT GRT EFIS mount screws. Also spent some time
planning the brackets for the Garmin stack.
9.25 hr
This
shows how the BMA backing plate shows how to cut out the display, once
you've carefully located it. Top, bottom, and LT cut straight lines to
the IN side of the screw tabs. On the RT, follow the plate exactly.
Perfect results. You can see I've got the backing plate shoved down as
far as possible, and I even had to trim and radius it, so it would fit into
the radius of the flange at the bottom of the panel.
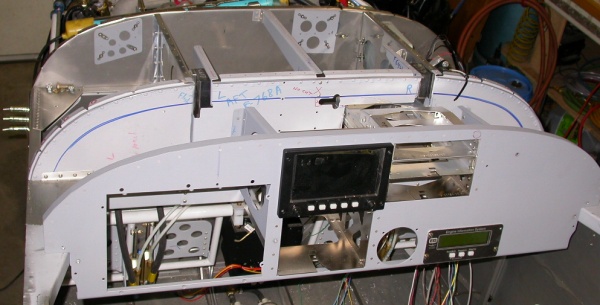
Here is a picture of the partially populated panel, after I got the BMA
display mounted. Under the GRT EFIS (upper center) is the rack for the
Garmin GNS530, and to the RT of that is the yet-uncut Dynon hole (centered
on the little blue circle), and to the RT of that is the GRT EIS. To
the RT of the GRT is the Garmin radio stack hole. I haven't finished
fitting the hole to the trays there yet. Most or all switches will go
on a subpanel mounted to the bottom of the bottom panel flange.
Important indicators, like the AOA display, DVM, and low fuel quantity and
pressure warning lights, will go in the space above the BMA EFIS. The
rest of the panel is presently unallocated.
Feb 5 - sort and put away Wicks nutplates
order. Resume Garmin stack brackets layout. More planning fit &
layout of F745 extensions. Marked approximate Garmin stack cutout in
subpanel. Mate F745L extension to panel - panel removal will require
removing top LT Garmin 530 tray screw. Despite my huge order of
nutplates from Wicks, I still need some more nutplates I don't have
(MS21061-L06), in order to finish this installation. Finish
angle bracket onto F745L extension, and primed and riveted it. Drill
530 brackets for MS21061-L06 nutplates when I get them. Worked on
angle brackets for the Garmin stack. Trimmed about 0.100" off one side
of Garmin stack mount brackets, so the clipnuts I got from Eckhard will work
on them. The best ones from Eckhard are p/n 089-02353-0001 P1-101.
I also found that they work best over a #19 hole. Lots of little
trimming & clearance fitting here & there. Got GMS340 audio panel tray
mounted to brackets; looks good so far. 9.5
hr
Here is the F745L extension, showing where it is located and how it is
fastened. There is less than 1/16" clearance on either side, so it's a
perfect fit. On the bottom, a screw goes through the panel, through
the Garmin 530 mount bracket, and into a nutplate on the F745L extension.
The F745L extension is held in place on top by the 2 mount screws for the
GRT EFIS. The screw goes through the GRT, through the panel, through
the upper angle, and to a nutplate on the inside of the F745L extension.
The upper angle is held to the F745L extension by the nutplate rivets, as
well as about 6 other rivets on both legs of the angle. You can also
see the RT 530 bracket, as well as the 2 brackets for the Garmin stack.
The LT Garmin stack angle bracket also serves as the placement for the 2
nutplates for the RT side of the GRT EFIS. Lots of carefully thought
out overlapping & tight clearances, but it does seem to be coming together
OK. The LT Garmin 530 bracket had zero clearance to the BMA display,
so I ground that leg a bit (RT in pic) so now there's about 1/16" clearance.
These
clipnuts worked really well. Eckhard gave them to me. He said
they come from Bendix King install kits. They worked perfectly
here, after I trimmed about 0.100" off the angle leg. They want a #19 hole
to sit in. I had a slightly smaller hole for #6 screws before (5/32"),
but the clipnuts didn't sit in them as well as they do now.
Feb 6 - Double-check and finalize Garmin GMA340
audio tray mounting to brackets- perfectly perpendicular. Start laying
out SL30 tray to brackets. Made up 0.040" spacers for between the
trays where the clearance bumps don't align. SL30 has a 0.040" bump in
the top front, and the others have 0.020" bumps that are supposed to align
with each other to form the requisite 0.040" gap, but neither Garmin tray
bumps align with the SL30 tray bumps. Since the SL30 is BETWEEN the
Garmin 330 and 340, the Garmin spacing bumps don't align. Glued 0.040"
shims onto the top, bottom and sides of the SL30 tray. The SL30 tray
is also about 0.090" less wide than the 2 Garmin trays, so the 2 shims on
the sides will take up that extra space. The SL30 may be sold by
Garmin now, but they sure haven't updated the physical package to be
compatible with the Garmin trays. Mark & drill holes to mount SL30 to
brackets. Worked to 0300. Update web site
2.25 hr + 1.0 hr doc
Feb 7 - Finish SL30 tray install. Install
Garmin GTX330 transponder tray. Mate Garmin stack brackets to panel.
Reassemble Garmin stack and match drill rivet holes for brackets.
Worked to 0230. Update web site 3.25 hr
+ 0.5 hr doc
Finally finished carefully laying out the tray holes for the Garmin stack
brackets. It was a lot more work than it appears to be. Each
tray was done individually, then fastened into place to guide the fitting
for the next tray, to get the holes as accurate as possible.
Here is the assembled Garmin stack, ready to go back into the panel for
match drilling the brackets to the panel. Each tray had to be laid up,
marked, holes drilled as carefully and accurately as possible, then
assembled, then disassembled and do it all over again with the next tray.
I have a swivel-tip Craftsman screwdriver that is a big help in getting
those tray mount screws in and out.
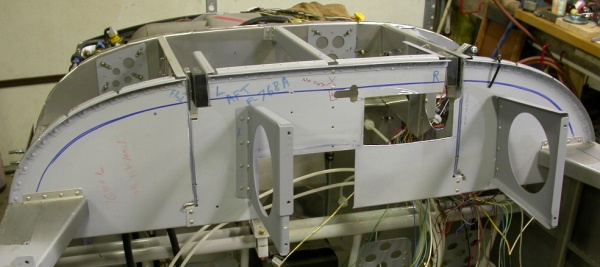
Here is the panel at this point. All the major avionics cutouts are
done, and the Garmin stack is match drilled to the panel and clecoed into
place. The thing sticking out in the LT back is the F745L extension,
for bracing the panel to the subpanel. I am waiting on an order for
more nutplates from Wicks, so I can finish the Garmin GNS530 brackets
installation. Next, I'll be putting in all the rest of the nutplates,
riveting the brackets to the panel, and riveting the top brace angle to the
top of the panel. You can see the highly attractive plywood flooring
the panel is sitting on. Scroll down a couple days to see what
it's being covered with.
Feb 8 - Received yet another Wicks order with
more nutplates
I need to finish this work. Work on various panel brackets; final
fitting, drilling, countersinking, and fitting for nutplates and rivets.
Remove F703B and F703Cs, panel flange angles, for deburring and
countersinking. Clean and prime all pieces. It's very cold in the
garage (in the teens) for painting, but it seems to work OK - I just take
the pieces and the spray can out there, spray them quickly, then hit them
with a heat gun for a couple minutes until the primer flashes, then bring it
all back into the house. Update web site
3.75 hr + 1.0 hr doc
Feb 9 - Cleco and rivet all panel pieces and
brackets. Only thing remaining is I forgot to enlarge the holes and
install the nutplates for the EIS and the F745R extension. Update web
site 1.75 hr + 0.5 hr doc
Here is the panel, with all the brackets, nutplates, and reinforcing angles
riveted on. After I do the EIS and F745R nutplates, I'll start looking
at indicators and cutting out the subpanel for the long trays.
Feb 10 - Update web site
0.5 hr doc
Got
it all riveted, and put the pieces in.
Blue Mountain EFIS/One primary, Grand Rapids EFIS secondary, Dynon as
backup instead of turn coordinator, Garmin GNS530 GPS, GMA340 audio, SL30
radio, GTX340 transponder, Grand Rapids EIS.
Warning indicators will go in the panel above the Blue Mountain, and the AOA
display will be hanging down from the glare shield where the black line is
above the Blue Mountain. That line marks the pilot centerline. Switches will
go in a subpanel below the main panel. Fuel select, MT prop controller, some
switches, and throttle quadrant will go in a console, maybe something like
Pete James'. The blank spaces on the RT and below the Garmin stack are
presently unallocated. I will probably decide to add a music-type
radio/player under the Garmin stack, but I'm still pondering that.
This is a tipup canopy, so both F745s had to be cut off and relocated. They
now are fastened on the LT by the 2 LT GRT fasteners and one screw in the LT
bracket for the 530 tray (you can see the screw hole). The RT F745 is
fastened with the upper RT Grand Rapids EIS fastener and the new hole above
it. The old F745R hole is below and to the LT of that. Being a tipup gives
good access between the panel & subpanel. Also, the skin between the
subpanel and firewall will have 2 top and 1 RT access panels cut in it, for
full access to all the avionics.
Everything was measured, laid out, and cut by hand, using a cutoff wheel in
my cordless drill, followed by plenty of filing. Experimental Panel Builder
site was a help in basic layout, Panel Planner software was too buggy &
other problems. The initial goal was to get the BMA as far to the LT as
possible, then fill in the rest as tight to that as I could get it. Layout
focus was more on functionality and access than on symmetry. The panel will
be painted flat or semi-flat black when I am done.
Barred Owl outside my house. I hear them frequently, but I haven't
seen one before.
Feb 11 - Clean tools out of house, both
because I am done working on just the panel, and just in time to clear out
for the hardwood flooring to go in. I've lived there 15 years with
just the plywood subflooring, and I am finally getting the first floor
flooring put in. No more working, drilling, cutting, etc in the house!
Cleaned up shop mess. Worked on cutting the holes in the subpanel for
the long trays. 6.75 hr
This is the start of the flooring. It's prefinished 3 5/8"
African Cherry
(aka Makore), laid
out diagonally in 4 directions from the center. The center is local
White Pine. No more shop work inside the house with this on the floor!
Feb 12 - trim cuts in subpanel and F745s for
fit, start making brackets to attach F745s to subpanel. Visit from Jon
Ard to look the plane over. 2.5 hr
Feb 13 - Update web site
0.5 hr doc
Feb 15 - been spending plane building time
watching the Olympics and its 5 minutes of ads every couple minutes.
Install & cleco subpanel bracket for F745R extension.
1.0 hr
Feb 16 - fit F745L subpanel bracket, prime
both brackets & F745 extensions. Balmy weather lately - temps in
50s. 1.0 hr
Feb 17 - rivet subpanel brackets to F745
extensions, clean up holes in subpanel, rivet F745 brackets to subpanel.
Planning for mounting BMA AHRS and GRT AHRS. Start fabricating bracket
to hold GRT AHRS. 4.75 hr
Here are the modified F745 extensions. You can see the vertical line
where they were cut off, then each moved over to the RT a few inches.
Here is the panel mounted to the fuselage and to the F745 extensions.
Everything fits nice & snug.
After much time spent pondering and trying different things, here is what I
ended up with for mounting the Blue Mountain AHRS computer. It's just
2 simple pieces of angle between the subpanel and the firewall. They
are temporarily held on by the 2 Cleco clamps indicated by the red arrows.
By using bolts at the mount points, I can remove the AHRS from either the
top or the bottom. The GRT AHRS will go to the RT (LT in pic) of this,
mounted to the RT F745 rib.
Feb 18 - went to auction of abandoned goods at storage facility.
Bought lots of tool bargains. Very windy & very cold.
Feb 19 - clean up house, put away tools from auction.
Watched Olympics, didn't get to plane. Also, it's been bitter
cold the last several days, so I haven't been real tempted to work in
garage..
Feb 20 - Update web site
1.0 hr doc
Feb 21 - work on fabricating GRT AHRS mount
bracket 1.5 hr
Feb 22 - more work on GRT AHRS mount bracket
2.25 hr
Here is the tray for the GRT AHRS. It will be mounted to the inboard
side of the RT F745 rib. The holes on the RT are for access to the
connectors. I will also be cutting lightening holes in it. This
is made from 0.040" 2024T3.
Feb 23 - Update web site
1.0 hr doc
Feb 27 - No work on plane. It's
been bitter cold (minus 10 this AM) the last few days. I've also been
busy finishing up the flooring job in the house and related cleanup & rearranging
things, and watching Olympics ad-fest. It's really annoying the
way they have 5 minutes of Olympics and 5 minutes of ads, plus they break up
each event, so you have to sit through 4 hours of the ads just to see the
events people really want to see, like Ohno in the short track and the
ladies figure skating. I should have just taped it & watched
later, skipping the ads. Update web site
0.5 hr doc
 This pic is looking down from the front top (aft-most) of a Garmin tray.
The fuzzy line on the LT of the pic is the RT side of the tray.
You can see how the bottom piece is inset a bit on the side, and sticks out
further than the rest of the tray. The face of that longest edge is
what the radio butts up against, and it supposed to be mounted so it's flush
with the face of the panel. That also means that the side and top
pieces do not come through the panel, so the cutout hole does not have to be
the distance from outside edge to outside edge, as I did it.
The cutout width should be from inside edge to
inside edge on the sides, and the cutout height should be outside bottom
edge to inside top edge. It sucks finding this out after
the fact. Hopefully, I can use the angle mount brackets to make up the
1/8" to 3/16" or so of slop I am left with at this point. The rest of
the cutouts (GRT EFIS and EIS) came out perfectly. I am still waiting
for BMA to send me back my new display. Supposedly, I will get it
tomorrow. Ordered some 1/2" aluminum angle from Wicks for the
rack mounts. I am using 3/4" on the 530, but I think the others will
need the more narrow angle, so I can get the slip-on captive nuts onto them
and over the hole. There won't be room on those others to use
nutplates, even the miniature MK ones, as all the screw holes are too close
together.
This pic is looking down from the front top (aft-most) of a Garmin tray.
The fuzzy line on the LT of the pic is the RT side of the tray.
You can see how the bottom piece is inset a bit on the side, and sticks out
further than the rest of the tray. The face of that longest edge is
what the radio butts up against, and it supposed to be mounted so it's flush
with the face of the panel. That also means that the side and top
pieces do not come through the panel, so the cutout hole does not have to be
the distance from outside edge to outside edge, as I did it.
The cutout width should be from inside edge to
inside edge on the sides, and the cutout height should be outside bottom
edge to inside top edge. It sucks finding this out after
the fact. Hopefully, I can use the angle mount brackets to make up the
1/8" to 3/16" or so of slop I am left with at this point. The rest of
the cutouts (GRT EFIS and EIS) came out perfectly. I am still waiting
for BMA to send me back my new display. Supposedly, I will get it
tomorrow. Ordered some 1/2" aluminum angle from Wicks for the
rack mounts. I am using 3/4" on the 530, but I think the others will
need the more narrow angle, so I can get the slip-on captive nuts onto them
and over the hole. There won't be room on those others to use
nutplates, even the miniature MK ones, as all the screw holes are too close
together.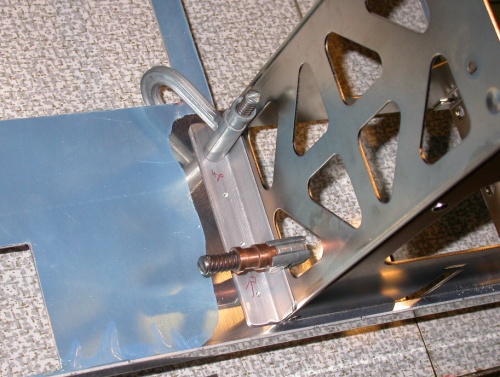 I am using the Garmin 530 tray in its hole to help guide the tray mount
brackets to exactly where they need to be. Having the hole cut to the
outside edges of the tray (as opposed to the inside edges, which would be
the minimum necessary) made the mating of the brackets easier. The
tray was firmly in place on the inside of the cutout, and I just clamped the
brackets to that & match drilled the brackets to the panel.
I am using the Garmin 530 tray in its hole to help guide the tray mount
brackets to exactly where they need to be. Having the hole cut to the
outside edges of the tray (as opposed to the inside edges, which would be
the minimum necessary) made the mating of the brackets easier. The
tray was firmly in place on the inside of the cutout, and I just clamped the
brackets to that & match drilled the brackets to the panel.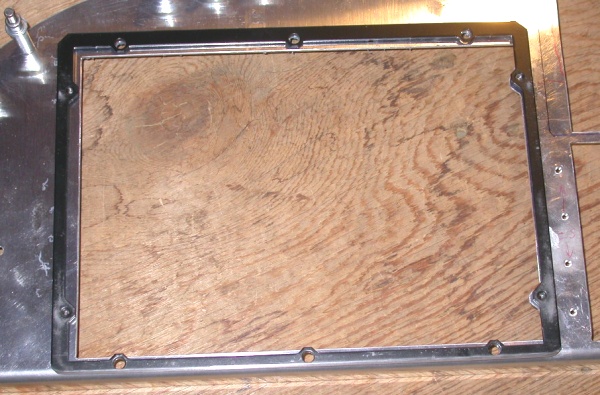 This
shows how the BMA backing plate shows how to cut out the display, once
you've carefully located it. Top, bottom, and LT cut straight lines to
the IN side of the screw tabs. On the RT, follow the plate exactly.
Perfect results. You can see I've got the backing plate shoved down as
far as possible, and I even had to trim and radius it, so it would fit into
the radius of the flange at the bottom of the panel.
This
shows how the BMA backing plate shows how to cut out the display, once
you've carefully located it. Top, bottom, and LT cut straight lines to
the IN side of the screw tabs. On the RT, follow the plate exactly.
Perfect results. You can see I've got the backing plate shoved down as
far as possible, and I even had to trim and radius it, so it would fit into
the radius of the flange at the bottom of the panel.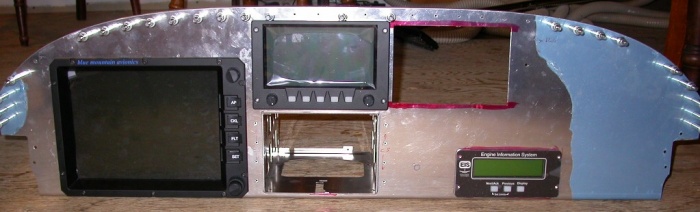 Here is a picture of the partially populated panel, after I got the BMA
display mounted. Under the GRT EFIS (upper center) is the rack for the
Garmin GNS530, and to the RT of that is the yet-uncut Dynon hole (centered
on the little blue circle), and to the RT of that is the GRT EIS. To
the RT of the GRT is the Garmin radio stack hole. I haven't finished
fitting the hole to the trays there yet. Most or all switches will go
on a subpanel mounted to the bottom of the bottom panel flange.
Important indicators, like the AOA display, DVM, and low fuel quantity and
pressure warning lights, will go in the space above the BMA EFIS. The
rest of the panel is presently unallocated.
Here is a picture of the partially populated panel, after I got the BMA
display mounted. Under the GRT EFIS (upper center) is the rack for the
Garmin GNS530, and to the RT of that is the yet-uncut Dynon hole (centered
on the little blue circle), and to the RT of that is the GRT EIS. To
the RT of the GRT is the Garmin radio stack hole. I haven't finished
fitting the hole to the trays there yet. Most or all switches will go
on a subpanel mounted to the bottom of the bottom panel flange.
Important indicators, like the AOA display, DVM, and low fuel quantity and
pressure warning lights, will go in the space above the BMA EFIS. The
rest of the panel is presently unallocated.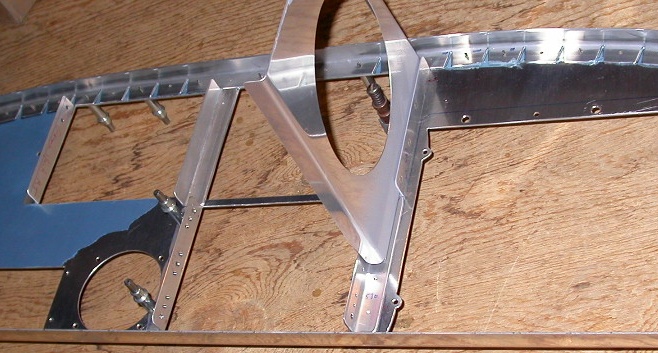 Here is the F745L extension, showing where it is located and how it is
fastened. There is less than 1/16" clearance on either side, so it's a
perfect fit. On the bottom, a screw goes through the panel, through
the Garmin 530 mount bracket, and into a nutplate on the F745L extension.
The F745L extension is held in place on top by the 2 mount screws for the
GRT EFIS. The screw goes through the GRT, through the panel, through
the upper angle, and to a nutplate on the inside of the F745L extension.
The upper angle is held to the F745L extension by the nutplate rivets, as
well as about 6 other rivets on both legs of the angle. You can also
see the RT 530 bracket, as well as the 2 brackets for the Garmin stack.
The LT Garmin stack angle bracket also serves as the placement for the 2
nutplates for the RT side of the GRT EFIS. Lots of carefully thought
out overlapping & tight clearances, but it does seem to be coming together
OK. The LT Garmin 530 bracket had zero clearance to the BMA display,
so I ground that leg a bit (RT in pic) so now there's about 1/16" clearance.
Here is the F745L extension, showing where it is located and how it is
fastened. There is less than 1/16" clearance on either side, so it's a
perfect fit. On the bottom, a screw goes through the panel, through
the Garmin 530 mount bracket, and into a nutplate on the F745L extension.
The F745L extension is held in place on top by the 2 mount screws for the
GRT EFIS. The screw goes through the GRT, through the panel, through
the upper angle, and to a nutplate on the inside of the F745L extension.
The upper angle is held to the F745L extension by the nutplate rivets, as
well as about 6 other rivets on both legs of the angle. You can also
see the RT 530 bracket, as well as the 2 brackets for the Garmin stack.
The LT Garmin stack angle bracket also serves as the placement for the 2
nutplates for the RT side of the GRT EFIS. Lots of carefully thought
out overlapping & tight clearances, but it does seem to be coming together
OK. The LT Garmin 530 bracket had zero clearance to the BMA display,
so I ground that leg a bit (RT in pic) so now there's about 1/16" clearance.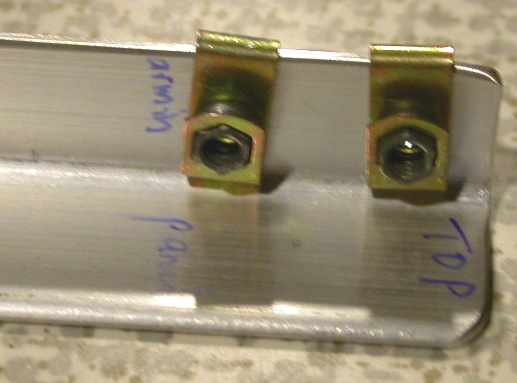 These
clipnuts worked really well. Eckhard gave them to me. He said
they come from Bendix King install kits. They worked perfectly
here, after I trimmed about 0.100" off the angle leg. They want a #19 hole
to sit in. I had a slightly smaller hole for #6 screws before (5/32"),
but the clipnuts didn't sit in them as well as they do now.
These
clipnuts worked really well. Eckhard gave them to me. He said
they come from Bendix King install kits. They worked perfectly
here, after I trimmed about 0.100" off the angle leg. They want a #19 hole
to sit in. I had a slightly smaller hole for #6 screws before (5/32"),
but the clipnuts didn't sit in them as well as they do now. Finally finished carefully laying out the tray holes for the Garmin stack
brackets. It was a lot more work than it appears to be. Each
tray was done individually, then fastened into place to guide the fitting
for the next tray, to get the holes as accurate as possible.
Finally finished carefully laying out the tray holes for the Garmin stack
brackets. It was a lot more work than it appears to be. Each
tray was done individually, then fastened into place to guide the fitting
for the next tray, to get the holes as accurate as possible.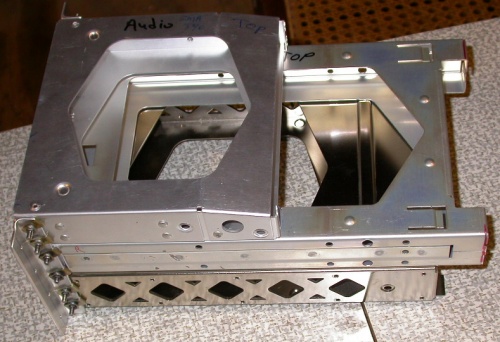 Here is the assembled Garmin stack, ready to go back into the panel for
match drilling the brackets to the panel. Each tray had to be laid up,
marked, holes drilled as carefully and accurately as possible, then
assembled, then disassembled and do it all over again with the next tray.
I have a swivel-tip Craftsman screwdriver that is a big help in getting
those tray mount screws in and out.
Here is the assembled Garmin stack, ready to go back into the panel for
match drilling the brackets to the panel. Each tray had to be laid up,
marked, holes drilled as carefully and accurately as possible, then
assembled, then disassembled and do it all over again with the next tray.
I have a swivel-tip Craftsman screwdriver that is a big help in getting
those tray mount screws in and out.  Here is the panel at this point. All the major avionics cutouts are
done, and the Garmin stack is match drilled to the panel and clecoed into
place. The thing sticking out in the LT back is the F745L extension,
for bracing the panel to the subpanel. I am waiting on an order for
more nutplates from Wicks, so I can finish the Garmin GNS530 brackets
installation. Next, I'll be putting in all the rest of the nutplates,
riveting the brackets to the panel, and riveting the top brace angle to the
top of the panel. You can see the highly attractive plywood flooring
the panel is sitting on. Scroll down a couple days to see what
it's being covered with.
Here is the panel at this point. All the major avionics cutouts are
done, and the Garmin stack is match drilled to the panel and clecoed into
place. The thing sticking out in the LT back is the F745L extension,
for bracing the panel to the subpanel. I am waiting on an order for
more nutplates from Wicks, so I can finish the Garmin GNS530 brackets
installation. Next, I'll be putting in all the rest of the nutplates,
riveting the brackets to the panel, and riveting the top brace angle to the
top of the panel. You can see the highly attractive plywood flooring
the panel is sitting on. Scroll down a couple days to see what
it's being covered with.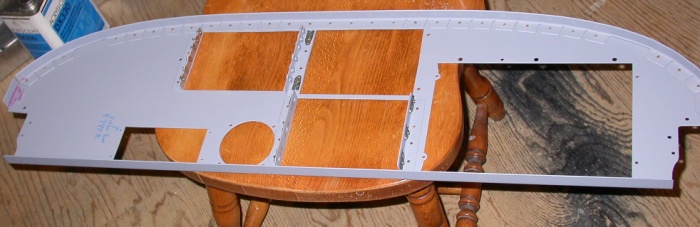 Here is the panel, with all the brackets, nutplates, and reinforcing angles
riveted on. After I do the EIS and F745R nutplates, I'll start looking
at indicators and cutting out the subpanel for the long trays.
Here is the panel, with all the brackets, nutplates, and reinforcing angles
riveted on. After I do the EIS and F745R nutplates, I'll start looking
at indicators and cutting out the subpanel for the long trays.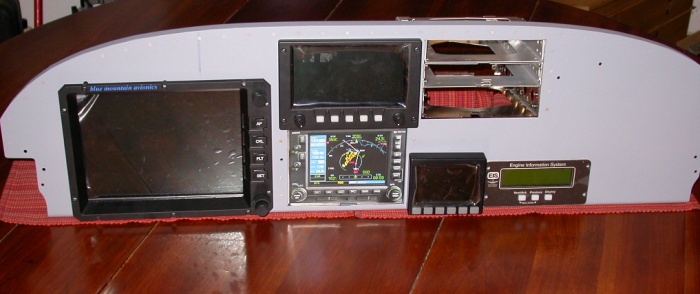 Got
it all riveted, and put the pieces in.
Got
it all riveted, and put the pieces in. 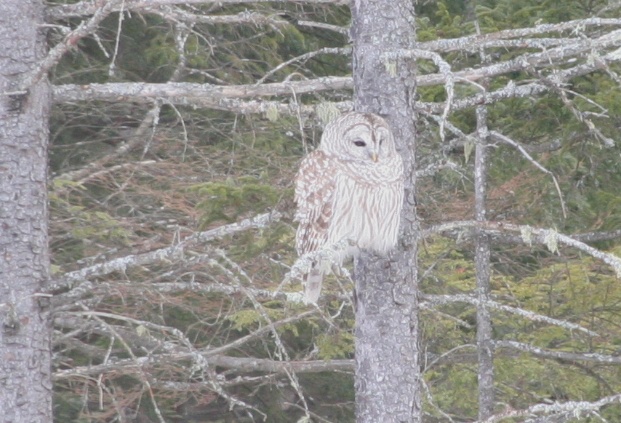 Barred Owl outside my house. I hear them frequently, but I haven't
seen one before.
Barred Owl outside my house. I hear them frequently, but I haven't
seen one before.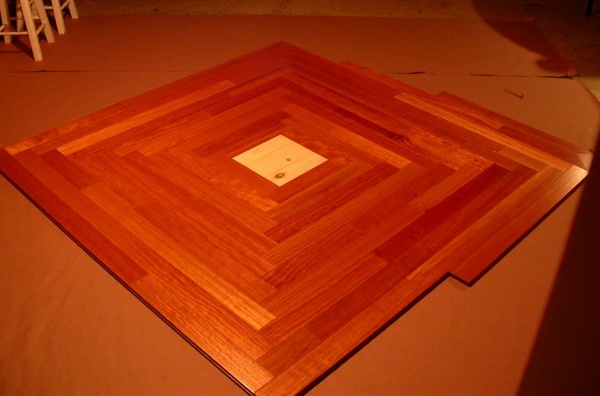 This is the start of the flooring. It's prefinished 3 5/8"
 Here are the modified F745 extensions. You can see the vertical line
where they were cut off, then each moved over to the RT a few inches.
Here are the modified F745 extensions. You can see the vertical line
where they were cut off, then each moved over to the RT a few inches.
 Here is the panel mounted to the fuselage and to the F745 extensions.
Everything fits nice & snug.
Here is the panel mounted to the fuselage and to the F745 extensions.
Everything fits nice & snug.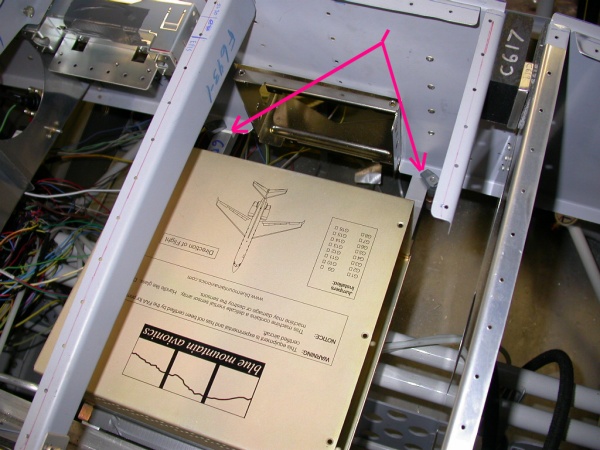 After much time spent pondering and trying different things, here is what I
ended up with for mounting the Blue Mountain AHRS computer. It's just
2 simple pieces of angle between the subpanel and the firewall. They
are temporarily held on by the 2 Cleco clamps indicated by the red arrows.
By using bolts at the mount points, I can remove the AHRS from either the
top or the bottom. The GRT AHRS will go to the RT (LT in pic) of this,
mounted to the RT F745 rib.
After much time spent pondering and trying different things, here is what I
ended up with for mounting the Blue Mountain AHRS computer. It's just
2 simple pieces of angle between the subpanel and the firewall. They
are temporarily held on by the 2 Cleco clamps indicated by the red arrows.
By using bolts at the mount points, I can remove the AHRS from either the
top or the bottom. The GRT AHRS will go to the RT (LT in pic) of this,
mounted to the RT F745 rib.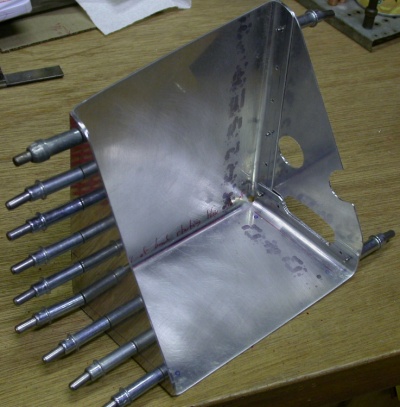 Here is the tray for the GRT AHRS. It will be mounted to the inboard
side of the RT F745 rib. The holes on the RT are for access to the
connectors. I will also be cutting lightening holes in it. This
is made from 0.040" 2024T3.
Here is the tray for the GRT AHRS. It will be mounted to the inboard
side of the RT F745 rib. The holes on the RT are for access to the
connectors. I will also be cutting lightening holes in it. This
is made from 0.040" 2024T3.