A lot of what I am doing right now is wiring related toward
getting the engine ready to start. If it's strictly engine wiring, it
on this page. If it's more general supporting wiring, it's on the
avionics/electric page, so be sure to check
there for details.
Jan 5 - install bulkhead fittings
for fuel return lines. Modified old 2-stroke race bike engine leakdown
tester to pressure test fuel lines. Pressure tested both sides.
Both sides are losing about 0.2 psi per minute. Very slow leak, but I
don't know where it's coming from. Perhaps it's my testing equipment.
2.0 hr
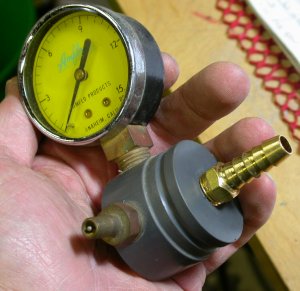
This is part of a leakdown testing system we used to use on our 2-stroke
motocross bikes for racing in the Mojave Desert. It's designed to plug
into a carb manifold. I added the barbed fitting, so I can pressurize
the fuel lines and check for leaks.
This is the leakdown test system. Here. I have pressurized the LT
return line and I'm checking for the pressure leaking down. I did get
about 0.2 psi leakdown per minute, but I could find no leaks.
Perhaps it was leaking back through the pump checkvalves? Anyway, no
leaks found.
Jan 7 - back to pressure testing
fuel system, after working on fuel valve and
electrics a bit more. I used a 50/50
mix of dish soap and water to test for leaks. I could find none,
although when I pressurize one side or the other, I lose about 0.2 psi per
minute. Gave up on it and decided that I'd just put the fuel to it and
then check for any seeping. Powered up both fuel pumps, separately and
together. They seem to work fine, although the main pump seems quieter
and smoother than the aux pump. It's distinctly louder and there's
what sounds like a cavitation noise when both pumps are on.
Pumping seems fine, though, and no leaks or seeping anywhere.
Reinstalled spark plugs and torqued to 180 in lb. Reinstalled coils
and torqued to 140 in lb. FIRED UP THE
ENGINE AT 1810 JAN 7. It started immediately and ran smoothly.
Checked oil pressure at 97 psi and oil temps at 70 degrees and rising.
Ran it a couple minutes and shut it down. I'm also very pleased with
the simplified and bulletproof electric
and engine control system I designed (block diagram
here). See
here for complete current electric
drawings summary. As long as the
locking ECM switch and one or more of the locking pump switches are on, the
engine runs, regardless of the state of any other switches or the primary or
aux contactor. Later on, worked on mounting mufflers for a
couple hours. 4.75 hr
Here is the temporary fuel supply system, feeding the LT side. Works
great!
Jan 8 - Mickey on the Egenfellner
list says he too is getting that cavitation sound when both pumps are on and
the engine is off. In the evening, I tried raising
the gas can up to the height of where the wing tanks would be, to see if
that helps with the cavitation sound. It did seem to help, so that's
resolved. I haven't heard back from Mickey yet as to whether or not he
was using a gas can on the ground, which was the cause of my problems with
noise. 0.25 hr
Jan 9 - Another Eggenfellner user
on the list says he tossed the SuperTrapp mufflers and went with ordinary
straight-thru glasspack mufflers. He said he got less cockpit noise
with them, and no issues with them clogging. The SuperTrapps,
especially with fiberglass packing, seem to have a problem with the packing
breaking down and clogging the muffler. Some of us got stainless steel
wool to use as packing, but Jerry, the other user, says he also got less
noise with his glasspacks, and he feels the SuperTrapps do not work well in
this application. I am just now mounting my mufflers, so if I am going
to replace them with something else, now would be the time to do it.
Didn't do much on plane tonight. I was pondering my next moves.
I am unsure what to do about the mufflers. I was just about to install
the SuperTrapps, but now I am wondering if I should switch to Cherry Bomb
glasspacks or spend the big bucks and get the lightweight stainless steel
mufflers from
Burns Stainless. Another user said the Burns ones are pretty loud,
though. And they are about $250 each! That's 10 times the price
of a Cherry Bomb.
Jan 10 - decided in "invest" in a
couple $25 Cherry Bomb glasspack mufflers, and temporarily install them to see
how they look and sound, compared to the SuperTrapps. Went to a
muffler shop and had them make me a couple adapters to go from the 1.75" s/s
tubing to the 2.25" Cherry Bombs. Reinstalled SuperTrapps and ran
engine briefly, to note the sound. Removed SuperTrapps and installed
Cherry Bombs, and ran engine a few minutes. "Seat of pants" seems to
indicate roughly equal noise levels. Perhaps I should invest in a
sound meter. The Cherry Bombs are longer and, with the extension pipes
I will be using regardless of which mufflers I use, the exhaust exit is
behind the wing spar. I am concerned about having those pipes and
mufflers hanging out there into the airstream, but I guess I have no choice
at this time. There seems to be a "buzzing" type vibration when the
engine is running. I will ask the Eggenfellner list about it, and I
will have Gary Newsted check it out next week, when he comes up to do my
Installation Inspection. Ran engine a few minutes, until oil temps
rose to 125 degrees. The battery is not charging. First realized
my alternator B cable is not connected to the contactor, then realized I
also have to finish wiring the Molex connector on the Perihelion LOVP module
for the alternator field circuit to be complete.
3.25 hr + 1.0 hr doc
Gary Newsted is now VP at Eggenfellner, and he will be
addressing the outstanding issues with the STi users, including what I see
as the biggest problem; the fuel injection system control system, which is
pretty klugey right now. That's very good news.
Jan 11 - Ziggy on the
Eggenfellner STi list reported problems with his SuperTrapp mufflers, and
says he does not recommend them. That about clinches it for me and the
Cherry Bombs. Worked a few hours in the evening mounting the Cherry
Bombs and adapters. 2.5 hr
Jan 12 - welded adapters onto Cherry Bomb
mufflers and installed them. 0.5 hr
Here are the Cherry Bomb mufflers. I still need to make up something
to support them. I am trying now to decide if I want to support them
fwd or aft of the spar, and if I want 1 support or 2. They are close
enough together that I could use one support in the middle.
Jan 13 - pondering how to support mufflers.
Turns out that the s/s round clamps that were for the SuperTrapp mufflers
are a perfect fit on the Cherry Bombs. I thought they'd be too big;
the SuperTrapps look larger in diameter. So, I used them,
although I modified them a bit to better clamp and support the mufflers.
Made load distribution plates and support bushings for the Lord mounts.
I chose to use a separate mount for each muffler for several reasons.
First, there's less load on each Lord mount, so less likely to fail.
Second, if one lets go, it doesn't affect both sides. Third, there is
much more clearance on the floor for installing the Lord mounts offset to
each side than to try to get them into the center, whether fwd or aft of the
spar. Fwd of the spar, the fuel valve and plumbing are in the way.
Aft of the spar, the elevator control rod is in the way.
5.0 hr
Jan 14 - finish fabricating and installing
muffler supports. I just need to get some 3/8" locknuts for the
support bolts, and I'll be all set. See my
July 16, '05 engine page for my previous
views of muffler installations. Clean up workbench.
6.0 hr
I made my muffler hanger Lord mounts so they are suspended above the floor,
on a 0.062" reinforcing plate, similar to how Larry Simpson did it for his
H6. This way it avoids having to cut big 2" holes in the floor, and
even if a Lord mount fails, nothing can fall from the plane. Larry did
his mount bolts all the way through the plate and the floor, while my setup
uses flathead screws which only go through the plate. See my
July 20, '05 page for pics &
descriptions of others' installations Perhaps the added drag of
having the bolt heads on the bottom of the fuselage skin is negligible
compared to having the pipes, mufflers, and attach bolts out there in the
airstream, so maybe it doesn't matter. Since the bottom of the plate
is countersunk, I could drill the 4 holes through the floor and dimple them.
But I think it's fine like this.
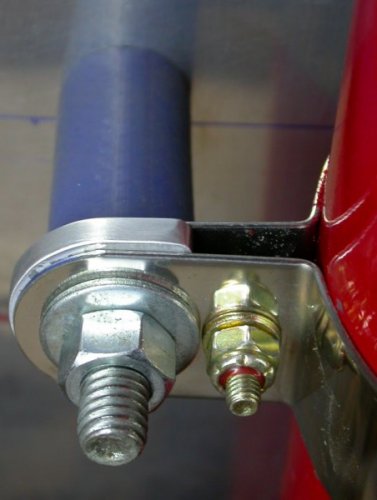
This is how I did the muffler hangers on the bottom. If you try to use
the big 3/8" bolt to both hang the muffler and clamp it tightly, it doesn't
do either job as well as using the 3/8" bolt to hang the muffler and a
separate AN3 bolt, closer to the point where you want to squeeze it tight
against the muffler, to clamp the muffler tight. You want the clamp
tight, because if it isn't, then it can rotate on the muffler and cause the
clamp flange-to-skin distance to change, thus affecting how much play there
is in the system. I then made a spacer from 3/16" aluminum stock to
keep the clamp flange ends from squeezing together and bending the clamp.
The red is the muffler. The blue is silicone 1/2" heater hose, over
the 3/8" bolt, about 1/8" longer than the distance between the fuselage
bottom skin and the (parallel) flange on the clamp. This keeps it
snug, yet allows slight movement. That stainless steel muffler clamp
was a bitch to drill - I ruined two new #40 bits, then did it with a carbide
drill. The nut will be replaced with a locknut when I get one.
The bolt is just a hardware store item, but even a hardware store 3/8" bolt
ought to be way more than enough to hold a 4 pound muffler. At any
rate, I am ordering AN6 bolts and locking nuts for this.
Jan 16 - update web site
1.0 hr doc
Jan 18 - it's been bitter cold (below zero)
the last few days, so I haven't worked on the plane. We had an ice
storm on the 15th, and southern NH (including Gary Newsted) has been without
power since then. Gary came up to do my Eggenfellner Installation
Inspection before he leaves for Florida to be Eggenfellner Aircraft Vice
President. It was quite an extensive inspection, and lasted about 6
hours. Gary recommended a couple changes with the muffler supports.
He thought I should run the 4 screws on each Lord mount all the way through
the floor, so the plate is clamped to the floor. I don’t need to rivet
the plate to the floor, but he also suggested some RTV between the plate and
the floor, to dampen any slight movement. The buzzing vibration I’d
mentioned earlier was due to exhaust vibration, and Gary thought the engine
ran fine. He suggested tying the muffler support plates into the floor
support angles on each side of each plate. This will lessen the stress
on the floor rivets, and make them less likely to pull out. He would
also like me to do a more firm connection between the extension pipes and
the muffler adapters, so I will weld that. He felt that the one loose
connector (Jan’s clamp & pin setup) at each header was all the play I need,
and I don't need the same relatively loose clamp & pin arrangement at the
header extension/muffler adapter junction. Gary really liked the
extensions I used. It puts the sound and exhaust further back. I
had ordered AN6 bolts and castle nuts yesterday afternoon from Wicks and got
them already today, so I'll soon be updating the 3/8" bolts on the mufflers.
As per suggestion from Carsten, I should probably also put castle nuts on
the AN3 clamping bolts.
The engine ran great, and Gary helped me tweak some of the EIS settings.
We also discovered that the fuel pressure sensor won’t work unless it is
GROUNDED. I need to add a ground wire to mine. We confirmed the
calibration of the fuel pressure sender with a gage Gary had with him, then
we adjusted the fuel pressure from over 40 static to 35 static and 25 at
idle. We confirmed that the fuel pressure increased when the vacuum
line was removed. I need to redo my fuel pumps ground (currently both
pumps and the heater are sharing the same ground wire - seemed like a fine
idea at the time). Gary also had lots of other
suggestions and tips, even though
my plane wasn’t complete enough to check many of the things he would
normally check. We joked that my “percent complete” was 80% when he
arrived and 65% when he left. It was all helpful and informative.
It was so cold, I used up about 40 pounds of LP gas, heating the garage
during the inspection. 6.0 hr
Jan 19 - Gary sent me his extensive Inspection
Review. He estimates that I am 60% done. Yikes! He says
there is a LOT more left to do. Redid fuel pumps and heater ground
wires. Reinstalled supercharger belt and tensioner rod. Added
rubber boots to fuel pumps + terminals. Added a second engine ground
strap. Torqued intake manifold bolt to 215 in lb.
2.5 hr
Jan 20 - finished up rewiring fuel pumps and
heater grounds. 2.0 hr
Jan 21 - Remove mufflers and look into bending
them down some, as per Gary's recommendation. Made persuader bar from
1.5" water pipe to be a nice slip fit inside headers. Spun engine with
starter (and ECM and fuel pumps off) to make sure supercharger belt
alignment seemed basically OK. Started engine - quite a bit of noise
from the supercharger. Tested LOVP
system and confirmed that alternator is charging. Indicated idle (EIS
tach value needs trimming, I know) was 1420 and dropped to 1240 when I
switched on main contactor (thus energizing LOVP module and turning on the
alternator). Voltage jumped up to 13.8. All good. The
supercharger belt tracks at the aft end of the drive pulley, and is right in
the center of the driven pulley. The "supercharger howl" is about as
loud as the exhaust sound. Part of it may be because I have no
plumbing installed from the supercharger to the intercooler. After
heating up engine and headers to about 160 degrees water temp, shut engine
down and used water pipe to bend the headers down for more muffler
clearance. Reinstalled mufflers. Fit is much better now, but I
will need to readjust the muffler mount clamps a bit.
3.5 hr
After running the engine awhile, this is the resulting belt alignment.
Looks fine to me, and Robert says to not get too concerned about belt
alignment on cogged belts, anyway. Some people on the STi list were
talking about a lot of screwing around they had to do to get good alignment.
Mine looks fine. Right in the center of the driven pulley, and at the
aft end (to LT in pic) on the drive pulley.
Here is a closeup of the drive pulley, looking from the center outboard
toward the RT (fwd is LT in pic). Looks good to me. The
hazy shadow in the background is the supercharger driven pulley.
Here is the setup for bending the headers. I was not at all
comfortable with just reefing on them, as I was concerned about too much
stress on the manifold and header flange. So, I used a floor jack and
a chunk of firewood to support the header where the brace is welded on (see
circle for view of where you'd do it on the LT side). This will focus
the bending between there and the end of the header. It will also
prevent most bending forces from acting on the header mount flange.
The black pipe is a 4-5 foot long piece of 1.5" iron water pipe, with the
end ground down a bit so it's a nice slip fit inside the headers. You
want the fit to be as close as possible to the ID of the header, so you
don't distort the roundness of the end of the header when you crank on it.
And you want to insert it as far as possible into the header; at least a
couple inches. I bent the RT side down from 3.7" at the aft end of the
pipe to 4.7", which should give me about 1/2" at the muffler. Then I
bent the LT side down to match that. The LT side had been higher than
the RT side; only a couple inches at the aft end of the pipe. The
mufflers seem to have ideal (and identical) clearance to the floor now.
I highly recommend supporting the headers somehow if you decide to bend
them. They do bend OK, especially when hot.
The engine heat melted the cheap paint on the Cherry Bombs. I need to
slide the 2 s/s clamps a bit aft after the header bending. The clamps
were completely bonded to the mufflers, and I had to use a Mapp gas torch to
heat everything up to get the clamps off. This will all get nicely
painted or powder-coated when I am done with it.
Here is a good pic of the complete fuel pumps setup, the heater, and the RT
muffler hanger. I will be securing those fuel and brake lines, once I
make a cover for the fuel pumps area. I will also be adding a small
vent/drain hole in the floor, under the Andair valve, as per Gary's
suggestion.
Jan 22 - Gary, Randy, and Robert all say not
to worry about the SC noise - it will lessen after I install the plumbing.
Robert also says the belt alignment is fine. Gary is being a big help
in getting the STi group moving toward completion, and in providing us info
on the whole fuel injection/mixture situation. Didn't work on plane,
cuz it's TOO COLD. Instead, I've been updating my
electrical drawings with all the work
completed and changes made. Update web site
1.0 hr doc
Jan 25 - Robert Paisley is producing a wide
band oxygen sensor & display kit, so I looked into that some.
Eggenfellner is now recommending a air/fuel mixture display in the cockpit.
A few other companies also make them, but it's been confusing so far as to
what I'd get. While Robert's is quite expensive, at least I can be
sure it's exactly what I need for this.
Jan 28 - remove throttle quadrant top to send
out for engraving by
Full Throttle
Concepts. They had the best prices of 3 vendors I contacted.
0.25 hr
Jan 29 - still hashing out on the STi list
exactly what I do and don't need to do in order to install the air/fuel
ratio meter. My exhaust and intercooler installations are on hold
until that gets settled, as I may need to pull off one header and get
another bung welded into it. It's also been very cold (average about
zero F), so I've been working on panel- and electrical-related stuff in the
house, instead of heating up the garage.
This
is the local porcupine in his protective posture on the ground in front of
my house.
Jan 30 - exchanged some emails with Pete Krok
out in CA, who has tried the Innovate air/fuel sensor. He had some
problems with RF interference with his, and Innovate support has been
helping him with that. But he says, and I tend to agree, that a
full-time a/f meter is not necessary, anyway. All we use it for is to
get the fuel pressure set right, then we leave it alone. So why spend
all that time and money for that? I will borrow a portable
laptop-based system Pete has, after I get my prop installed and can do full
power runups. So, if it ever warms up a tad around here, I will
proceed with my mufflers installation.
Jan 31 - Jan tells me on the STi list that my
current two oxy sensors are redundant for car emissions control, and that I
can cut the wires going to one sensor, and run those wires to the same leads
on the other sensor, this freeing up a sensor bung if I want to. At
this point, I am satisfied that I can do Jan's suggestion and/or Pete Krok's
solution, so I am no longer going to worry about whether or not I need to
pull a header to install another bung. I will be proceeding with the
permanent mufflers installation as soon as possible.
 This is part of a leakdown testing system we used to use on our 2-stroke
motocross bikes for racing in the Mojave Desert. It's designed to plug
into a carb manifold. I added the barbed fitting, so I can pressurize
the fuel lines and check for leaks.
This is part of a leakdown testing system we used to use on our 2-stroke
motocross bikes for racing in the Mojave Desert. It's designed to plug
into a carb manifold. I added the barbed fitting, so I can pressurize
the fuel lines and check for leaks.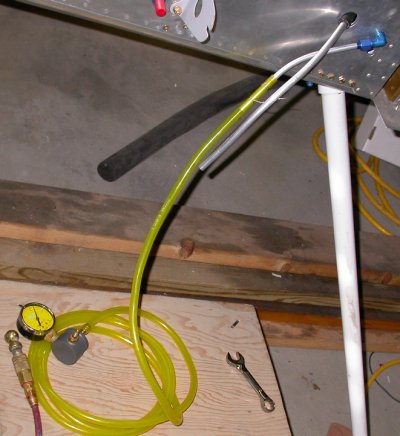 This is the leakdown test system. Here. I have pressurized the LT
return line and I'm checking for the pressure leaking down. I did get
about 0.2 psi leakdown per minute, but I could find no leaks.
Perhaps it was leaking back through the pump checkvalves? Anyway, no
leaks found.
This is the leakdown test system. Here. I have pressurized the LT
return line and I'm checking for the pressure leaking down. I did get
about 0.2 psi leakdown per minute, but I could find no leaks.
Perhaps it was leaking back through the pump checkvalves? Anyway, no
leaks found.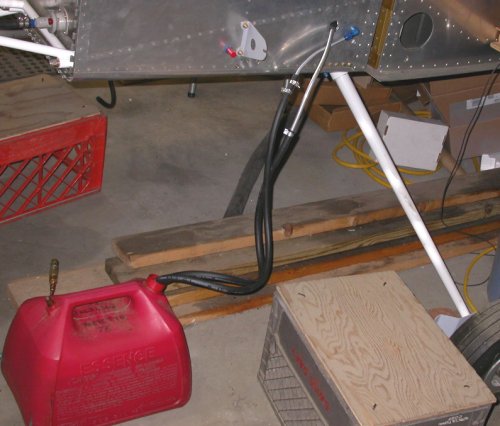 Here is the temporary fuel supply system, feeding the LT side. Works
great!
Here is the temporary fuel supply system, feeding the LT side. Works
great! 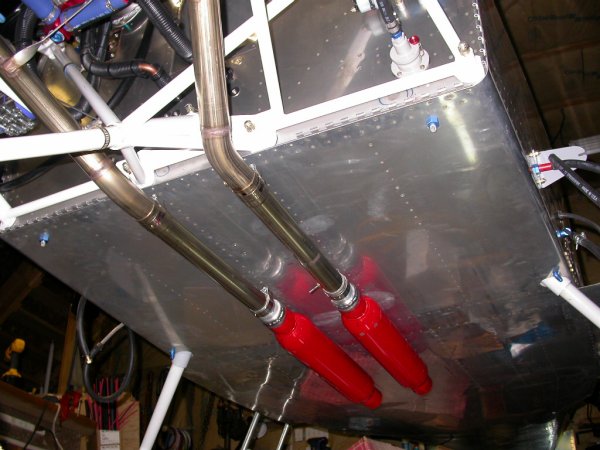 Here are the Cherry Bomb mufflers. I still need to make up something
to support them. I am trying now to decide if I want to support them
fwd or aft of the spar, and if I want 1 support or 2. They are close
enough together that I could use one support in the middle.
Here are the Cherry Bomb mufflers. I still need to make up something
to support them. I am trying now to decide if I want to support them
fwd or aft of the spar, and if I want 1 support or 2. They are close
enough together that I could use one support in the middle.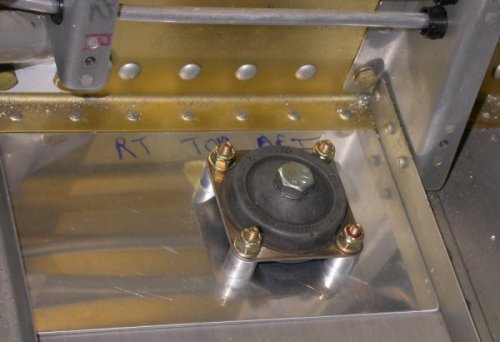 I made my muffler hanger Lord mounts so they are suspended above the floor,
on a 0.062" reinforcing plate, similar to how Larry Simpson did it for his
H6. This way it avoids having to cut big 2" holes in the floor, and
even if a Lord mount fails, nothing can fall from the plane. Larry did
his mount bolts all the way through the plate and the floor, while my setup
uses flathead screws which only go through the plate. See my
I made my muffler hanger Lord mounts so they are suspended above the floor,
on a 0.062" reinforcing plate, similar to how Larry Simpson did it for his
H6. This way it avoids having to cut big 2" holes in the floor, and
even if a Lord mount fails, nothing can fall from the plane. Larry did
his mount bolts all the way through the plate and the floor, while my setup
uses flathead screws which only go through the plate. See my
 This is how I did the muffler hangers on the bottom. If you try to use
the big 3/8" bolt to both hang the muffler and clamp it tightly, it doesn't
do either job as well as using the 3/8" bolt to hang the muffler and a
separate AN3 bolt, closer to the point where you want to squeeze it tight
against the muffler, to clamp the muffler tight. You want the clamp
tight, because if it isn't, then it can rotate on the muffler and cause the
clamp flange-to-skin distance to change, thus affecting how much play there
is in the system. I then made a spacer from 3/16" aluminum stock to
keep the clamp flange ends from squeezing together and bending the clamp.
The red is the muffler. The blue is silicone 1/2" heater hose, over
the 3/8" bolt, about 1/8" longer than the distance between the fuselage
bottom skin and the (parallel) flange on the clamp. This keeps it
snug, yet allows slight movement. That stainless steel muffler clamp
was a bitch to drill - I ruined two new #40 bits, then did it with a carbide
drill. The nut will be replaced with a locknut when I get one.
The bolt is just a hardware store item, but even a hardware store 3/8" bolt
ought to be way more than enough to hold a 4 pound muffler. At any
rate, I am ordering AN6 bolts and locking nuts for this.
This is how I did the muffler hangers on the bottom. If you try to use
the big 3/8" bolt to both hang the muffler and clamp it tightly, it doesn't
do either job as well as using the 3/8" bolt to hang the muffler and a
separate AN3 bolt, closer to the point where you want to squeeze it tight
against the muffler, to clamp the muffler tight. You want the clamp
tight, because if it isn't, then it can rotate on the muffler and cause the
clamp flange-to-skin distance to change, thus affecting how much play there
is in the system. I then made a spacer from 3/16" aluminum stock to
keep the clamp flange ends from squeezing together and bending the clamp.
The red is the muffler. The blue is silicone 1/2" heater hose, over
the 3/8" bolt, about 1/8" longer than the distance between the fuselage
bottom skin and the (parallel) flange on the clamp. This keeps it
snug, yet allows slight movement. That stainless steel muffler clamp
was a bitch to drill - I ruined two new #40 bits, then did it with a carbide
drill. The nut will be replaced with a locknut when I get one.
The bolt is just a hardware store item, but even a hardware store 3/8" bolt
ought to be way more than enough to hold a 4 pound muffler. At any
rate, I am ordering AN6 bolts and locking nuts for this.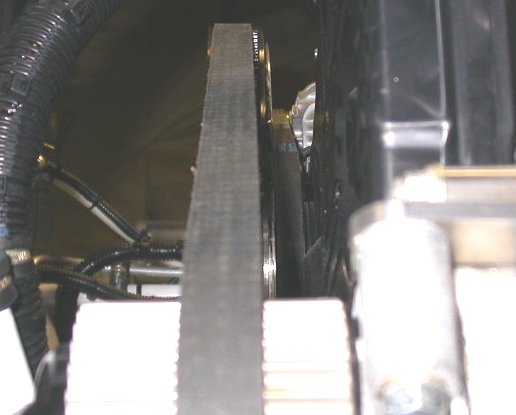 After running the engine awhile, this is the resulting belt alignment.
Looks fine to me, and Robert says to not get too concerned about belt
alignment on cogged belts, anyway. Some people on the
After running the engine awhile, this is the resulting belt alignment.
Looks fine to me, and Robert says to not get too concerned about belt
alignment on cogged belts, anyway. Some people on the 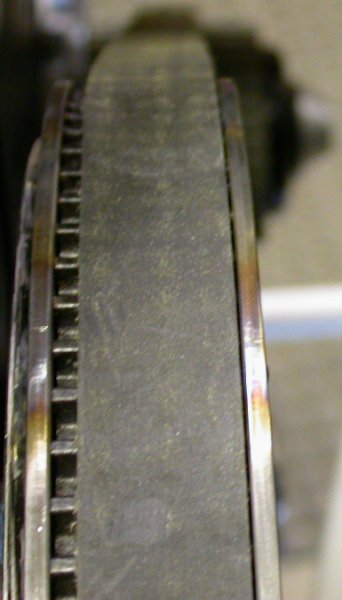 Here is a closeup of the drive pulley, looking from the center outboard
toward the RT (fwd is LT in pic). Looks good to me. The
hazy shadow in the background is the supercharger driven pulley.
Here is a closeup of the drive pulley, looking from the center outboard
toward the RT (fwd is LT in pic). Looks good to me. The
hazy shadow in the background is the supercharger driven pulley.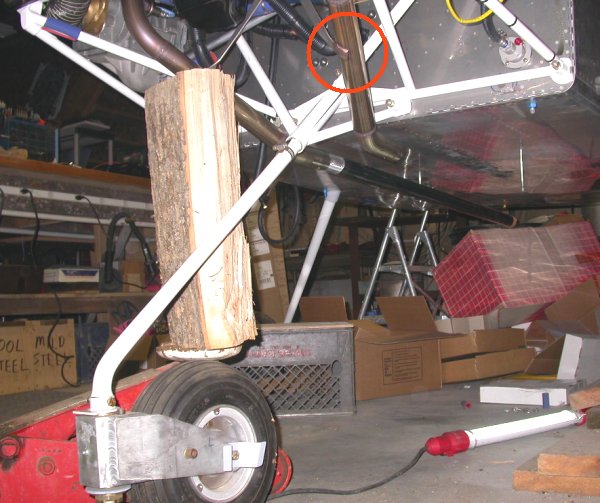 Here is the setup for bending the headers. I was not at all
comfortable with just reefing on them, as I was concerned about too much
stress on the manifold and header flange. So, I used a floor jack and
a chunk of firewood to support the header where the brace is welded on (see
circle for view of where you'd do it on the LT side). This will focus
the bending between there and the end of the header. It will also
prevent most bending forces from acting on the header mount flange.
The black pipe is a 4-5 foot long piece of 1.5" iron water pipe, with the
end ground down a bit so it's a nice slip fit inside the headers. You
want the fit to be as close as possible to the ID of the header, so you
don't distort the roundness of the end of the header when you crank on it.
And you want to insert it as far as possible into the header; at least a
couple inches. I bent the RT side down from 3.7" at the aft end of the
pipe to 4.7", which should give me about 1/2" at the muffler. Then I
bent the LT side down to match that. The LT side had been higher than
the RT side; only a couple inches at the aft end of the pipe. The
mufflers seem to have ideal (and identical) clearance to the floor now.
I highly recommend supporting the headers somehow if you decide to bend
them. They do bend OK, especially when hot.
Here is the setup for bending the headers. I was not at all
comfortable with just reefing on them, as I was concerned about too much
stress on the manifold and header flange. So, I used a floor jack and
a chunk of firewood to support the header where the brace is welded on (see
circle for view of where you'd do it on the LT side). This will focus
the bending between there and the end of the header. It will also
prevent most bending forces from acting on the header mount flange.
The black pipe is a 4-5 foot long piece of 1.5" iron water pipe, with the
end ground down a bit so it's a nice slip fit inside the headers. You
want the fit to be as close as possible to the ID of the header, so you
don't distort the roundness of the end of the header when you crank on it.
And you want to insert it as far as possible into the header; at least a
couple inches. I bent the RT side down from 3.7" at the aft end of the
pipe to 4.7", which should give me about 1/2" at the muffler. Then I
bent the LT side down to match that. The LT side had been higher than
the RT side; only a couple inches at the aft end of the pipe. The
mufflers seem to have ideal (and identical) clearance to the floor now.
I highly recommend supporting the headers somehow if you decide to bend
them. They do bend OK, especially when hot.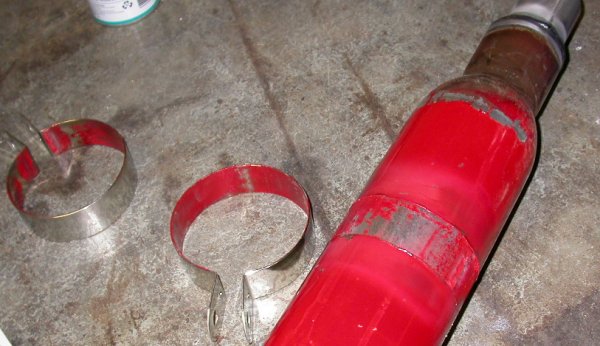 The engine heat melted the cheap paint on the Cherry Bombs. I need to
slide the 2 s/s clamps a bit aft after the header bending. The clamps
were completely bonded to the mufflers, and I had to use a Mapp gas torch to
heat everything up to get the clamps off. This will all get nicely
painted or powder-coated when I am done with it.
The engine heat melted the cheap paint on the Cherry Bombs. I need to
slide the 2 s/s clamps a bit aft after the header bending. The clamps
were completely bonded to the mufflers, and I had to use a Mapp gas torch to
heat everything up to get the clamps off. This will all get nicely
painted or powder-coated when I am done with it. Here is a good pic of the complete fuel pumps setup, the heater, and the RT
muffler hanger. I will be securing those fuel and brake lines, once I
make a cover for the fuel pumps area. I will also be adding a small
vent/drain hole in the floor, under the Andair valve, as per Gary's
suggestion.
Here is a good pic of the complete fuel pumps setup, the heater, and the RT
muffler hanger. I will be securing those fuel and brake lines, once I
make a cover for the fuel pumps area. I will also be adding a small
vent/drain hole in the floor, under the Andair valve, as per Gary's
suggestion. This
is the local porcupine in his protective posture on the ground in front of
my house.
This
is the local porcupine in his protective posture on the ground in front of
my house.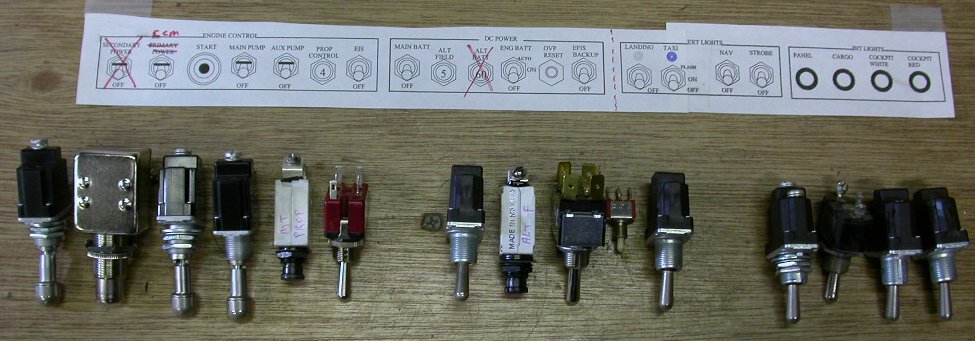