If it's strictly engine wiring, it's
on this page. If it's more general supporting wiring, it's on the
avionics/electric page, so be sure to check
there for details.
Feb 1 - it's been quite cold - will try to get back
out in the garage ASAP. Also been busy getting taxes done and doing
all the paperwork and planning for my hangar.
Feb 4 - Bitter cold out - single
digits - so the 250K BTU heater was going full blast the whole time for the
last couple days' work, just trying to keep the garage at about 50 degrees.
Redo Lord mount plates per Gary Newsted suggestions, so the mount screws go
all the way through the floor. Also made angle brackets on each side
of Lord mount plates, so the plate is tied into the floor ribs on each side.
Mark, drill, dimple mount plate holes in floor. Fabricate, drill,
prime, rivet angle brackets to plates. Match drill plate/bracket
assemblies to floor ribs. 5.0 hr
Feb 5 - update web site
1.0 hr doc
Feb 10 - Very cold; 25 degrees in
garage, much colder outside. Sealed and reinstalled Lord mounts,
bolted Lord mount plates to floor rib angles. Cut excess parts off
intercooler plumbing (from obsolete wastegate servo system). Make
cover for old servo-based wastegate opening. Start reinstalling
intercooler and related plumbing. 3.5 hr
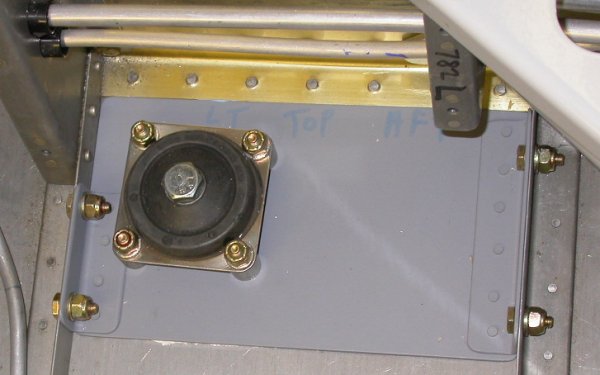
Here are the muffler Lord mounts, redone. The mount plate is now tied
via angles to the floor rib angles, rather than just laying on the floor.
This should reduce stress on the floor rivets. Also, the 4
screws that secure the Lord mount go all the way through the floor.
And the little white you can see at the bottom the the pic, at the edge of
the plate, is silicone sealer. Gary Newsted suggested I add some
between the plate and the floor, both as a sealant for the holes in the
bottom of the floor and to dampen any vibration from the mufflers. In
hindsight, I should have RIVETED those support angles to the floor rib
angles, rather than bolting them; it would have saved a relatively large
amount of weight.
Feb 11 - Finish reinstalling and
securing intercooler and related plumbing. Start reinstalling
mufflers. 4.0 hr
Feb 13 - continued bitter cold -
high today was ZERO (F). Ordered some hardware from
ACS. Ordered
Moroso coolant recovery tank from Summit Racing. Update web
site 0.5 hr doc
Feb 14 - Ordered
200a ANL fuses from
CarDomain. Ordered more electrical supplies from
SteinAir and
B&C. Snowing like crazy.
Feb 18 - Been busy dealing with
the big 2' snowstorm we had, cleaning up from that, replacing batteries on 2
vehicles, cleaning snow off solar panels, etc. Finally got back to
plane. At the suggestion of a friend, I replaced a dozen of the 4'
florescent bulbs in my garage with T8 bulbs in daylight color.
What a huge difference! More and better light from fewer bulbs, and
each bulb takes less electricity. I HIGHLY recommend T8 bulbs for your
shop. Also installed a new stereo system in garage; based on a simple
MP3 player attached to a set of computer speakers. That system
sounds much better than the previous setup (remote speakers run off the main
amp/receiver in the house), and it takes about 1/10th the electricity.
Cleaned up bench some and put away orders received from ACS and Summit.
Printed out the discrepancy list from Gary Newsted's inspection, and went
through all that. Most of his suggestions have already been
implemented, with the rest being worked on. Assembled the Moroso
coolant recovery tank, and installed it. Had to redo the Moroso mount
backing stiffener a couple times, until I was satisfied with it.
Worked on reinstalling mufflers. It looks like I will STILL need more
AN6 bolts, to get the right length. Installed and secured coolant
overflow tubing onto Moroso tank. 5.75
hr
Here is the Moroso coolant recovery tank installed. I used a 3/4"
angle as the backing for this, on the aft side of the firewall. I had
to do it a couple times to get it right. The firewall is quite flexy,
and I was getting horizontal flexing, so I remade the backing angle go all
the way from the vertical firewall brace angle to the diagonal firewall
brace angle, behind the firewall. Due to the tank mount design, it
still has hugely unacceptable vertical flexing. The bottom of the tank
is very floppy. I will fix that by using NAPA "The Right Stuff" (RTV)
to glue the bottom of the tank to the engine frame tubes, on both the aft
and RT sides of the tank. If you install this tank, you will see what
I mean - it MUST have some sort of anti-flex support at the bottom; if
fastened only by the top 2 bolts, it will flex and vibrate itself to death
in no time.
Feb 19 - Barely above 0 today.
It's been below freezing every day for over a month. Update web site
0.5 hr
Feb 21 - received SteinAir, B&C,
CarDomain (fuses) orders. Get mufflers welded to exhaust extension
pipes. Sent email to Full Throttle Concepts guy, Dave Czachorowski,
asking status of my throttle quadrant engraving. No response.
Feb 22 - received ACS order of
more muffler hanger bolts. Put away orders, reinstall mufflers.
0.5 hr
Feb 23 - Still temps in 20s.
Warm up garage, clean up bench, secure Moroso overflow bottle, resume
mufflers install. Remove, prep, paint mufflers. Top off coolant
to top of cap. Warm engine with heater under it while doing all the
other work. Start engine with supercharger, intercooler, and plumbing
fully installed and wastegate open. It idles very high (1500) and the
supercharger makes even more noise than it did when the supercharger outlet
was open and no plumbing installed. It's definitely much louder than
the exhaust; so loud I had to put on ear muffs. Also noted that the
air coming out of the wastegate is very hot; so hot I can barely put my
finger into the airflow. There is a LOT of air coming out the
wastegate opening, even at idle. The supercharger belt was flopping
quite a bit, so I will need to tighten that.
4.75 hr
Here is the Moroso coolant overflow tank, with the back of it secured to the
firewall with NAPA's The Right Stuff. Ever since I had that
corrosion problem with the hardware for
the wiring harness firewall passthru hardware, I have been leery of using
the acetic acid based RTV sealants, even though I have been using them for
years and have never before seen any such problem. The Right Stuff
does not seem to be acid-based, and acts just like RTV. I also put
some between the bottle neck and the 2 engine frame tubes at the bottom.
The bottle seems to be well secured now. This will eliminate any
tendency of the bottom of the bottle to move fore/aft.
Here, I am painting the mufflers with a nice dark gray hi temp stove paint
Feb 24 - Final-install mufflers.
Final-tighten engine mount bolts and cotter pin the nuts. Tighten
supercharger belt 1 turn on the tension rod. Restart engine.
Starts at 1500 rpm for 15 seconds, then drops to 1300 after a minute or so,
then drops to about 750. MAP is 10.5. Ran engine a few
minutes until water temp reached 170, then shut it down. Also tried a
few warm restarts. Starts at 1000 and climbs slowly to 1200 RPM.
Reconfigure EIS tach settings to get proper values (was reading double RPM).
Did some more warm restarts. It seems to like to climb slowly to 1280
RPM, then drop quickly to 1100, then climb slowly back to 1280.
Noted that, even though I fully filled the coolant tank, the tank gets warm,
but the overflow tank does not. I had expected that the overflow tanks
would receive overflow as the the coolant warmed up and expanded. Ran
engine until water temp was 180 degrees, then shut it down. Put
together a bunch of questions to ask the STi list.
4.0 hr
Feb 25 - set up magnehelic gage
to monitor inlet air pressure. It immediately pegged as soon as the engine
started, so I switched to a regular low pressure tire gage, which showed me
that inlet air pressure is 7 psi. Posted questions on STi list
about this. Made and installed drain/vent/fairing for fuel pumps area,
as per Gary Newsted's recommendations. Removed Omron relay to sell it.
Removed wiring from fuel pressure transducer to add a ground to its case.
Then decided to redo fuel senders area yet again; this time I will add a
Gems switch, in place of the Barksdale, and use a manifold from ACS so all
components are right-side-up (as opposed to the plumbing cross I used
before). This will prevent any component from being upside down and
possibly trapping water that could freeze or trapping air. Using a
manifold will also ground the case of the fuel pressure transducer, so I
won't have to jury-rig something for that. Put together ACS and Avery
Tools orders. Formulated a series of questions for the STi list.
6.75 hr
This is my setup for testing the supercharger pressure at the throttle inlet
at idle. I got 7 psi here with the wastegate open. I don't know
if this is OK or not, so I asked the STi list about it. I may need a
bigger wastegate, but I hope not. The engine idles too high right now,
especially at cold startup (1500 rpm). Since the idle is all
computer-controlled, I don't know what to do about it.
Here is the drain hole for the fuel pumps area. On the bottom of the
floor skin, I used one of Avery's little rudder cable fairings over the
hole. I need to finish bucking these rivets, but Karla was getting
tired, so we left it like this for now.
Feb 26 - ordered
Gems pressure switch to give me an additional warning if fuel pressure
drops. PS61-11-4MNS-B-SP-V-G-FS18PSIF (PS61 Series, 15-60 psi,
1/4 NPTM, 316SS, SPST/NC, Spade Terminals, Viton Diaphragm, Gold Contacts,
Factory Setting of 18 PSI Falling). Update web site
1.0 hr doc
Feb 27 - Sent yet another email to the Full
Throttle Concepts guy, Dave Czachorowski, asking status of my throttle
quadrant engraving. While Dave was responsive before I sent him
the quadrant, it's been a month since I sent it to him and he did not
respond at all to my email query a week ago. Perhaps dealing
with him was a mistake.
Ran the engine again after spending some time
configuring the EIS. Other than
the initial starting idle being a couple hundred rpm more than it was
without the supercharger plumbing connected, everything ran normally.
It started at 1500 rpm and indicating 7 psi in the supercharger ducting.
After about 30 seconds, it dropped to 1300 rpm. After a couple
minutes, it dropped suddenly to 900 rpm, then slowly fluctuated between 900
and 1200. At about 3 minutes, the idle dropped to 910 rpm and slowly
falling. Water temp then was 137 degrees. MAP remained steady
through all this at 10.8. The alternator amps read 105 at startup and
102 at this point (I realize my EIS current sensor needs configuring).
But the reading was steady, and dropped some after the initial charge, as
expected. The inlet air pressure also dropped to 4 psi. After 4
minutes, the idle was a nice steady 740 rpm. At 5 minutes, the idle
was 760 rpm, inlet pressure was 4 psi, and water was 168 degrees.
I revved it up to a steady 2000 rpm, and the inlet pressure read 6 psi.
Water temp was 185 degrees by then, so I shut it down. Seemed like a
good run. 0.25 hr
Feb 28 - It's a tad warmer; been getting up to
a high in mid-30s yesterday, low 40s today. It's been over 6 weeks
with temps never rising above freezing. I finally got a
response from Dave Czachorowski at Full Throttle Concepts. Apparently
he hasn't yet started on my quadrant, even though it's been a
month since I sent it to him. He says he will work on it tonight.
Did more work on configuring the GRT EIS
and ran another engine test. Other than being 200 rpm higher idle at
startup than without the supercharger, it seems to be running pretty
normally; after a few minutes of idling, inlet PSI was 3, RPM was 660-700,
amps=11, GBT=54, water=157. 0.25
hr
 Here are the muffler Lord mounts, redone. The mount plate is now tied
via angles to the floor rib angles, rather than just laying on the floor.
This should reduce stress on the floor rivets. Also, the 4
screws that secure the Lord mount go all the way through the floor.
And the little white you can see at the bottom the the pic, at the edge of
the plate, is silicone sealer. Gary Newsted suggested I add some
between the plate and the floor, both as a sealant for the holes in the
bottom of the floor and to dampen any vibration from the mufflers. In
hindsight, I should have RIVETED those support angles to the floor rib
angles, rather than bolting them; it would have saved a relatively large
amount of weight.
Here are the muffler Lord mounts, redone. The mount plate is now tied
via angles to the floor rib angles, rather than just laying on the floor.
This should reduce stress on the floor rivets. Also, the 4
screws that secure the Lord mount go all the way through the floor.
And the little white you can see at the bottom the the pic, at the edge of
the plate, is silicone sealer. Gary Newsted suggested I add some
between the plate and the floor, both as a sealant for the holes in the
bottom of the floor and to dampen any vibration from the mufflers. In
hindsight, I should have RIVETED those support angles to the floor rib
angles, rather than bolting them; it would have saved a relatively large
amount of weight.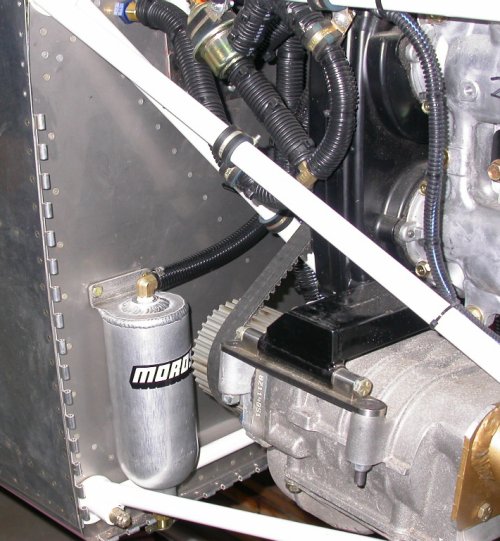 Here is the Moroso coolant recovery tank installed. I used a 3/4"
angle as the backing for this, on the aft side of the firewall. I had
to do it a couple times to get it right. The firewall is quite flexy,
and I was getting horizontal flexing, so I remade the backing angle go all
the way from the vertical firewall brace angle to the diagonal firewall
brace angle, behind the firewall. Due to the tank mount design, it
still has hugely unacceptable vertical flexing. The bottom of the tank
is very floppy. I will fix that by using NAPA "The Right Stuff" (RTV)
to glue the bottom of the tank to the engine frame tubes, on both the aft
and RT sides of the tank. If you install this tank, you will see what
I mean - it MUST have some sort of anti-flex support at the bottom; if
fastened only by the top 2 bolts, it will flex and vibrate itself to death
in no time.
Here is the Moroso coolant recovery tank installed. I used a 3/4"
angle as the backing for this, on the aft side of the firewall. I had
to do it a couple times to get it right. The firewall is quite flexy,
and I was getting horizontal flexing, so I remade the backing angle go all
the way from the vertical firewall brace angle to the diagonal firewall
brace angle, behind the firewall. Due to the tank mount design, it
still has hugely unacceptable vertical flexing. The bottom of the tank
is very floppy. I will fix that by using NAPA "The Right Stuff" (RTV)
to glue the bottom of the tank to the engine frame tubes, on both the aft
and RT sides of the tank. If you install this tank, you will see what
I mean - it MUST have some sort of anti-flex support at the bottom; if
fastened only by the top 2 bolts, it will flex and vibrate itself to death
in no time.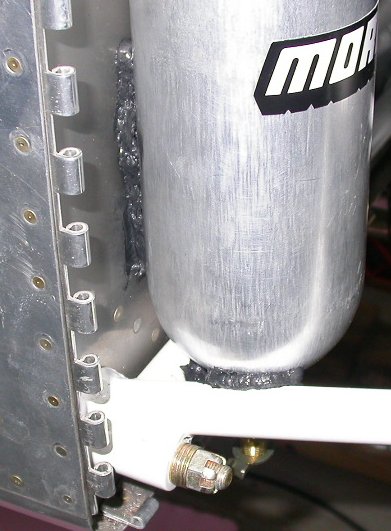 Here is the Moroso coolant overflow tank, with the back of it secured to the
firewall with NAPA's The Right Stuff. Ever since I had that
Here is the Moroso coolant overflow tank, with the back of it secured to the
firewall with NAPA's The Right Stuff. Ever since I had that
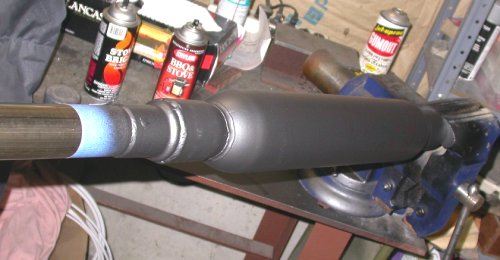 Here, I am painting the mufflers with a nice dark gray hi temp stove paint
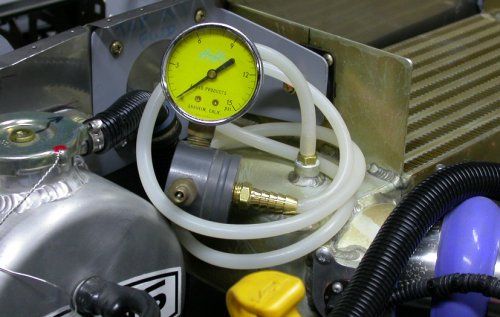 This is my setup for testing the supercharger pressure at the throttle inlet
at idle. I got 7 psi here with the wastegate open. I don't know
if this is OK or not, so I asked the
This is my setup for testing the supercharger pressure at the throttle inlet
at idle. I got 7 psi here with the wastegate open. I don't know
if this is OK or not, so I asked the  Here is the drain hole for the fuel pumps area. On the bottom of the
floor skin, I used one of Avery's little rudder cable fairings over the
hole. I need to finish bucking these rivets, but Karla was getting
tired, so we left it like this for now.
Here is the drain hole for the fuel pumps area. On the bottom of the
floor skin, I used one of Avery's little rudder cable fairings over the
hole. I need to finish bucking these rivets, but Karla was getting
tired, so we left it like this for now.