Mar 2 - received my clay order
from ArtMmolds. I'd ordered both
"medium" and "soft" Plastiline clay. Boy, the medium is stiff as hell.
I can barely deform a golf ball sized chunk of it at room temperature.
It might be useful somewhere, but it's very stiff. I can't imagine
what the "stiff" is like - it must be very hard, for sculpting with metal
tools. Definitely get the "soft" if you order this stuff.
Spent some time cutting the clay up into manageable balls & stashed it in a
coffee can. A 2 pound block makes 10 golfball-sized pieces, and 20
balls just about fit into a 3 pound coffee can. 1.0 hr
Mar 3 - update web site
1.5 hr
Mar 4 - remove bubble from frame,
prep for painting frame, mark paint line, lay out 3/4" masking tape along
edge of paint line 0.75 hr
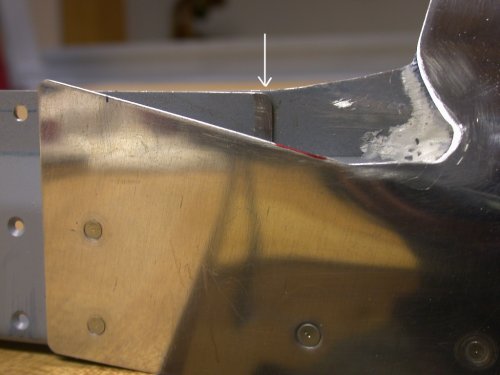
Bevel the edge of where the WD716 and WD715 canopy frame weldments overlap.
The bubble rests against this, so it's best to not have an edge to create a
stress riser in the plexi. The white at the RT edge of the opening is
part of the epoxy I put between the skin and frame
Here, I put 3/4" making tape along the aft side of the line I drew, marking
the fwd edge of the plexi. This will give me a 3/4" unpainted strip
aft of the fwd edge of the plexi, so the epoxy will have a place to stick.
Mar 5 - scuff & clean C702 skin
top surface for primer prep. I worked over 100 hours last week, and
this week looks like a repeat, so not much time to work on the plane.
0.25 hr
Scuff aft of the 3/4" masking tape. This will be painted now. I
debated between using the gray spatter paint and flat black. I decided
on flat black. Hope it ends up looking OK. This need to be done
before the bubble goes on, because it would be very difficult to spray paint
in there with the bubble hovering above it. The stuff in the
background is what I use as a last step to clean before painting. It
seems a tad oily to me, but it's supposedly made exactly for this purpose;
cleaning before painting, and leaving no residue.
Mar 7 - patch 4 epoxied rivet
holes for smooth surface, prior to priming. On 2 of the holes, the
epoxy I'd put in a while ago hadn't quite come up flush with the surface,
and 2 had pinholes to fill. Update web site.
0.5 hr + 0.5 hr doc
Mar 8 - prime C702, paint frame
until I ran out of paint. 1.0 hr
Here's the first part of painting the frame. I take it out in the
garage, paint it quickly, use an LP camping heater to warm it until the
paint flashes, then I bring it back in the house. I painted this until
I ran out of flat black paint.
Mar 9 - more taping & finish
painting frame 2.0 hr
Mar 10 - final frame paint
touchup, remove masking, roughen aluminum 1.0
hr
Here is the frame, fully painted flat black inside & out, with the masking
removed. You can still see the line that marks where the fwd edge of
the bubble is.
Here, I have used 80 grit sandpaper to scuff the skin 3/4" aft of the line,
to the edge of the black paint, and about 1" fwd of the line. This is
so the epoxy will grip well. I also used the same sandpaper to scuff
the fwd inside 3/4" of the plexi bubble. You can still see
remnants of the blue line.
Mar 11 - Start epoxying bubble to
frame. Start with outside corners, and frame lying flat. I am applying the epoxy from the inside, as it is easier to
control the epoxy flow when dealing with a concave surface than when dealing
with a convex surface. By tipping the frame & bubble at different
angles, I cause different portions of the bubble/frame line to be level.
Then I let the epoxy flow into the level part. I am using clear poly tubing in my mouth to
suck some epoxy up into the tubing, then I put the tubing where I want to
apply the epoxy, and blow the epoxy into place. This worked OK, but
the next batch will need to be thinner. It was some pretty hard
sucking and even harder blowing, especially after the stuff stiffened up a
bit. I used 1 heaping plastic soup spoon of microballoons and 1
stroke on the pump. I think 1/2 spoon will work better for the
next batch. I am using a "flow" epoxy application process,
rather than a "pasting" or "putty" application, because I think the flow of
the epoxy will form a closer fit, without gaps or air pockets, between the
bubble and the frame. I knew I wanted a liquid flow,
rather than a paste, for better contact, and it’s a whole lot easier to
control the flow on the concave inside than the convex outside. I pondered
it quite a bit before doing it. In fact, one of the reasons I got the
clay earlier was to make a dam on the inside, but then I decided the dam was
better if placed on the outside. I started by reaching in from the outside, but as I
worked toward the center, it got harder to do. Finally, I tried it by
sitting on the inside , and it was super-easy – I didn’t think I’d be able
to see the epoxy from in there, but it turned out to be MUCH easier and more
visibility and control, so I didn’t get the stuff all over. I also used black epoxy coloring. I was
afraid it would take a lot of the coloring, or it would end up gray, but
after I tried mixing in a small amount of the coloring, the batch of epoxy
turned from pure white to jet black. I'm making it black, following an
idea from Len Loudis, so the color
doesn't stand out and contrast. This way, when seen from
the inside, the epoxy will match the black paint I used on the portion of
the C702 skin that is under the bubble. Update web site
2.5 hr + 2.0 hr doc
It's very difficult to photograph stuff so you can see it well, when
everything in the picture is clear or a slightly different shade of
black. Here, A is the top edge of the epoxy, covering where the tabs
from the WD716 and WD725 overlap under the plexi. B is the masking
tape dam between the bottom edge of the plexi and the C702 skin. You
can see where the epoxy colors the tape as it flows in and fills the dam.
The red line shows the edge of the plexi. C is the scuffed portion of
the C702 skin that was not painted. C is also where the epoxy has not
flowed to yet. D is the C702 skin where it was painted. At E,
you are looking through the plexi into the epoxy, and at F you are seeing
the painted C702 skin through the plexi and the protective sheet.
Mar 12 - Over the course of the
day, added 4-5 more epoxy batches in sections. I started with the
frame flat on the table and did the aft corners, then tipped the frame up so
more fwd parts of the skin/bubble junction would be level for the epoxy to
flow in.
HERE
is a link to the user manual for West System epoxy. 4.5 hr
The red line is the bottom edge of the plexi protective sheet under the
plexi. The white line is the bottom edge of the plexi. The top
edge of the epoxy under the bubble is about halfway between the 2 lines, but
not really discernable in this pic.
Here I am, sucking epoxy up into a tube, so I can then reach under the frame
and blow it into place inside the bubble, between the fwd edge of the bubble
and the C702 skin. I highly recommend the use of CLEAR tubing if you
choose to do this!
Here's the last bit of epoxying needed, in the front center. The red
line shows the top of the epoxy, under the plexi, where the C702 skin paint
line stops and the scuffing begins. It's 3/4" from the bottom edge of
the plexi, seen here in the middle of the band of masking tape, to the edge
of where the skin is painted.
Here is the canopy, tipped all the way up to get the epoxy level in the last
section, in the front center.
Mar 13 - Finished product came out very good.
This came out so good, you could almost just go with it as is. Lay out
& plan for filler to smooth the transition between skin & plexi.
The LT corner is a bit too high. The edge of the plexi is higher than
a straight line between the fwd edge of the skin scuffing and the top of the
epoxy under the bubble. Used a file to grind down the edge of the
plexi in the middle of the side curve on the LT side.
1.0 hr
I just need to make a smooth transition now from the fwd edge of the
scuffing on the skin to the top of the epoxy, between B and C. A is
the epoxy that came out under the bubble and was held in place by the
masking tape dam. B is the epoxy through the Plexiglas. C is the
C702 skin, painted flat black, seen through the plexi only. D is the
C702 skin, painted and seen through the layer of protective skin on the
inside of the plexi. It's very difficult to photograph stuff so
you can see it well, when everything in the picture is varying degrees of
clear or black.
Mar 14 - File edge of LT corner plexi, so it
lies flatter, for better transition. Plan for layout for adding
filler. Update web site. 1.75 hr + 2.0 hr doc
View from the LT side, over the corner, looking toward the center. I
had to bevel the edge of the plexi through the curve at the LT fwd corner,
to enable a smooth, straight transition from the plexi to the skin.
Otherwise, the edge would have been higher than a straight line from the
plexi, above the edge, to the skin.
Mar 15 - Lay on first layer of filler.
I did the first part thin, for the RT corner that had no epoxy come thru
under the bubble I had to tip the canopy up at an angle so the corner
was on top. As mentioned earlier, flow control is difficult on
a convex curve. The epoxy kept wanting to flow to the edges. I used
some clear shipping tape at each end to hold the flow in place. Then,
I added plenty of microballoons to the mixture, until it was as thick as
taffy. I laid that down as a bead along the top of the
epoxy that had flowed under the bubble, to build it up. For some
reason, the thick stuff hardened MUCH quicker than the thin stuff. If
anything, I'd have thought it would be the other way around. Updated web site.
1.5 hr + 1.0 hr doc
Here, at the arrow at the top, I am adding a thin epoxy mix to the RT fwd
corner of the bubble, where it was so tight to the skin that the epoxy
didn't flow under it. As mentioned earlier in my reasoning, it's a lot
more difficult to control flow on something convex, but this was only a
distance of a few inches. The canopy is tipped at a compound angle so
the place needing epoxy is at the top. Even then, I had to add tape at
the 2 lower ends of the new white epoxy, to keep it all from running away.
The red line in the middle shows the approximate epoxy line. The rest
of what appears to be solid black is just the top of the painted C702 skin,
seen through the inner layer of bubble protective plastic layer.
Then I took the rest of the one-pump batch I'd made for the top part that
hadn't gotten epoxy flow under the bubble, and added plenty of microballoons
until I had the consistency of taffy. Then I applied that epoxy as a
first layer fwd of the black epoxy, as a first step in blending the bubble
into the C702 skin.
Mar 16 - Oddly enough, the thin epoxy I did
last night is STILL a bit tacky feeling. Used Karla's hair dryer
on it awhile. Didn't seem to make much difference. Sanded the
first layer of microballoon filler I put on. Also made the first
attempt to lay down the electrical tape to define the borders of the epoxy
application. 0.5 hr
Mar 17 - After looking over how Dan Checkoway
did his bubble fiberglass/blending work, I decided that I should have put
some fiberglass cloth in there, instead of building it all up with
microballoon/epoxy mix. So, I put a cutoff wheel in the drill and used
that to grind the convex top off the bead of white microballoon mix I'd put
on. I didn't try to take it ALL off, but I ground it down so it's flat
and in line with plane of the bubble, rather than convex. Then I laid
3 layers of glass cloth over that. Doing the fiberglassing went well.
I also put a heater under the frame awhile, to try to get that RT corner
where I put the thin microballoon mix, to lose its stickiness.
1.75 hr
Here is the canopy, after I finished grinding down the first layer of
epoxy/microballoon filler I'd laid down. I also have the red
electrical tape defining the approximate top of the epoxy filler line.
I spent a lot of time agonizing over how to put down the tape so it's
perfect. I finally just gave up & put it on. I guess it's OK,
but I wish I had a more definitive way of deciding exactly where to put it.
This is a close-up of the microballoon filler I ground down. The blue
line represents the fill line I plan to use; a straight line from skin to
bubble. I think it'll be easier to do, and I think it will let the
airflow change directions more gradually than coming in flat the base of the
bubble, then suddenly curving up. This pic was taken when I was
partway done grinding down the filler in the middle. It had been
convex, to fill up the depth of the gap in the middle, but then I decided to
lay some glass cloth in there, for more strength. After taking this
pic, I ground more on the fwd edge of the white filler (LT in the pic) so it
blended as well with the skin on the LT as it is with the bubble on the RT.
Using the cutoff wheel, very carefully, worked quickly and quite well.
Then, I was ready to glass it.
This is after laying down 3 layers, about an inch wide, over the
microballoon filler mix. I could have done more work, but I used West
Systems FAST hardener, so this was all I had time for before it started
stiffening up.
This is a close-up of the first 3 layers of fiberglass. In the
background, you can see how I ground the microballoon filler to be a smooth
straight line between the bubble and the skin, for a better surface to lay
the fiberglass cloth onto. I'll build up the middle, where it needs
the most filler, with fiberglass cloth, then I'll finish it with
microballoon mix. I didn't let the width of the cloth get any closer
to the to/bottom edges, because then it would have made the subsequent
feathering more difficult. The bottom of the red tape is the top of
the black epoxy I had flowed into place. The black you see above the
red tape is the painted skin, seen through no layers of plastic protective
layer. Above that, you're looking through just the inside layer of
protective plastic, and above that you're seeing through both the inside and
outside layers of protective plastic.
Mar 18 - That RT corner, where I put the thin
microballoon mix, is still slightly tacky. It seems hard under the
surface, but the surface is a bit sticky. I know I mixed it a LONG
time when I made it, and the same mixture later hardened OK when I added the
microballoons. I decided the surface must have reacted with the
adhesive on that clear shipping tape I used to make a dam. I used my
trusty cutoff wheel in the drill and ground down the top of that portion of
the filler. It seemed hard & non-sticky after that.
MORAL = don't use clear shipping tape on the epoxy. Then I laid
down 4 more layers of cloth, using the West Systems SLOW hardener, so I'd
have more time to work with it. I also laid down 3 additional short
layers on each corner, where it needed more building up. That
should be all the fiberglass cloth I need. I will fill the rest and
feather the top & bottom edges using the microballoon epoxy filler.
Update web site 1.5 hr + 2.0 hr doc
Mar 19 - grind down high spots on
resin/fiberglass cloth. I decided to pull off the red electrical tape
and reposition it better. Even though the tape looked symmetrical when
looking at the bubble, I realized it was not an equal distance from the tape
to the rivets. This would show up as unsymmetrical when I finish the
fill work and paint it. I taped a Sharpie to a divider and used that
to mark symmetrical lines along the bubble that were equidistant from each
rivet along the rivet line, working from the center out. I marked the
distance from the rivets and put the tape down a couple times, but I was not
satisfied with the work, so I ended up pulling the tape off completely, and
removing all the marks, to start over from scratch.
3.0 hr
Mar 20 - Did a final layout of the tape lines
and laid the tape down again. It seemed pretty good, so I decided to
go with it. I sanded all the exposed plexi and skin in preparation for
the first layer of microballoon epoxy.
2.0 hr + 0.5 hr doc
Laying out the tape line again, so it's perfectly symmetrical with regard to
the rivets & frame/skin. I just taped a Sharpie to my dividers, and
made sure the bottom edge of the tape was the same distance from each rivet
on each side, equidistant from the center.
Mar 21 - mixed up the microballoon filler.
I used 1 heaping plastic soup spoon plus 2 level spoons, to one pump from
the West Systems epoxy. It was TOO THICK. It worked OK, but
barely. It got too stiff too quickly. It was OK as a first coat,
but it was too thick and hard to lay down. Later on, laid down another
coat, using 1 heaping spoonful and 1 level spoonful. That worked out
pretty good. 2.0 hr
First coat laid down.
Second layer goes down. Getting there slowly. In the upper LT,
you can see the shape I'm heading for; more of a gradual straight line than
a sudden curve.
Mar 22 - laid down a couple more coat over the
course of the day & night. This stuff doesn't really lay down like
Bondo, or maybe it's because I'm being careful to not get it on the bubble
or skin anywhere I don't want it permanently. It seems to take a lot
of thin, spotty layers to get it to properly fill in. It tends to ride
along the rubber application paddle, rather than flowing down into the low
spots. I'm using a Bondo squeegee that I cut to the exact width of the
final distance from the bottom of the red tape to the skin (1.75").
The final few coats will probably be thinner, so they flow into the low
spots better, when the layers are of a low enough depth that they'll be less
likely to run. 2.0 hr + 1.0 hr doc
I cut this body filler spreader to the length I wanted from the bottom of
the red tape to the skin. This is 1.75", and gives me about 1" up the
bubble and 1" fwd on the skin. I just move the squeegee along, keeping
the upper corner against the red tape, and it should come out very smooth
and even when I am done.
Mar 23 - did another layer.
1.5 hr + 0.5 hr doc
A few more layers later, and it's starting to get there. It still
needs several more. In the background, over the center of the canopy
frame (this is taken from the RT edge), you can see how the line blends from
the skin into the bubble shape.
One
problem I am increasingly having is that a one-pump batch is way too much,
especially as I get closer to the finish product. Here, at least 3/4
of the batch is left over, after I've done all I can for now. I don't
trust trying to judge doing "half-a-pump". Today, I ordered some more
epoxy and hardener from Soller.
I asked Jon Soller about the problem. He said I can mix up smaller
batches by using a 1:5 ratio of hardener to resin, so I'll be doing that in
the future.
Mar 25 - get some Evercoat Rage Gold body
filler and lay
down a thin layer of it. 1.0 hr
I happened to catch a mention on the RV7 list about this Rage Gold body filler.
Everyone raved about how good it is, so I went out & got some locally, along
with a palette and an assortment of spreaders. It's a sick green
color, and the hardener is blue, so it mixes up to a putrid "bug-guts green"
color.
Here's the first layer of the Rage Gold filler. I really didn't think
it went down any smoother than the microballoon filler I was using.
Look at how rough it is just under the red tape, near the center of the pic.
It also hardens very fast, which can be good or bad. I tried to
minimize the amount of hardener I used, but I still only got about 5-10
minutes out of it. I only got less than halfway across the bubble/skin
joint before it got too hard to use. Because it hardens so fast, it is
also harder to clean up than the epoxy. With the epoxy, I can work in
a more leisurely fashion and when I am done, I just wipe things off with a
paper towel. Of course, then I have to wait several hours for it to
harden, especially when I am using the slow hardener. I also like the
fact that I can control the viscosity of the microballoon mix, depending on
what I am doing with that particular batch. I make it thinner as I get
closer to the finish product. I guess I will
try more of the Rage Gold; after all, I now own a *&^%$#@ gallon of it.
Mar 26 - Went back to using
epoxy/microballoons mix, as I like it better than the body filler. For
my current schedule, where I can only get in an hour or so once or twice a
day, the longer curing time of the epoxy (compared to the Rage Gold) is not
a factor. I stole a 1/4 teaspoon measuring spoon from the kitchen, and
I now use that to mix up the epoxy. One 1/4 tsp of hardener mixes with
5 1/4 tsp of epoxy and gives me a good quantity, without wasting so much.
Update web site
0.5 hr + 1.0 hr doc
Mar 27 - In the AM, I decided that, if I
feather the epoxy into the bubble under the red tape, then when the red tape
is removed, it will be very difficult to determine where the paint line
should be when the canopy exterior is painted. So, I decided to
fill fully to the tape line and leave an edge
as thick as the tape. I laid a piece of black tape down over the red
tape, about 1/16" higher, so I can fill right to the red tape.
This way, there will be a
distinct line there the thickness of the tape, so I will know where to tape
for masking for paint.
Then I laid down another layer of microballoon mix, starting to get
it right up to the red tape. In the PM, put on another layer.
2.0 hr
Mar 28 - Put on another coat of microballoon
mix. I expect to go back to the Rage Gold for the final touchups.
1.0 hr
 Bevel the edge of where the WD716 and WD715 canopy frame weldments overlap.
The bubble rests against this, so it's best to not have an edge to create a
stress riser in the plexi. The white at the RT edge of the opening is
part of the epoxy I put between the skin and frame
Bevel the edge of where the WD716 and WD715 canopy frame weldments overlap.
The bubble rests against this, so it's best to not have an edge to create a
stress riser in the plexi. The white at the RT edge of the opening is
part of the epoxy I put between the skin and frame 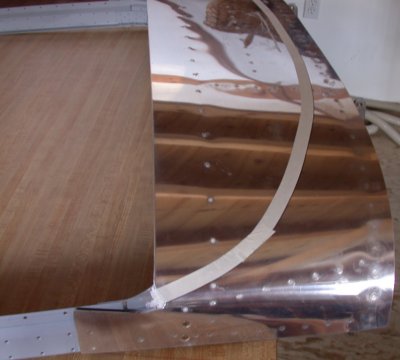 Here, I put 3/4" making tape along the aft side of the line I drew, marking
the fwd edge of the plexi. This will give me a 3/4" unpainted strip
aft of the fwd edge of the plexi, so the epoxy will have a place to stick.
Here, I put 3/4" making tape along the aft side of the line I drew, marking
the fwd edge of the plexi. This will give me a 3/4" unpainted strip
aft of the fwd edge of the plexi, so the epoxy will have a place to stick.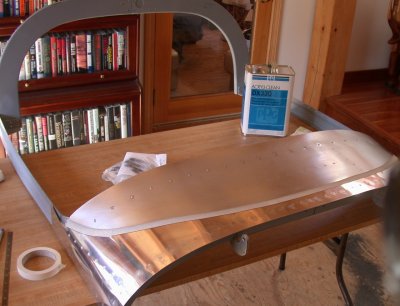 Scuff aft of the 3/4" masking tape. This will be painted now. I
debated between using the gray spatter paint and flat black. I decided
on flat black. Hope it ends up looking OK. This need to be done
before the bubble goes on, because it would be very difficult to spray paint
in there with the bubble hovering above it. The stuff in the
background is what I use as a last step to clean before painting. It
seems a tad oily to me, but it's supposedly made exactly for this purpose;
cleaning before painting, and leaving no residue.
Scuff aft of the 3/4" masking tape. This will be painted now. I
debated between using the gray spatter paint and flat black. I decided
on flat black. Hope it ends up looking OK. This need to be done
before the bubble goes on, because it would be very difficult to spray paint
in there with the bubble hovering above it. The stuff in the
background is what I use as a last step to clean before painting. It
seems a tad oily to me, but it's supposedly made exactly for this purpose;
cleaning before painting, and leaving no residue.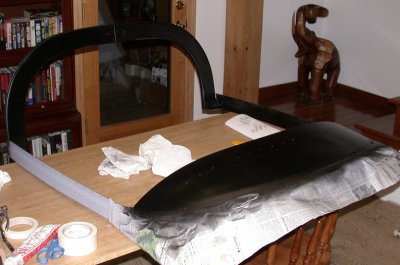 Here's the first part of painting the frame. I take it out in the
garage, paint it quickly, use an LP camping heater to warm it until the
paint flashes, then I bring it back in the house. I painted this until
I ran out of flat black paint.
Here's the first part of painting the frame. I take it out in the
garage, paint it quickly, use an LP camping heater to warm it until the
paint flashes, then I bring it back in the house. I painted this until
I ran out of flat black paint.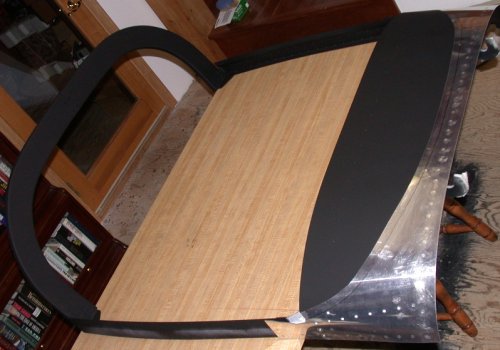 Here is the frame, fully painted flat black inside & out, with the masking
removed. You can still see the line that marks where the fwd edge of
the bubble is.
Here is the frame, fully painted flat black inside & out, with the masking
removed. You can still see the line that marks where the fwd edge of
the bubble is. Here, I have used 80 grit sandpaper to scuff the skin 3/4" aft of the line,
to the edge of the black paint, and about 1" fwd of the line. This is
so the epoxy will grip well. I also used the same sandpaper to scuff
the fwd inside 3/4" of the plexi bubble. You can still see
remnants of the blue line.
Here, I have used 80 grit sandpaper to scuff the skin 3/4" aft of the line,
to the edge of the black paint, and about 1" fwd of the line. This is
so the epoxy will grip well. I also used the same sandpaper to scuff
the fwd inside 3/4" of the plexi bubble. You can still see
remnants of the blue line.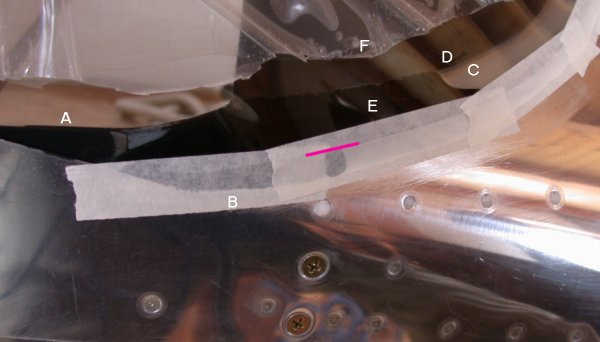 It's very difficult to photograph stuff so you can see it well, when
everything in the picture is clear or a slightly different shade of
black. Here, A is the top edge of the epoxy, covering where the tabs
from the WD716 and WD725 overlap under the plexi. B is the masking
tape dam between the bottom edge of the plexi and the C702 skin. You
can see where the epoxy colors the tape as it flows in and fills the dam.
The red line shows the edge of the plexi. C is the scuffed portion of
the C702 skin that was not painted. C is also where the epoxy has not
flowed to yet. D is the C702 skin where it was painted. At E,
you are looking through the plexi into the epoxy, and at F you are seeing
the painted C702 skin through the plexi and the protective sheet.
It's very difficult to photograph stuff so you can see it well, when
everything in the picture is clear or a slightly different shade of
black. Here, A is the top edge of the epoxy, covering where the tabs
from the WD716 and WD725 overlap under the plexi. B is the masking
tape dam between the bottom edge of the plexi and the C702 skin. You
can see where the epoxy colors the tape as it flows in and fills the dam.
The red line shows the edge of the plexi. C is the scuffed portion of
the C702 skin that was not painted. C is also where the epoxy has not
flowed to yet. D is the C702 skin where it was painted. At E,
you are looking through the plexi into the epoxy, and at F you are seeing
the painted C702 skin through the plexi and the protective sheet.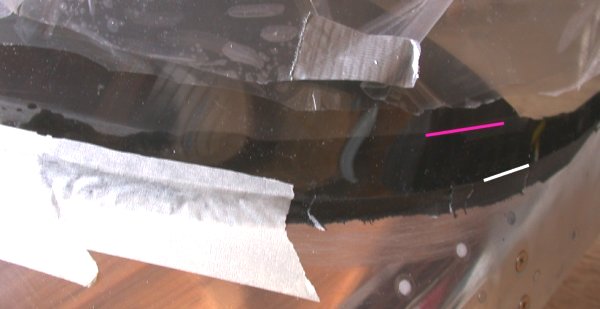 The red line is the bottom edge of the plexi protective sheet under the
plexi. The white line is the bottom edge of the plexi. The top
edge of the epoxy under the bubble is about halfway between the 2 lines, but
not really discernable in this pic.
The red line is the bottom edge of the plexi protective sheet under the
plexi. The white line is the bottom edge of the plexi. The top
edge of the epoxy under the bubble is about halfway between the 2 lines, but
not really discernable in this pic.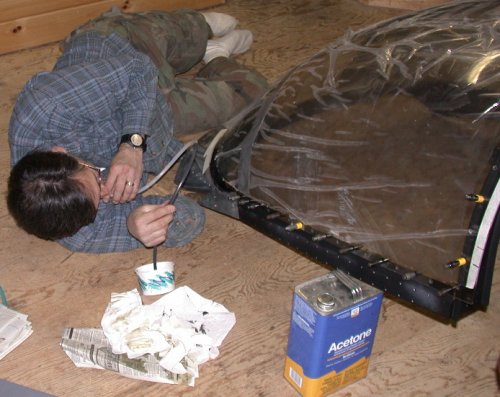 Here I am, sucking epoxy up into a tube, so I can then reach under the frame
and blow it into place inside the bubble, between the fwd edge of the bubble
and the C702 skin. I highly recommend the use of CLEAR tubing if you
choose to do this!
Here I am, sucking epoxy up into a tube, so I can then reach under the frame
and blow it into place inside the bubble, between the fwd edge of the bubble
and the C702 skin. I highly recommend the use of CLEAR tubing if you
choose to do this!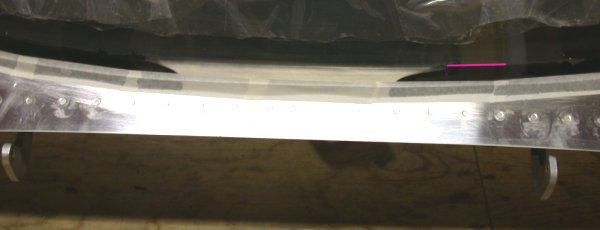 Here's the last bit of epoxying needed, in the front center. The red
line shows the top of the epoxy, under the plexi, where the C702 skin paint
line stops and the scuffing begins. It's 3/4" from the bottom edge of
the plexi, seen here in the middle of the band of masking tape, to the edge
of where the skin is painted.
Here's the last bit of epoxying needed, in the front center. The red
line shows the top of the epoxy, under the plexi, where the C702 skin paint
line stops and the scuffing begins. It's 3/4" from the bottom edge of
the plexi, seen here in the middle of the band of masking tape, to the edge
of where the skin is painted.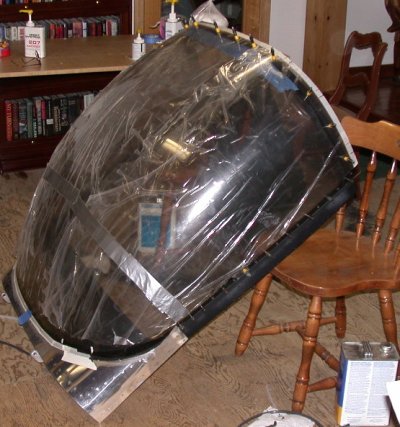 Here is the canopy, tipped all the way up to get the epoxy level in the last
section, in the front center.
Here is the canopy, tipped all the way up to get the epoxy level in the last
section, in the front center.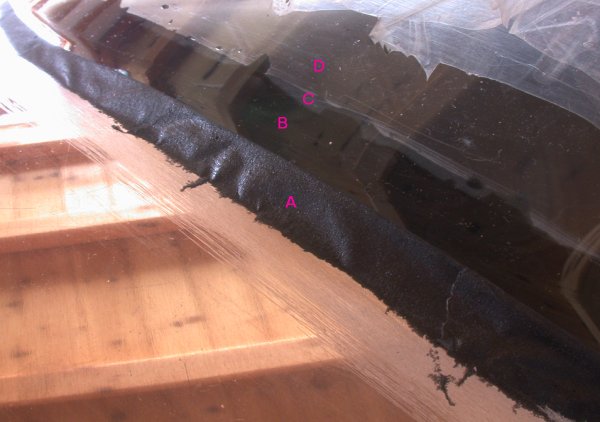 I just need to make a smooth transition now from the fwd edge of the
scuffing on the skin to the top of the epoxy, between B and C. A is
the epoxy that came out under the bubble and was held in place by the
masking tape dam. B is the epoxy through the Plexiglas. C is the
C702 skin, painted flat black, seen through the plexi only. D is the
C702 skin, painted and seen through the layer of protective skin on the
inside of the plexi. It's very difficult to photograph stuff so
you can see it well, when everything in the picture is varying degrees of
clear or black.
I just need to make a smooth transition now from the fwd edge of the
scuffing on the skin to the top of the epoxy, between B and C. A is
the epoxy that came out under the bubble and was held in place by the
masking tape dam. B is the epoxy through the Plexiglas. C is the
C702 skin, painted flat black, seen through the plexi only. D is the
C702 skin, painted and seen through the layer of protective skin on the
inside of the plexi. It's very difficult to photograph stuff so
you can see it well, when everything in the picture is varying degrees of
clear or black.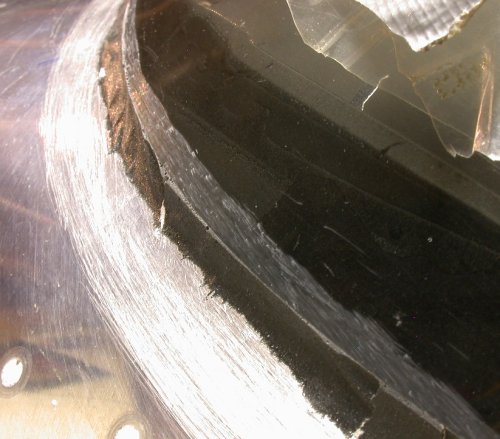 View from the LT side, over the corner, looking toward the center. I
had to bevel the edge of the plexi through the curve at the LT fwd corner,
to enable a smooth, straight transition from the plexi to the skin.
Otherwise, the edge would have been higher than a straight line from the
plexi, above the edge, to the skin.
View from the LT side, over the corner, looking toward the center. I
had to bevel the edge of the plexi through the curve at the LT fwd corner,
to enable a smooth, straight transition from the plexi to the skin.
Otherwise, the edge would have been higher than a straight line from the
plexi, above the edge, to the skin.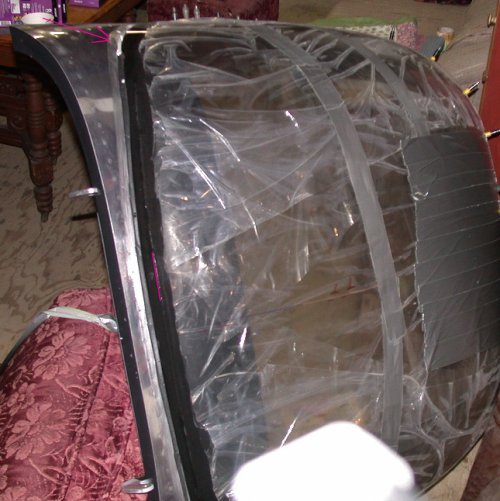 Here, at the arrow at the top, I am adding a thin epoxy mix to the RT fwd
corner of the bubble, where it was so tight to the skin that the epoxy
didn't flow under it. As mentioned earlier in my reasoning, it's a lot
more difficult to control flow on something convex, but this was only a
distance of a few inches. The canopy is tipped at a compound angle so
the place needing epoxy is at the top. Even then, I had to add tape at
the 2 lower ends of the new white epoxy, to keep it all from running away.
The red line in the middle shows the approximate epoxy line. The rest
of what appears to be solid black is just the top of the painted C702 skin,
seen through the inner layer of bubble protective plastic layer.
Here, at the arrow at the top, I am adding a thin epoxy mix to the RT fwd
corner of the bubble, where it was so tight to the skin that the epoxy
didn't flow under it. As mentioned earlier in my reasoning, it's a lot
more difficult to control flow on something convex, but this was only a
distance of a few inches. The canopy is tipped at a compound angle so
the place needing epoxy is at the top. Even then, I had to add tape at
the 2 lower ends of the new white epoxy, to keep it all from running away.
The red line in the middle shows the approximate epoxy line. The rest
of what appears to be solid black is just the top of the painted C702 skin,
seen through the inner layer of bubble protective plastic layer.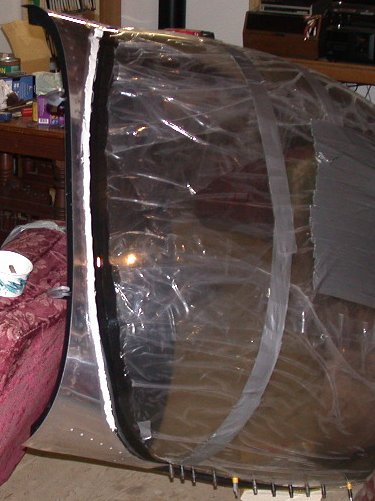 Then I took the rest of the one-pump batch I'd made for the top part that
hadn't gotten epoxy flow under the bubble, and added plenty of microballoons
until I had the consistency of taffy. Then I applied that epoxy as a
first layer fwd of the black epoxy, as a first step in blending the bubble
into the C702 skin.
Then I took the rest of the one-pump batch I'd made for the top part that
hadn't gotten epoxy flow under the bubble, and added plenty of microballoons
until I had the consistency of taffy. Then I applied that epoxy as a
first layer fwd of the black epoxy, as a first step in blending the bubble
into the C702 skin.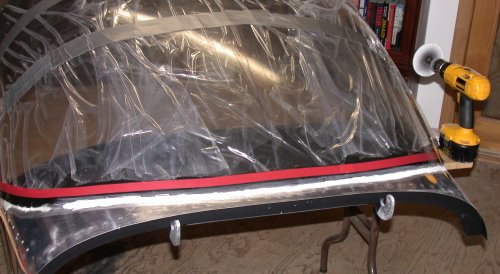 Here is the canopy, after I finished grinding down the first layer of
epoxy/microballoon filler I'd laid down. I also have the red
electrical tape defining the approximate top of the epoxy filler line.
I spent a lot of time agonizing over how to put down the tape so it's
perfect. I finally just gave up & put it on. I guess it's OK,
but I wish I had a more definitive way of deciding exactly where to put it.
Here is the canopy, after I finished grinding down the first layer of
epoxy/microballoon filler I'd laid down. I also have the red
electrical tape defining the approximate top of the epoxy filler line.
I spent a lot of time agonizing over how to put down the tape so it's
perfect. I finally just gave up & put it on. I guess it's OK,
but I wish I had a more definitive way of deciding exactly where to put it. This is a close-up of the microballoon filler I ground down. The blue
line represents the fill line I plan to use; a straight line from skin to
bubble. I think it'll be easier to do, and I think it will let the
airflow change directions more gradually than coming in flat the base of the
bubble, then suddenly curving up. This pic was taken when I was
partway done grinding down the filler in the middle. It had been
convex, to fill up the depth of the gap in the middle, but then I decided to
lay some glass cloth in there, for more strength. After taking this
pic, I ground more on the fwd edge of the white filler (LT in the pic) so it
blended as well with the skin on the LT as it is with the bubble on the RT.
Using the cutoff wheel, very carefully, worked quickly and quite well.
Then, I was ready to glass it.
This is a close-up of the microballoon filler I ground down. The blue
line represents the fill line I plan to use; a straight line from skin to
bubble. I think it'll be easier to do, and I think it will let the
airflow change directions more gradually than coming in flat the base of the
bubble, then suddenly curving up. This pic was taken when I was
partway done grinding down the filler in the middle. It had been
convex, to fill up the depth of the gap in the middle, but then I decided to
lay some glass cloth in there, for more strength. After taking this
pic, I ground more on the fwd edge of the white filler (LT in the pic) so it
blended as well with the skin on the LT as it is with the bubble on the RT.
Using the cutoff wheel, very carefully, worked quickly and quite well.
Then, I was ready to glass it.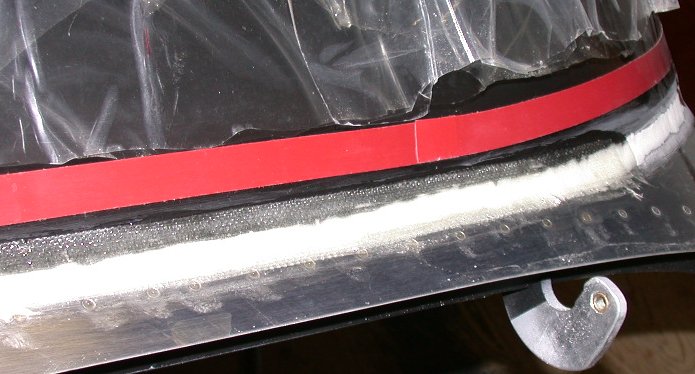 This is after laying down 3 layers, about an inch wide, over the
microballoon filler mix. I could have done more work, but I used West
Systems FAST hardener, so this was all I had time for before it started
stiffening up.
This is after laying down 3 layers, about an inch wide, over the
microballoon filler mix. I could have done more work, but I used West
Systems FAST hardener, so this was all I had time for before it started
stiffening up.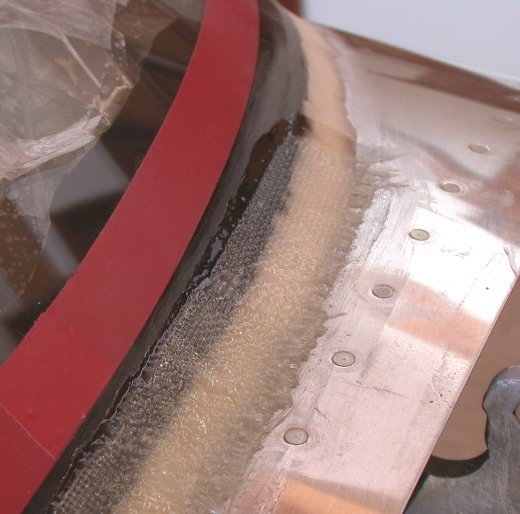 This is a close-up of the first 3 layers of fiberglass. In the
background, you can see how I ground the microballoon filler to be a smooth
straight line between the bubble and the skin, for a better surface to lay
the fiberglass cloth onto. I'll build up the middle, where it needs
the most filler, with fiberglass cloth, then I'll finish it with
microballoon mix. I didn't let the width of the cloth get any closer
to the to/bottom edges, because then it would have made the subsequent
feathering more difficult. The bottom of the red tape is the top of
the black epoxy I had flowed into place. The black you see above the
red tape is the painted skin, seen through no layers of plastic protective
layer. Above that, you're looking through just the inside layer of
protective plastic, and above that you're seeing through both the inside and
outside layers of protective plastic.
This is a close-up of the first 3 layers of fiberglass. In the
background, you can see how I ground the microballoon filler to be a smooth
straight line between the bubble and the skin, for a better surface to lay
the fiberglass cloth onto. I'll build up the middle, where it needs
the most filler, with fiberglass cloth, then I'll finish it with
microballoon mix. I didn't let the width of the cloth get any closer
to the to/bottom edges, because then it would have made the subsequent
feathering more difficult. The bottom of the red tape is the top of
the black epoxy I had flowed into place. The black you see above the
red tape is the painted skin, seen through no layers of plastic protective
layer. Above that, you're looking through just the inside layer of
protective plastic, and above that you're seeing through both the inside and
outside layers of protective plastic.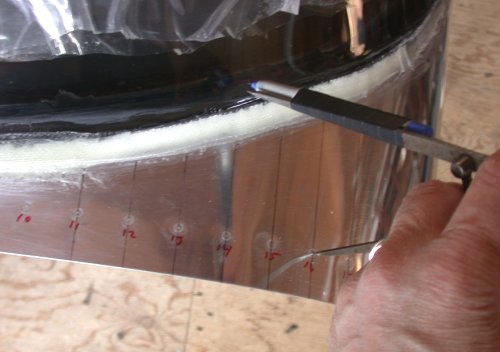 Laying out the tape line again, so it's perfectly symmetrical with regard to
the rivets & frame/skin. I just taped a Sharpie to my dividers, and
made sure the bottom edge of the tape was the same distance from each rivet
on each side, equidistant from the center.
Laying out the tape line again, so it's perfectly symmetrical with regard to
the rivets & frame/skin. I just taped a Sharpie to my dividers, and
made sure the bottom edge of the tape was the same distance from each rivet
on each side, equidistant from the center. First coat laid down.
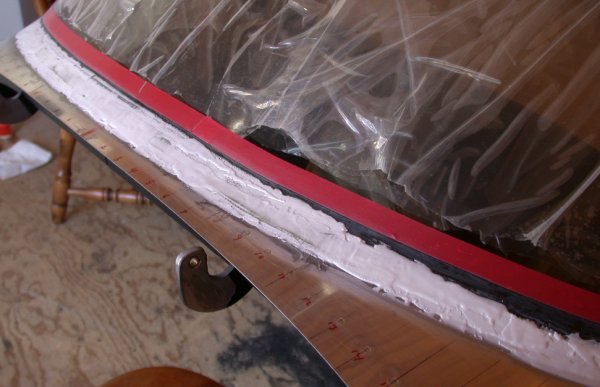 Second layer goes down. Getting there slowly. In the upper LT,
you can see the shape I'm heading for; more of a gradual straight line than
a sudden curve.
Second layer goes down. Getting there slowly. In the upper LT,
you can see the shape I'm heading for; more of a gradual straight line than
a sudden curve. I cut this body filler spreader to the length I wanted from the bottom of
the red tape to the skin. This is 1.75", and gives me about 1" up the
bubble and 1" fwd on the skin. I just move the squeegee along, keeping
the upper corner against the red tape, and it should come out very smooth
and even when I am done.
I cut this body filler spreader to the length I wanted from the bottom of
the red tape to the skin. This is 1.75", and gives me about 1" up the
bubble and 1" fwd on the skin. I just move the squeegee along, keeping
the upper corner against the red tape, and it should come out very smooth
and even when I am done.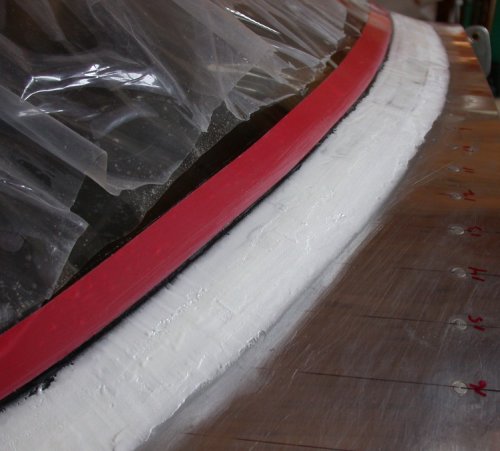 A few more layers later, and it's starting to get there. It still
needs several more. In the background, over the center of the canopy
frame (this is taken from the RT edge), you can see how the line blends from
the skin into the bubble shape.
A few more layers later, and it's starting to get there. It still
needs several more. In the background, over the center of the canopy
frame (this is taken from the RT edge), you can see how the line blends from
the skin into the bubble shape.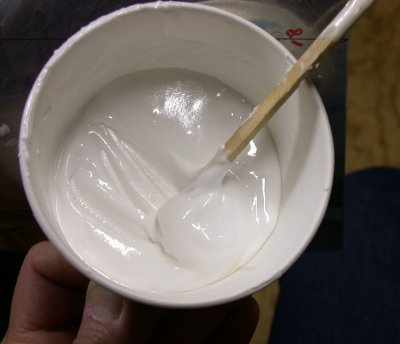 One
problem I am increasingly having is that a one-pump batch is way too much,
especially as I get closer to the finish product. Here, at least 3/4
of the batch is left over, after I've done all I can for now. I don't
trust trying to judge doing "half-a-pump". Today, I ordered some more
epoxy and hardener from
One
problem I am increasingly having is that a one-pump batch is way too much,
especially as I get closer to the finish product. Here, at least 3/4
of the batch is left over, after I've done all I can for now. I don't
trust trying to judge doing "half-a-pump". Today, I ordered some more
epoxy and hardener from 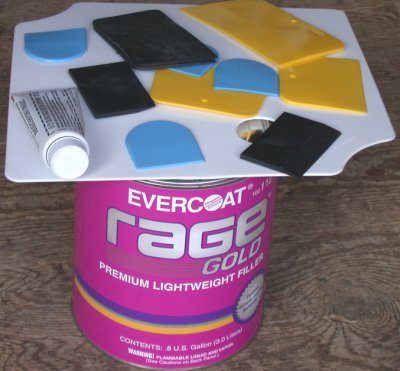 I happened to catch a mention on the RV7 list about this Rage Gold body filler.
Everyone raved about how good it is, so I went out & got some locally, along
with a palette and an assortment of spreaders. It's a sick green
color, and the hardener is blue, so it mixes up to a putrid "bug-guts green"
color.
I happened to catch a mention on the RV7 list about this Rage Gold body filler.
Everyone raved about how good it is, so I went out & got some locally, along
with a palette and an assortment of spreaders. It's a sick green
color, and the hardener is blue, so it mixes up to a putrid "bug-guts green"
color.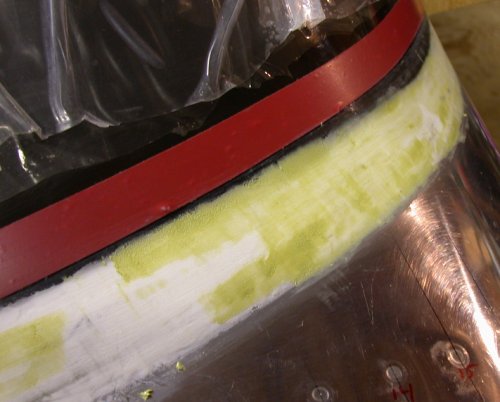 Here's the first layer of the Rage Gold filler. I really didn't think
it went down any smoother than the microballoon filler I was using.
Look at how rough it is just under the red tape, near the center of the pic.
It also hardens very fast, which can be good or bad. I tried to
minimize the amount of hardener I used, but I still only got about 5-10
minutes out of it. I only got less than halfway across the bubble/skin
joint before it got too hard to use. Because it hardens so fast, it is
also harder to clean up than the epoxy. With the epoxy, I can work in
a more leisurely fashion and when I am done, I just wipe things off with a
paper towel. Of course, then I have to wait several hours for it to
harden, especially when I am using the slow hardener. I also like the
fact that I can control the viscosity of the microballoon mix, depending on
what I am doing with that particular batch. I make it thinner as I get
closer to the finish product. I guess I will
try more of the Rage Gold; after all, I now own a *&^%$#@ gallon of it.
Here's the first layer of the Rage Gold filler. I really didn't think
it went down any smoother than the microballoon filler I was using.
Look at how rough it is just under the red tape, near the center of the pic.
It also hardens very fast, which can be good or bad. I tried to
minimize the amount of hardener I used, but I still only got about 5-10
minutes out of it. I only got less than halfway across the bubble/skin
joint before it got too hard to use. Because it hardens so fast, it is
also harder to clean up than the epoxy. With the epoxy, I can work in
a more leisurely fashion and when I am done, I just wipe things off with a
paper towel. Of course, then I have to wait several hours for it to
harden, especially when I am using the slow hardener. I also like the
fact that I can control the viscosity of the microballoon mix, depending on
what I am doing with that particular batch. I make it thinner as I get
closer to the finish product. I guess I will
try more of the Rage Gold; after all, I now own a *&^%$#@ gallon of it.