 I was
supposed to have some 1" bar stock in 1/4", but all I had was this
1.5", so I cut my C619s out of this.
I was
supposed to have some 1" bar stock in 1/4", but all I had was this
1.5", so I cut my C619s out of this.CANOPY July, 2004
July 15 - Well, I finally got to start in on the big CANOPY job. Slow & careful - that's the watchword here. Fabricate C617 & C618 blocks. The plans say to use 1/4" x 1" bar stock to make the C619. All I have is 1/4" x 1.5" bar stock, so I had to cut it out of that. Fit F617s to F745 ribs. GRRRR- now on this DWG 47, I see that the F697 is supposed to have a couple nutplates on it. Very irritating that Van's didn't have me do that when I was MAKING the F697 and before they told me to RIVET it on (page8-19). Now here, a couple pages later, they are expecting that it is NOT riveted on. Also DWG 24A is saying that the F697 needs a couple cutouts; a trivial matter if the F697 was still removable, but a huge pain now that they told me to rivet this thing in. Partially reinstalled F771 skin to align the F644s to the blocks. Then take skin back off again, to get the C617/618 blocks into place. Then put skin back on again, and drilled fwd block bolts. Locating the 1/4" hole is going to be very tricky, as Van's told me a couple pages ago to RIVET those F644s into place. 5.5 hr
I was
supposed to have some 1" bar stock in 1/4", but all I had was this
1.5", so I cut my C619s out of this.
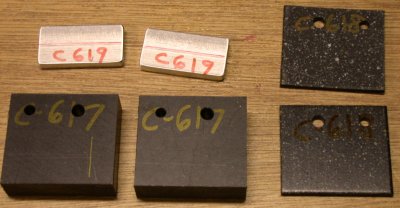 Here are the C617/618/619 canopy hinge block parts.
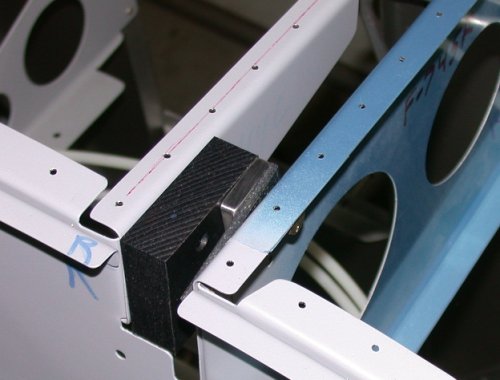 Here are the canopy hinge block parts, held in place with the upper bolt,
prior to putting the skin back on. I found it was much easier to
get the blocks initially into place with the skin off, then I put the skin
back on.
Here are the canopy hinge block parts, held in place with the upper bolt,
prior to putting the skin back on. I found it was much easier to
get the blocks initially into place with the skin off, then I put the skin
back on.
July 16 - Finally realized I can just remove the whole center sub panel to get these hinge block and F644 rib holes drilled. Removed F771 skin yet again, fit blocks to F745s, and drilled 1/4" holes in blocks. Put subpanels back in, bolted blocks back in, and put skin on AGAIN. Then drilled 1/4" holes through blocks and into ribs. Removed skin again. Fabricate C620. Mill shoulder onto C620. Drill C620 holes. Start fabricating C621, C622. 3.0 hr
 I sure got tired of taking this skin off & on about 10 times. It
was beginning to aggravate some carpal tunnel in my hands from it.
I sure got tired of taking this skin off & on about 10 times. It
was beginning to aggravate some carpal tunnel in my hands from it.
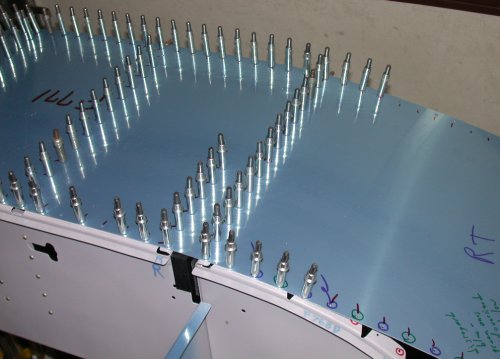
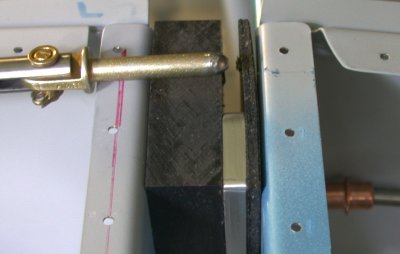
 Everything clamped in place, with the upper canopy hinge block bolt in
place, ready to drill the lower bolt hole.
Everything clamped in place, with the upper canopy hinge block bolt in
place, ready to drill the lower bolt hole.
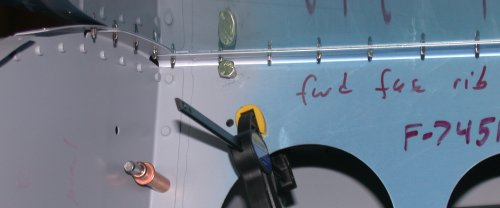
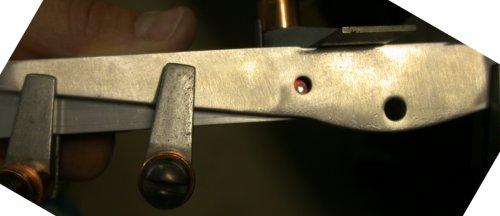
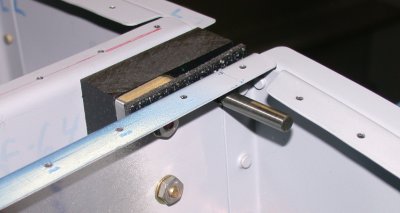 I used a drill bit through the canopy blocks, to align everything and hold
it in place, while marking where the 1/4" canopy hinge pin/bolt hole
will be drilled through the F644s.
I used a drill bit through the canopy blocks, to align everything and hold
it in place, while marking where the 1/4" canopy hinge pin/bolt hole
will be drilled through the F644s.
July 17 - Got so much into it, I pulled an all-nighter - worked midnight to 0730, after being up all day, too. Resume fabricating C621, C622. Cut C621/622 to length. Drill end holes in C621/622, taking great pains to ensure they are parallel. Mill 1/16" slots in C621/622 ends, taking great pains to ensure they are parallel to each other and perpendicular to the holes. Broke 3 of those delicate 3/16" mills in the process. Realized one end should been milled to 1/8", so I did that. Make AN43B modifications. Cut slots and holes in WD620. Started fitting all the pieces together and found the arms hit the top of the C620, and 2 of the top corners will have to be rounded. Pins are hitting shoulders of C620. Cut rounded corners on C620 shoulders. Added washers so pins do not hit C620. Difficult to deal with riveted-in F697. No info on how to "clock" the WD618 to the WD619. Boy, Van's plans really suck in this area. Wrong directions in manual, cryptic plans that don't show clarifying end views, etc. Not their usual standards. Rod arms are too short, and I can't figure out why. Everything is made exactly right, but the arms are too short to be effective. Finally figured it out - their plans show C621/622 rod overall length (OAL) as from HOLE CENTER to HOLE CENTER, not end to end, as is normal, and I missed that. Very irritating. Slept 0800-1230, then resumed work. Quite irritated with Van's about all the mistakes & non-standard way of doing plans in this area. I thought about how to fix the too-short rods (can just TIG weld in a new piece, rather than make new rods from scratch), but the more I thought about it, the more I thought "why do I need all this crap anyway - just put a damn bolt in there and be done with all this foolishness". This would also result in less chance of all these parts and the Quick Release rod interfering with my avionics placement choices. 8.75 hr
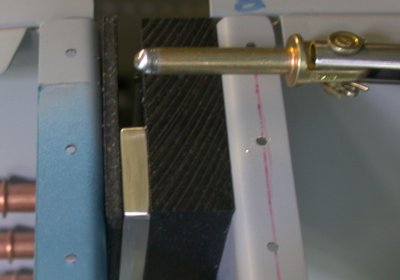
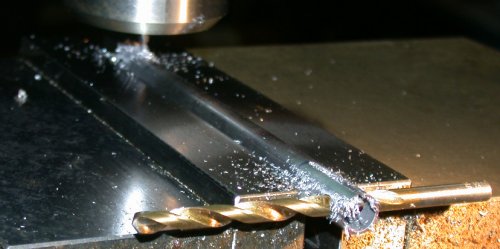 Milling the 1/16" slots in the C621/622 pushrods. The drill bit
through the end hole helps me see more clearly that the slots will be
perfectly perpendicular to the hole centerlines, by showing me that the
drill bit is parallel to the top of the milling vise.
Milling the 1/16" slots in the C621/622 pushrods. The drill bit
through the end hole helps me see more clearly that the slots will be
perfectly perpendicular to the hole centerlines, by showing me that the
drill bit is parallel to the top of the milling vise.
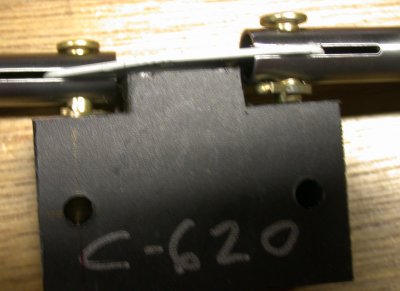
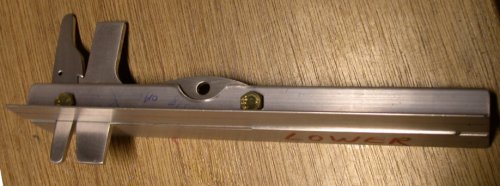
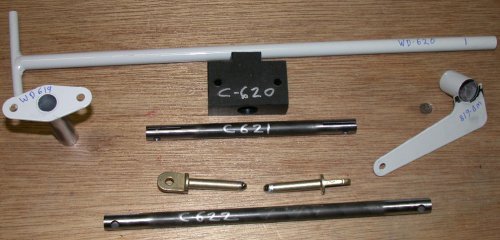 Here are all the Canopy Quick Disconnect parts, ready to assemble.
Check out the writing from the cool new SILVER sharpies I got for marking on
dark things.
Here are all the Canopy Quick Disconnect parts, ready to assemble.
Check out the writing from the cool new SILVER sharpies I got for marking on
dark things.
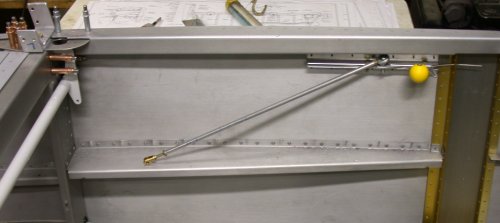
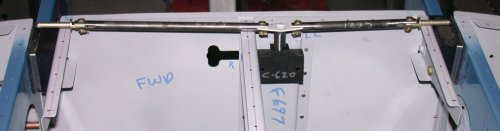 This shows the Canopy Quick Release mechanism laid in place, showing that
it's too short. The C620 block is supposed to be mounted to the F697
here.
This shows the Canopy Quick Release mechanism laid in place, showing that
it's too short. The C620 block is supposed to be mounted to the F697
here.
 The LT is too short by about 5/8"
 The RT side is too short by about 1/2". I later found out this is
because the plans specify rod OAL, but they are doing it BETWEEN THE HOLE
CENTERS, not end to end, as is normal practice. A moot point, as I
ended up deciding to not use any of these Canopy Quick Disconnect parts,
after all the work I put into making them.
The RT side is too short by about 1/2". I later found out this is
because the plans specify rod OAL, but they are doing it BETWEEN THE HOLE
CENTERS, not end to end, as is normal practice. A moot point, as I
ended up deciding to not use any of these Canopy Quick Disconnect parts,
after all the work I put into making them.
 The ends
of the rods bind up on the shoulder of the C620. I had to cut off the
square corners of the top part so the rod ends would clear the C620 when the
bracket rotates. As you can see clearly on the RT side, the pin also
will hit on the side of the C620 block shoulder. With the pin sitting
on the shoulder, you can see how much it's pushed up in the rod. I
fixed this by adding a washer to the top of each pin. This all ended
up being a moot point, anyway, as I decided to not use any of these canopy
latch quick release parts.
The ends
of the rods bind up on the shoulder of the C620. I had to cut off the
square corners of the top part so the rod ends would clear the C620 when the
bracket rotates. As you can see clearly on the RT side, the pin also
will hit on the side of the C620 block shoulder. With the pin sitting
on the shoulder, you can see how much it's pushed up in the rod. I
fixed this by adding a washer to the top of each pin. This all ended
up being a moot point, anyway, as I decided to not use any of these canopy
latch quick release parts.
July 18 - Spent several hours working on posting a question to the RV lists and to a couple respected builders I know, concerning whether to use the canopy hinge quick release system, as specified in the plans, or to just use an AN4 BOLT. Then I came across Dan Checkoway's Notes on this question. I agree with everything he said there, so his comments confirm my own feelings; to hell with the hinge quick release system, even though I spent WAY too many hours, including an all-nighter Friday night, making all the parts for it. Dan also mentions the F644s that the manual tells you on one page to rivet into place, then several pages later is expecting that you have NOT riveted them. Ditto for the F643-1 and the F697 that are now causing me problems because the manual said to rivet them in. Running into these problems, as well as a couple others, is what got me questioning whether or not to even use the quick release system. I am rather disappointed in Van's for not informing people about these problems in their manual. Dan mentioned encountering this a year and a half ago. Dan also mentions yet another "gotcha" here, with the canopy release handle, that I have not yet encountered, so I will watch out for that. 4.0 hr
July 20 - work on lengthening one of the canopy release rods, even though the consensus is to bag the whole thing. Debur canopy frame hinges, so they slide in & out of hinge blocks more easily. Spent lots of time screwing around, changing bandsaw blades around, making bandsaw square, sorting old aircraft hardware. Used DWG 48 template to lay out canopy fwd latch slot & drill initial holes for it. Straightened C609 and C607. 5.25 hr
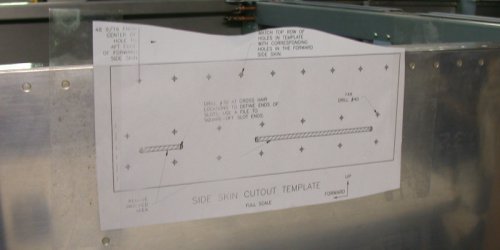 I cut
this template out of DWG 48, taped it to the fuselages side skin, then taped it back onto the plans when I was
done marking the holes.
I cut
this template out of DWG 48, taped it to the fuselages side skin, then taped it back onto the plans when I was
done marking the holes.
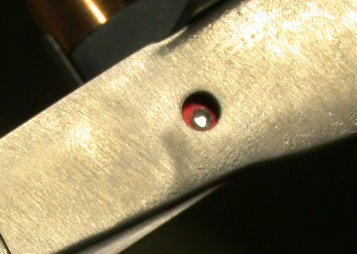
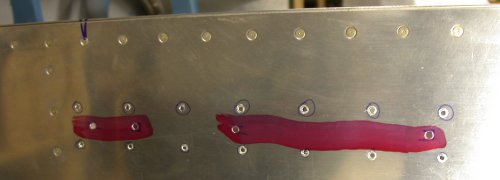 Here are all the holes drilled for the fwd canopy latch handle rivets and
slots. Then I dyed it red & used a fine scratch awl to lay out the
cut lines for the slots.
Here are all the holes drilled for the fwd canopy latch handle rivets and
slots. Then I dyed it red & used a fine scratch awl to lay out the
cut lines for the slots.
July 21 - cut & trim canopy latch slots. File edges & hooks on C607 latch handle and C609 locking hook. Make upper & lower C712s. Cut out half circles on C712s. 2.0 hr
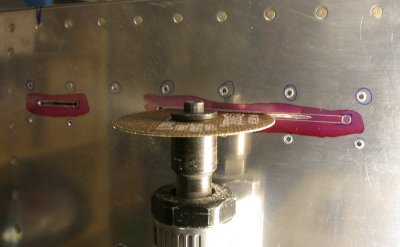 Don't try this at home, kids! Yes, I knew it was extremely dangerous
to try to cut these slots this way, but I was confident I could do it very
carefully, without getting over the lines. It came out great, and it
didn't take me long at all to make the slots. I don't really
recommend this method, but I was sure I could do it without slipping.
You have to use low speeds, and CONSTANTLY watch BOTH ends of BOTH upper
& lower surfaces. If you concentrate too much on where one disk surface
is in relation to the lines, you can get over the line somewhere else.
Having magnifying glasses while doing this helps a lot, too.
Don't try this at home, kids! Yes, I knew it was extremely dangerous
to try to cut these slots this way, but I was confident I could do it very
carefully, without getting over the lines. It came out great, and it
didn't take me long at all to make the slots. I don't really
recommend this method, but I was sure I could do it without slipping.
You have to use low speeds, and CONSTANTLY watch BOTH ends of BOTH upper
& lower surfaces. If you concentrate too much on where one disk surface
is in relation to the lines, you can get over the line somewhere else.
Having magnifying glasses while doing this helps a lot, too.
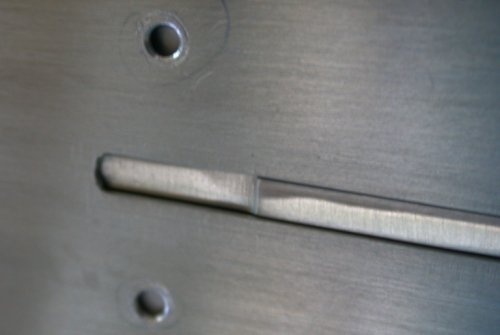
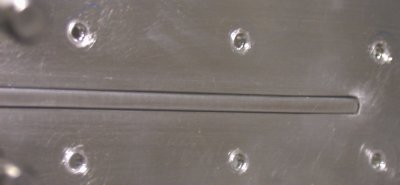
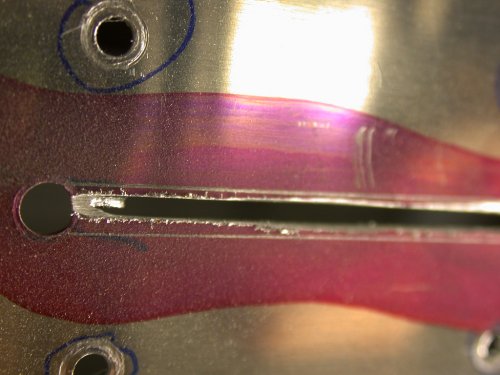 After making the initial cut with the cutoff wheel, I carefully edged the
top & bottom of the spinning cutoff wheel toward the lines, until the red between the lines was nearly
gone, then I finished it up with a small flat file. Of course, this is
a quite magnified view, but look at how much my drill bit stops damage the
metal then they contact it on those drilled holes. Seeing this pic
made me realize I am going to discontinue use of the drill bit stops, unless
it's a situation where I REALLY need them.
After making the initial cut with the cutoff wheel, I carefully edged the
top & bottom of the spinning cutoff wheel toward the lines, until the red between the lines was nearly
gone, then I finished it up with a small flat file. Of course, this is
a quite magnified view, but look at how much my drill bit stops damage the
metal then they contact it on those drilled holes. Seeing this pic
made me realize I am going to discontinue use of the drill bit stops, unless
it's a situation where I REALLY need them.
 Smoothing up those cut lines on the canopy latch handle slots.
July 22 - Continue fabricating C712 angles and cutting half circles out of them. Measure my teflon tape at 0.025" and make temporary 0.025" spacer shims to simulate the teflon tape between the 2 C712s. Match drill upper & lower C712s. Fit assembled latch handle assy to skin; drill & cleco it. Install latch side handle spring & core. Install knob onto C607 handle after modifying the handle. The slot cut in the yellow knob is tapered, but the handle is not, so it wouldn't go in. Tapered the handle a bit, and it went right in. Fine tune & tweak fit & finish of latching handle assy. Ended up with perfect fit and smooth as glass. Fabricate C710 pushrod. Find & fit WD617 & C611 blocks. 7.75 hr
 As Dan Checkoway mentioned
on his site, if you make this hole in the bracket
where the plans tell you to make it, you'll end up with the C607 handle not
perfectly flush with the outside of the skin. This arrangement clamps
the handle so the inside part of it is right up tight to the inside of the
side skin. The square in the upper RT of this pic is holding the
perfectly flush with the outside of the angle (and thus flush with the
inside of the skin). Then, the outside part of it will be perfectly
flush with the outside of the skin. Otherwise, it would have been
inboard about 1/32" or so.
As Dan Checkoway mentioned
on his site, if you make this hole in the bracket
where the plans tell you to make it, you'll end up with the C607 handle not
perfectly flush with the outside of the skin. This arrangement clamps
the handle so the inside part of it is right up tight to the inside of the
side skin. The square in the upper RT of this pic is holding the
perfectly flush with the outside of the angle (and thus flush with the
inside of the skin). Then, the outside part of it will be perfectly
flush with the outside of the skin. Otherwise, it would have been
inboard about 1/32" or so.
 Here's a closeup of the difference between where the plans said to put the
hole and where I made it, using the C607 latch handle as a drill guide. As
you can see here, the mark on the angle is not centered in the hole.
Here's a closeup of the difference between where the plans said to put the
hole and where I made it, using the C607 latch handle as a drill guide. As
you can see here, the mark on the angle is not centered in the hole.
 This is a mistake in the way Van's makes that C607 canopy latch handle.
There is an extra half inch of 1/32" cutaway here that should not
be. I noticed this on my plane, then on several planes at OSH04,
including the Van's RV-7A, so I know it isn't me. I mentioned it to
the Van's guys at their AirVenture booth, but they said no one had ever
brought it up before, and they didn't know why it was cut like that.
The portion of the handle that's 1/32" wider than the rest needs to be
about half an inch longer to properly fit the slot. I minimized
the effect of this on my plane by smoothing this shoulder out, so it's a gradual
transition from one level to another.
This is a mistake in the way Van's makes that C607 canopy latch handle.
There is an extra half inch of 1/32" cutaway here that should not
be. I noticed this on my plane, then on several planes at OSH04,
including the Van's RV-7A, so I know it isn't me. I mentioned it to
the Van's guys at their AirVenture booth, but they said no one had ever
brought it up before, and they didn't know why it was cut like that.
The portion of the handle that's 1/32" wider than the rest needs to be
about half an inch longer to properly fit the slot. I minimized
the effect of this on my plane by smoothing this shoulder out, so it's a gradual
transition from one level to another.
 Here is the completed fwd canopy latch mechanism. I had some
0.025" teflon tape that I used on the top of the lower C712 bracket and
the bottom of the upper C712 bracket. The teflon tape made the whole
thing nice and smooth. With it bolted together like this, I then put
it up to the drilled holes in the fuselage side skin and match drilled the
legs of the C712 angles to the skin.
Here is the completed fwd canopy latch mechanism. I had some
0.025" teflon tape that I used on the top of the lower C712 bracket and
the bottom of the upper C712 bracket. The teflon tape made the whole
thing nice and smooth. With it bolted together like this, I then put
it up to the drilled holes in the fuselage side skin and match drilled the
legs of the C712 angles to the skin.
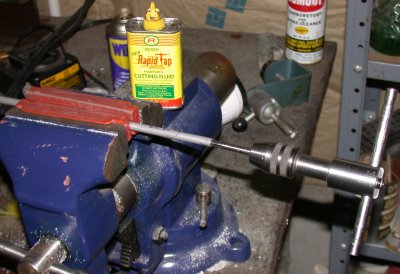 I cut & drilled the tubing for the C710 pushrod and I'm tapping it here
for the rod ends.
I cut & drilled the tubing for the C710 pushrod and I'm tapping it here
for the rod ends.
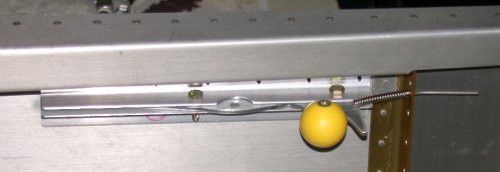 Here is the complete latch mechanism, clecoed in place. It works
perfectly, and it's real smooth.
Here is the complete latch mechanism, clecoed in place. It works
perfectly, and it's real smooth.
 Final fit on the latch to the slot. Pretty durn good, if I do say so
myself. This kind of perfection is what I strive for on everything I
do;
sometimes I achieve it ;-)
Final fit on the latch to the slot. Pretty durn good, if I do say so
myself. This kind of perfection is what I strive for on everything I
do;
sometimes I achieve it ;-)
![]() This is the completed C710 canopy latch pushrod.
This is the completed C710 canopy latch pushrod.
July 23 - Continue fitting WD617 and C611 blocks. Drill & mount C611s and WD617. Pack up to drive to AirVenture '04. 2.0 hr
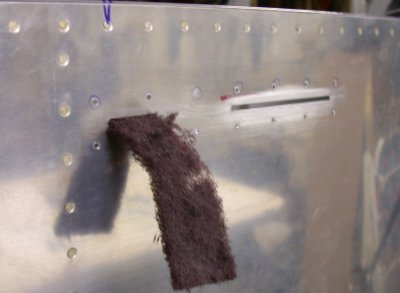
 This is the aft canopy latch mechanism. It's held in place by the C611
blocks on each end. The duct tape in the middle helps support it until
I get the blocks drilled
This is the aft canopy latch mechanism. It's held in place by the C611
blocks on each end. The duct tape in the middle helps support it until
I get the blocks drilled
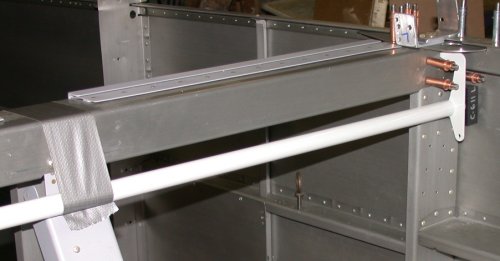
 Here is the canopy latching mechanism, nearly complete. It's just
lacking the parts to connect the aft latch to the pushrod.
Here is the canopy latching mechanism, nearly complete. It's just
lacking the parts to connect the aft latch to the pushrod.
GO TO AUGUST CANOPY
BACK TO MY RV BUILDER'S HOME
BACK TO BRIAN'S HOME