
THE WING TANK SCRATCHES
When I pulled the wing tanks off, I noticed they had a lot of scratches, so I wrote to Van's about it. I decided the scratches were not bad enough to need to send the tanks back, but it will take a bunch of polishing to fix them. This is what I wrote to Van's:
2/18/03: I
noticed that my RT wing tank had a couple gouges in it.
I was certain it wasn’t from me, but I let it slide.
Then I noticed that the LT wing tank had a lot of scratches in it.
I looks like someone had it lying flat on a table, working on it, when
there was one or more screws laying under it.
It looks like the tank was then rotated around on the screw(s).
This definitely was not caused by me, and I have never laid the wings on
anything. I took them out of
their box and mounted them vertically on racks I made.
Please look at the attached photos to see what I mean about the damages.
While I don’t expect you do anything about the damages to my wing
tanks, I do hope you will (1) make sure the people in the plants working on
these watch out for screws under something they are working on and (2) make sure
your people are looking for damage like this when inspecting incoming QB
components.
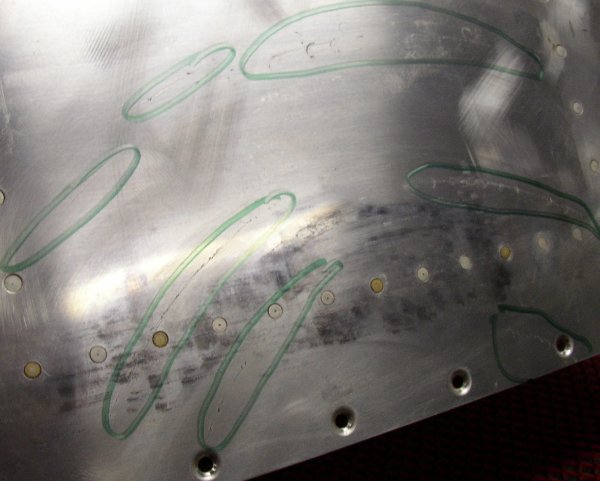
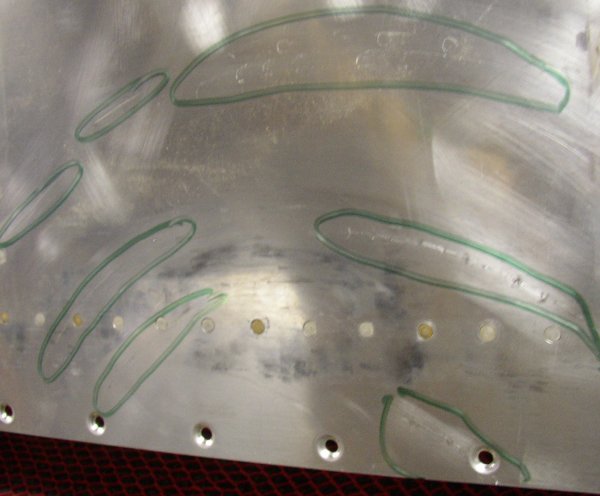
When I first saw the 2 gouges on the RT tank, I was pretty sure it wasn't me, but I said to myself "well, maybe it's remotely possible somehow I did it.". However, there is just no way I (or shipping) could have caused the scratches on the LT tank. They can't be from anything being dragged across or knocked against the wing, because of the nature of the scratches. They are difficult to photograph, but I think you can see in the pics I sent you that they aren't all just scratches. Some are a series of round scratches, like a screw head, ground into the metal, then the metal rotated, then ground in some more, then rotated and ground in some more, continuing in a semi-circular fashion. Also, there are at least 4 discernable parallel rows of these scratches, which would indicate to me that they all happened together at once. I think it's most noticeable in the top and bottom rows. The only way I can imagine for such scratches to be created is by laying the wing on a surface that has some screws or similar hardware on it, then working on the wing & rotating it around, grinding the screws into the sheet metal while working on it awhile then rotating it some more. The RT tank gouges are clearly from an impact, and could have conceivably come from anywhere at any time by anything. But the LT tank scratches, IMHO, could only come from the rather specific actions I've described.
Scott at Van's wrote back & said their QA had said it was impossible for such scratches to have gone through their inspection without being noticed. So, I sent Scott this letter:
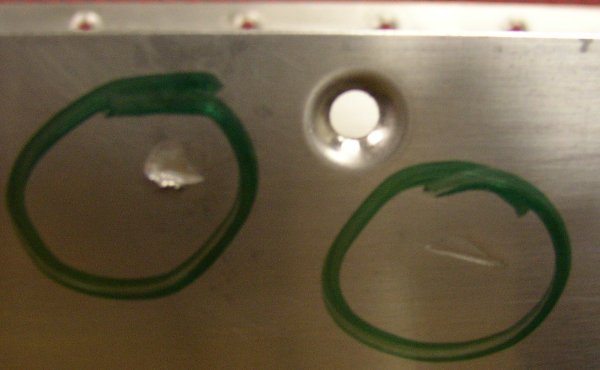
2/21/03: I was looking at the pics I sent you in my Paint Shop Pro window one last time before shutting down the computer, and suddenly I realized exactly what the LT wing tank scratches are. They are without any doubt AN426-3 rivet head scratches. I don't know why I didn't realize that before. Look at the topmost series of scratches in the third picture. What do they look like? Rivets. Look at the rivet heads in the bottom of the picture. They are exactly the same.
I just went out to my shop and held a 426-3 rivet up to all those scratches. They all came from 426-3 rivet heads; no doubt about it. It's hard to see in the pics, but these scratches have, as some or all of the scratch component, a series of perfect little circles the exact same diameter as a 426-3 rivet head. Rivets on their side would cause the linear scratches. The middle row, rightmost series of scratches in that same Scratches3 file is a series of little circles, separated by linear gouges; just what you'd get as a loose rivet trapped between the tank and table tumbled between a moving tank and stationary table. You'd get a round head mark, then a gouge as the rivet fell over and the sharp edge of the head dug in, then another round head mark as it stood up again, then another gouge as it fell on its side and the edge of the rivet head dug in, then another head imprint, etc in a curved linear fashion, following the movement of the tank on the table.
In the bottom RT corner of the second picture, it looks like a series of connected "m" s . It doesn't show up in the pic, but I can actually see on the tank the complete diameter of some of the circles making up each "m". Again, a perfect match for a 426-3 head. Also, the scratches go up to the edge of the screw dimple, then resume with one more little circle on the other side of it. This tells me the tank was mounted to the wing when all this happened.
This LT wing, with tank mounted, was worked on while it lay on a table with loose rivets under it. I'd say each one of these rows of scratches was a separate rivet under the tank as it and/or the wing was being worked on. Your QA folks definitely missed this one. I can send you more pics, or even the tank, if necessary. So, knowing that it happened after the tank was completed and mounted to the wing, but before all work on the wing was completed, should be able to tell someone pretty much just where in the building process this happened.
Scott at Van's said they'd pass the word on to their people in PI and to their QA people.
These are the scratches:
BACK TO MY RV BUILDER'S HOME
BACK TO BRIAN'S HOME